Donations Welcome
I am currently saving toward a new version of Paint Shop Pro. If you wish to help me out, then please donate.
Larger versions of images can be seen by clicking on the image. Also, thank you for your kind and encouraging comments. I love reading the comments. If you use my any of freebies, I would be overjoyed with a comment containing a link to your item. I love seeing any of my freebies in use.
Wednesday, December 30, 2009
Humbug Icing and Cookies Font
Here is a font for those people who want to try the drizzled icing on a gingerbread cookie tutorial but do not own Illustrator. The solid cookie are the capital letters and the icing are the lower case letters. It should work, though I admit that I have not tried it out yet.
Tuesday, December 29, 2009
Drizzled Icing on Gingerbread Cookies
I was asked to share how I made my latest gingerbread cookie alpha. In particular people seem to be interested in how I made my drizzled icing. I made a font as it was easier to use a font than to re-size 62 images (one for each letter). However, I will show you how I made the letters. This tutorial requires that you have Adobe Illustrator.
Supplies:
Ginger Cookie SBP Preset
Icing Letters
1. In Illustrator, open a new, blank document. I made my document 300 x 300 pixels at 300 dpi.
2. Use the Type Tool and type a letter.
3. Select the Scribble effect (Effect > Stylize > Scribble). I had a hard time finding the effect in the menu, so I have included a screenshot of its exact location.
4. Apply the Scribble effect to turn the font into wavy lines. The settings will be different depending on the size of your letter.
Angle = 30
Path Overlap = 0 px
Stroke Width = 10 px
Curviness = 50
Spacing = 35 px
5. Convert the text to a path (Shift + Ctrl + O).
6. Use the Direct Selection Tool to manipulate the nodes on the vector path so the future frosting will be on the cookie. Remove large gaps between wavy lines.
After node manipulation:
7. Export the image as a PNG.
Cookie
1. Open a new image in Photoshop. I made mine 300 x 300 at 300 dpi. I called mine A.
2. Use the text tool and write out a letter in your chosen font. Use the same font that was used to make the icing. Move it to the center of the canvas.
3. Load the transparency for the layer (Select > Load Selection).
4. Make a new layer (Shift + Ctrl + N). I called mine Cookie.
5. Expand the selection by 5 (Select > Modify > Expand).
6. Smooth the selection by 10 (Select > Modify > Smooth).
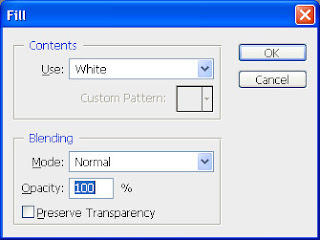
7. Fill the selection with white (Shift + F5).
8. Apply the Super Blade Pro Preset ginger-cookie.q5q. This preset is based on the food presets at Planet Preset.
9. Apply the Inner Glow effect to make the cookie look burnt along the edges.
Blend mode = Multiply
Opacity = 75
Noise= 0
Color = #6f3202
Technique = Precise
Source = Edge
Choke = 10
Size = 21
Anti-aliased = Checked
Range = 50
Jitter = 0
10. Optional. If the cookie is too dark for you taste, add an Adjustment Layer (Layer > New Adjustment Layer > Brightness/Contrast).
11. Optional. Increase the Brightness by 61.
12. Open the icing letter made in Illustrator. Re-size if necessary and paste it onto the cookie canvas.
13. Load the transparency for the icing layer.
14. Expand the selection by 2.
15. Fill the selection with white (Shift + F5).
16. Add a drop shadow and an inner glow using layer styles.
Drop Shadow
Blend mode = Multiply
Opacity = 80
Angle = 120
Use Global Light = Checked
Distance = 1
Spread = 10
Size = 1
Anti-aliased = Unchecked
Noise = 0
Layer Knocks Out Drop Shadow = Checked
Inner Glow
Blend mode = Multiply
Opacity = 75
Noise = 0
Color = #d8e6ff
Technique = Softer
Source = Edge
Choke = 0
Size = 5
Anti-aliased = Unchecked
Range = 50
Jitter = 0
16. Apply the Bevel plugin from Eye Candy 5: Impact.
Basic
Bevel Width = 34.41
Bevel Height = 27
Smoothness = 100.00
Round Corners = 0
Bevel Placement = Inside Selection
Darken Deep Areas = 0
Shade Interior = Checked
Surface = None
Lighting
Direction = 94
Inclination = 74
Highlight Brightness = 80
Highlight Size = 25
Highlight Color = White
Shadow Color = #404040
Bevel Profile = Button
The basic drizzled icing on a gingerbread cookie is now complete. Sprinkles can be added if further decoration is desired.
Sunday, December 27, 2009
Dripping Icicle Frame
I was asked to share how I made my Snowy Pole alphas. This tutorial will show you how to make a round frame covered in icicles. You can also use this technique to make an alpha similar to my Snowy Pole alpha by pasting the twirled candy cane pattern into the letters and it would be even nicer than my original alphas because the candy cane pattern would wrap.
Supplies:
Eye Candy 5: Nature
Candy Cane Pattern
1. Open up a candy cane pattern or make your own. If you do not have a pattern, open up a small canvas filled with white.
Width = 200
Height = 100
Raster Background = Checked
Color Depth = 16 million colors
Color = White
Transparent = Unchecked
2. Here are my custom selections for creating a striping pattern.
Top = 0
Bottom = 100
Left = 0
Right = 50
Top = 0
Bottom = 100
Left = 55
Right = 65
Top = 0
Bottom = 100
Left = 70
Right = 75
Top = 0
Bottom = 100
Left = 80
Right = 90
Top = 0
Bottom = 100
Left = 120
Right = 145
Top = 0
Bottom = 100
Left = 150
Right = 155
Top = 0
Bottom = 100
Left = 160
Right = 165
Top = 0
Bottom = 100
Left = 170
Right = 175
3. After each custom selection, fill with the color of your choice. Here is my candy cane striping pattern after each selection has been filled. Right-click the image and save if you want to use my candy cane pattern.
4. Ctrl + D to Select None.
Circular Frame
1. Open up a new canvas 1200 x 1200.
2. Choose the Flood Fill tool.
3. In the materials palette, select the candy cane pattern.
3. Use the Fill bucket and fill canvas with the candy cane pattern.
4. Convert the striping pattern into a pinwheel pattern using Polar Coordinates ( Effects > Distortion Effects > Polar Coordinates ).
Rectangular to polar = Checked
Wrap = Checked
5. Circularize the pinwheel pattern using the Twirl effect ( Effects > Distortion Effects > Twirl).
Degrees = 360
6. Choose the circle selection tool.
Selection Type = Circle
Mode = Replace
Feather = 0
Anti-alias = Checked
7. Click the center of the twirl.
8. Draw out the circle toward the edge of the canvas. It is best to stop/end the circle before the twirl starts to bend at right angles.
9. Use Selection Borders (Selections > Modify > Select Selection Borders) to create a frame of the desired width. I used 75 pixels.
Inside = Checked
Anti-alias = Checked
Border width = 75
10. Ctrl + C to copy the selection.
11. Paste the selection as a new image (Ctrl + V).
12. Select All (Ctrl + A). Float (Ctrl + F). De-float (Ctrl + Shift + F). This selects the round frame and preserves the anti-aliasing.
13. Create a new layer called Bevel 1.
14. Apply the Cutout Effect.
Vertical = 15
Horizontal = 15
Opacity = 40
Blur = 20
Shadow color = Black
15. Create a new layer called Bevel 2.
16. Apply the Cutout Effect.
Vertical = -15
Horizontal = -15
Opacity = 40
Blur = 20
Shadow color = Black
17. Create a new layer called Bevel 3.
18. Apply the Cutout Effect.
Vertical = 15
Horizontal = -15
Opacity = 40
Blur = 20
Shadow color = Black
19. Create a new layer called Bevel 4.
20. Apply the Cutout Effect.
Vertical = -15
Horizontal = 15
Opacity = 40
Blur = 20
Shadow color = Black
21. Hide the original layer (Raster 1).
22. Merge the visible layers.
23. Gaussian blur the bevel.
Radius = 5.00
24. Unhide the original layer.
Dripping Icicles
25. Create a new layer called Icicles.
26. Apply the Icicles plug-in from Eye Candy 5: Nature.
Basic
Maximum Length = 150.00
Width = 25.00
Density = 66
Pointedness = 70
Icicle Regularity = 30
Ice Height = 5.00
Ice on Entire Selection = Unchecked
Ice Color = #dedfe6
Opacity = 98
Refraction = 98
Lighting
Direction = 106
Inclination = 60
Highlight Brightness = 66
Highlight Size = 100
Highlight Color = White
Shadow Strength = 75
Shadow Color = #092e65
27. Create a new layer called Snow.
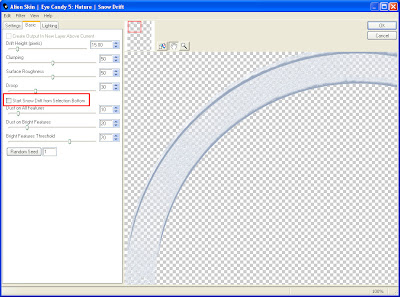
28. Apply the Snow Drift plug-in from Eye Candy 5: Nature.
Basic
Drift Height = 15.00
Clumping = 50
Surface Roughness = 50
Droop = 30
Start Snow Drift from Selection Bottom = Checked
Dust on All Features = 10
Dust on Bright Features = 10
Bright Features Threshold = 70
Lighting
Light Direction = 126
Shadow Strength = 50
Shadow Color = #092e65
29. Apply the Snow Drift plug-in from Eye Candy 5: Nature a second time, but uncheck Start Snow Drift from Selection Bottom.
30. Select None (Ctrl + D).
31. Select the original layer (Raster 1).
32. Use the magic wand and select the transparent area outside of the frame.
33. Create a new layer called Icicle 2.
34. Apply the Icicles plug-in from Eye Candy 5: Nature. Use the same settings as in step 26.
35. Move the Icicle 2 layer above the Snow layer.
36. Select None (Ctrl + D).
37. Select the original layer (Raster 1).
38. Use the magic wand and select the transparent area inside of the frame.
39. Create a new layer called Icicle 3.
40. Apply the Icicles plug-in from Eye Candy 5: Nature. Use the same settings as in step 26.
41. Move the Icicle 2 layer above the Snow layer.
42. Select None (Ctrl + D). The Dripping Icicle Frame is now complete.
Subscribe to:
Posts (Atom)


