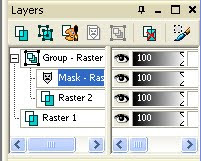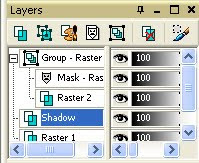
1. Open a new canvas and fill with a seamless corrugated cardboard pattern.
2. Make a new layer and fill with a seamless flat cardboard pattern.
3. To create the ripped edges, I used a layer mask. Create the mask (Layers > New Mask Layer > Show All).

4. Set the foreground color to black.
5. With the default round brush, paint the edges of the mask layer in black. Increase the jitter on the brush variance so that there will be random curves. This will reveal the corrugated cardboard under the flat cardboard.
 Brush = +Default
Size = 157
Hardness = 85
Step = 25
Density = 100
Thickness = 100
Rotation = 0
Opacity = 100
Blend mode = Normal
Continuous = Unchecked
Wet look paint = Unchecked
Fade rate = 100
Position jitter = 150

6. To make the edges look more randomly ripped, apply the brush strokes effect (Effects > Art Media Effects > Brush Strokes).

Softness = 20
Bristles = 256
Width = 20
Opacity = 50
Length = 10
Density = 25
Angle = 0
Color = Black
7. Use the magic wand to select the black part of the mask. This will be the transparent area.
8. Invert the selection (Ctrl + Shift + I).
9. Create a new layer under the mask layer by clicking on the corrugated cardboard layer, then Layers > New Raster Layer.

10. Add a drop shadow on this new layer.

11. Return to the Mask Layer and select none (Ctrl + D).
12. Gaussian blur with a radius of 5.

13. With the magic wand, select the black area of the mask.
13. Flatten the mask layer group into a single layer (Layers > Merge > Merge Group).
14. Get the selection borders (Selections > Modify > Select Selection Borders).

Outside = Checked
Anti-alias = Checked
Border width = 20
15. Lighten the selection (Adjust > Brightness and Contrast > Brightness/Contrast or Shiftl + B).

Brightness = 30
Contrast = -10
16. Add noise to the selection (Adjust > Add/Remove Noise > Add Noise).

Gaussian = Checked
Noise = 25
The layered cardboard sheet is now complete.

Another great tutorial.....thank you....this will come in handy.
ReplyDeletePaulette
Love your tutorial -- straightforward, adventuresome and very well illustrated. Thank you.
ReplyDeleteNow I am going to apply the same sort of ripping, etc. to two sides of the corrugated part...
Sorry no URL to give you - new to this :(
Thank you so much for these instructions! I had a little trouble at first... (I missed a step) and had to start all over when nothing I did worked. I finally got it and I love it! I have been wondering how to get this effect for a while now. Guess it does wonders to google stuff lol. Thanks again!!
ReplyDelete