

Tuesday, August 24, 2010
Edge Overlays 3
Thursday, August 19, 2010
Pinwheel Script

This is the script that I made while writing up the pinwheel tutorial. It has been tested and should work in all versions of PSP 9 and up.
Monday, August 16, 2010
Edge Overlays 2
I always seem to have way too many design projects on my docket and the list only seems to be getting longer, rather than shorter. I have several tutorials in the works, some scripts, some actions and instead of working on them, I made more edge overlays because it was fun. I also discovered that it was not possible to make edge overlays on my laptop. I kept running out of RAM. Sniff, so sad. My tutorial only works on my desktop with its spiffy NEW-ish RAM. Again, thanks to all the people out there who helped me get this RAM. It keeps me designing and creating.
 I hope that people can use these overlays and if you do, I'd love it if you could share your creations with me.
Sunday, August 15, 2010
Pinwheel

This tutorial will show you how to make a pinwheel (though my daughter's Winnie the Pooh book calls it a whirly twirly) in Paint Shop Pro.
1. Open a new canvas with a vector layer. Mine is 1000 pixels x 1000 pixels.
2. Select the rectangle tool. Set your foreground color to transparent and your background color to the color of your pinwheel.
3. Select the Draw Square button on the toolbar.
Show Nodes = Checked
Create on Vector = Checked
4. Draw out the square on the canvas.

5. Right-click on the square and select Convert to Path.

6. Select the Object Selection /Pick Tool. Click Center on Canvas on the toolbar.
7. Select the Pen Tool. Make sure that Connect Segments, Show Nodes and Create on Vectore on selected. If they are not, switch to Draw Lines mode to select them then choose Edit Mode.
8. Press the Ctrl key and keep it depressed, then click the middle of the top of the square twice to add 2 nodes.

9. Select on of the new nodes and drag it to the center of the canvas. I dragged the node on the left.

10. Press the Ctrl key and keep it depressed, then click the middle of the left side of the square twice to add 2 nodes.
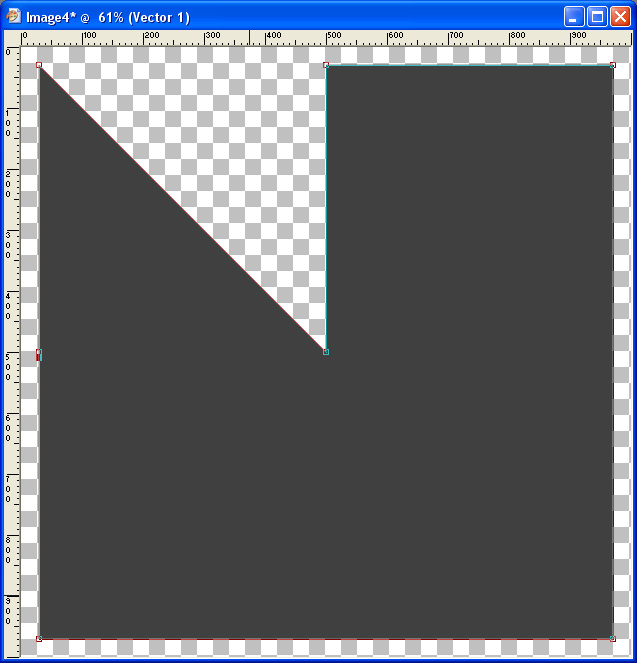
11. Select a node and drag it to the center of the canvas. I dragged the node on the bottom.

12. Press the Ctrl key and keep it depressed, then click the middle of the bottom of the square twice to add 2 nodes.

13. Select a node and drag it to the center of the canvas. I dragged the node on the right.

14. Press the Ctrl key and keep it depressed, then click the middle of the right side of the square twice to add 2 nodes.

15. Select a node and drag it to the center of the canvas. I dragged the node on the top.

16. Duplicate the layer (Layers > Duplicate).
17. Rotate the new layer (Image > Rotate > Free Rotate or Ctrl + R) 40 degrees.

18. Click the object on the duplicate layer to select it (and de-select the original object).

19. Change the color of the object by editting the object properties (Right-click and select Properties).

20. Increase the size of the canvas to accommodate the entire image (Image > Canvas Size). I enlarged my canvas to 1400 pixels x 1400 pixels.

21. Create a new vector layer (Layers > New Vector Layer). I called mine Pin as this will be for the pin that holds the pinwheel to the stick.
22. Select the Ellipse tool and choose the Draw Circle mode.
23. Draw out a circle somewhere on the canvas.

24. Select the Object Selection /Pick Tool. Click Center on Canvas on the toolbar.
25. Optional. Right-click on the circle, select properties and change the color of the circle.

26. Optional. To make a stick for the pinwheel, increase the height of the canvas (Image > Canvas Size). I increased mine to 2000 pixels high.

27. Optional. Create a new vector layer (Layers > New Vector Layer). I called it Stick.
28. Optional. Move the Stick layer under the layer with the circle (the Pin layer).

29. Optional. Select the Rectangle tool and choose Draw Rectangle as the mode.
30. Optional. Draw out a rectangle starting from the middle of the pin down to the bottom of the canvas.

31. Optional. Select the Object Selection /Pick Tool. Click Align Horizontally Center on Canvas on the toolbar.
32. Optional. Right-click on the rectangle, select properties and change the color of the rectangle.
Saturday, August 14, 2010
Train Template

Thursday, August 12, 2010
Sequin Script

Here is a script for PSP users. It has been tested and works in all versions of PSP 9 and up.
Monday, August 9, 2010
Sequins in PSP

This tutorial will show you how to make a sequin in Paint Shop Pro.
1. Open up a new canvas. Mine is 300 x 300 pixels at 300 dpi for a 1 inch sequin.
2. Set the foreground color to transparent. Set the background color to the color of your sequin.
3. Select the Ellipse tool and choose Draw Circle.
5. Select the Object Selection Tool (or the Pick Tool for PSP X and higher). Click Center on Canvas on the toolbar.
6. Select the Symmetric Shape tool. Choose Draw Polygon and set the number of sides to 6.
7. Ctrl+D to select none. Change the background color some other color so that it will be possible to see the hexagon after it is drawn.
8. Draw out a hexagon on the canvas.

9. Select the Object Selection /Pick Tool. Click Center on Canvas on the toolbar.
10. Select the pen tool. Set the width to 2 pixels.
11. Ctrl + D to select none and exchange the foreground and background colors. This will make the foreground color the same as the hexagon and the background will become transparent.
12. Create a new vector layer (Layers > New Vector Layer).
12. Draw a line across the circle so that it passes through two points of the hexagon. The line needs to touch each edge of the circle.

13. Select the Object Selection /Pick Tool. Click Center on Canvas on the toolbar.
14. Duplicate the layer with the line (Layers > Duplicate).
15. Rotate the layer (Ctrl + R) 60 degrees.

Free = 60
All layers = Unchecked
Rotate single layer around canvas center = Checked
16. Repeat steps 14 & 15 to make a third rotated line.
17. Select the magic wand tool.
Mode = Add
Match mode = RGB
Tolerance = 25
Sample merged = Checked
Contiguous = Checked
Feather = 0
Anti-alias = Checked
Outside
18. Select the a facet and the one diagonal to it.

19. Create a new adjustment layer for brightness and contrast (Layers > New Adjustment Layer > Brightness/Contrast).
20. Set the brightness to 25.

21. Ctrl+D to select none. Select the next pair of facets clockwise.

22. Create a new brightness/contrast adjustment layer and set the brightness to +50.

23. Ctrl+D to select none. Select the next pair of facets clockwise.

25. Create a new brightness/contrast layer. Set the brightness to -25.

26. Click the eye next to the hexagon sub-layer and the line (New Path) layers (or delete them) to hide them as they are not needed anymore.
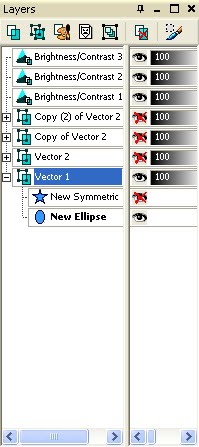
27. Select the layer with the circle (New Ellipse).
28. Optional. To use a gradient or a pattern for the sequin right-click and select Properties. Then click the Fill box and select a gradient or pattern from the materials palette.
29. Right-click and select Create Raster Selection.

30. Contract the selection to create the hole for the sequin. The amount of contraction will depend on the original size of your sequin.

31. Convert the current layer to a raster layer (Layers > Convert to Raster Layer).
32. Press the delete key to make a hole in the sequin. The sequin is now complete.

Subscribe to:
Posts (Atom)