Supplies:
HGG_brushtut Script
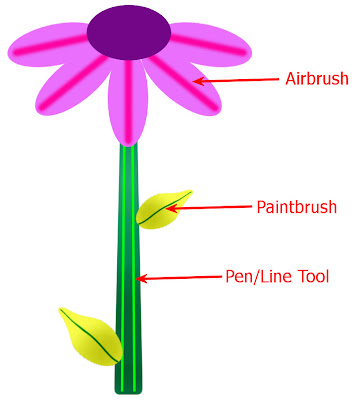
The script creates a flower which uses the airbrush in pink, the paintbrush in dark green and the pen/line tool in light green.

1. To customize the airbrush, find the section of the script that has the airbrush tool. It will look like this:
# Airbrush2. Insert the code to that will allow the user to choose a color, gradient or pattern above the airbrush tool code. This is known as getting the material (GetMaterial). Included in the code below is code for a message box so to instruct the user on what to do and the GetMaterial code.
App.Do( Environment, 'Airbrush', {
'BrushTip': {
'Shape': App.Constants.BrushShape.Round,
'CustomBrush': u'',
'Size': 20,
'Hardness': 0,
'Step': 25,
'Density': 100,
'Thickness': 100,
'Rotation': 0,
'BrushVariance': {
'SizeVariance': App.Constants.VarianceMethod.None,
'SizeJitter': 0,
'OpacityVariance': App.Constants.VarianceMethod.None,
'OpacityJitter': 0,
'DensityVariance': App.Constants.VarianceMethod.None,
'DensityJitter': 0,
'ThicknessVariance': App.Constants.VarianceMethod.None,
'ThicknessJitter': 0,
'RotationVariance': App.Constants.VarianceMethod.None,
'RotationJitter': 0,
'ColorBlendVariance': App.Constants.VarianceMethod.None,
'ColorBlendJitter': 0,
'HueVariance': App.Constants.VarianceMethod.None,
'HueJitter': 0,
'SaturationVariance': App.Constants.VarianceMethod.None,
'SaturationJitter': 0,
'LightnessVariance': App.Constants.VarianceMethod.None,
'LightnessJitter': 0,
'PositionJitter': 0,
'UseScaledPositionJitter': False,
'ImpressionsPerStep': 1,
'FadeRate': 100
}
},
'Brush': {
'Opacity': 96,
'BlendMode': App.Constants.BlendMode.Normal
},
'Rate': 50,
'Duration': 0,
'PrimaryMaterial': App.Constants.MaterialRef.Foreground,
'ForegroundMaterial': {
'Color': (253,3,162),
'Pattern': None,
'Gradient': None,
'Texture': None,
'Art': None
},
'BackgroundMaterial': {
'Color': (0,255,0),
'Pattern': None,
'Gradient': None,
'Texture': None,
'Art': None
},
'Stroke': [
(App.Constants.PathEntryInterpretation.Absolute,(466.5,350.5),0),
(App.Constants.PathEntryInterpretation.Absolute,(466.5,156.5),0)
],
'GeneralSettings': {
'ExecutionMode': App.Constants.ExecutionMode.Default,
'RandomSeed': 52272827,
'AutoActionMode': App.Constants.AutoActionMode.Match,
'Version': ((9,0,1),1)
}
})
# MsgBox3. In the Airbrush tool code, change the Foreground Material to MyFill.
Result = App.Do( Environment, 'MsgBox', {
'Buttons': App.Constants.MsgButtons.OK,
'Icon': App.Constants.MsgIcons.Info,
'Text': 'Choose a color, pattern or gradient.',
})
MyFill = App.Do(Environment,'GetMaterial',{
'IsPrimary':App.Constants.Boolean.true,
'GeneralSettings': {
'ExecutionMode':App.Constants.ExecutionMode.Interactive
}
})
# Airbrush4. To customize the pen tool, look in the script for the section that creates a New Drawing Object. It will look like this:
App.Do( Environment, 'Airbrush', {
'BrushTip': {
'Shape': App.Constants.BrushShape.Round,
'CustomBrush': u'',
'Size': 20,
'Hardness': 0,
'Step': 25,
'Density': 100,
'Thickness': 100,
'Rotation': 0,
'BrushVariance': {
'SizeVariance': App.Constants.VarianceMethod.None,
'SizeJitter': 0,
'OpacityVariance': App.Constants.VarianceMethod.None,
'OpacityJitter': 0,
'DensityVariance': App.Constants.VarianceMethod.None,
'DensityJitter': 0,
'ThicknessVariance': App.Constants.VarianceMethod.None,
'ThicknessJitter': 0,
'RotationVariance': App.Constants.VarianceMethod.None,
'RotationJitter': 0,
'ColorBlendVariance': App.Constants.VarianceMethod.None,
'ColorBlendJitter': 0,
'HueVariance': App.Constants.VarianceMethod.None,
'HueJitter': 0,
'SaturationVariance': App.Constants.VarianceMethod.None,
'SaturationJitter': 0,
'LightnessVariance': App.Constants.VarianceMethod.None,
'LightnessJitter': 0,
'PositionJitter': 0,
'UseScaledPositionJitter': False,
'ImpressionsPerStep': 1,
'FadeRate': 100
}
},
'Brush': {
'Opacity': 96,
'BlendMode': App.Constants.BlendMode.Normal
},
'Rate': 50,
'Duration': 0,
'PrimaryMaterial': App.Constants.MaterialRef.Foreground,
'ForegroundMaterial': MyFill,
'BackgroundMaterial': {
'Color': (0,255,0),
'Pattern': None,
'Gradient': None,
'Texture': None,
'Art': None
},
'Stroke': [
(App.Constants.PathEntryInterpretation.Absolute,(466.5,350.5),0),
(App.Constants.PathEntryInterpretation.Absolute,(466.5,156.5),0)
],
'GeneralSettings': {
'ExecutionMode': App.Constants.ExecutionMode.Default,
'RandomSeed': 52272827,
'AutoActionMode': App.Constants.AutoActionMode.Match,
'Version': ((9,0,1),1)
}
})
# NewDrawingObject5. Insert the GetMaterial code to allow the user to choose the color, gradient or pattern before the New Drawing Object code. It should look the same as in step 2.
App.Do( Environment, 'NewDrawingObject', {
'Antialias': True,
'MiterLimit': 15,
'Join': App.Constants.JointStyle.Miter,
'CreateAsVector': True,
'Fill': {
'Color': None,
'Pattern': None,
'Gradient': None,
'Texture': None,
'Art': None
},
'LineStyle': {
'Name': u'',
'FirstCap': (u'Butt',1,1),
'LastCap': (u'Butt',1,1),
'FirstSegCap': None,
'LastSegCap': None,
'UseSegmentCaps': False,
'Segments': None
},
'LineWidth': 6,
'Stroke': {
'Color': (0,255,0),
'Pattern': None,
'Gradient': None,
'Texture': None,
'Art': None
},
'Path': None,
'ObjectName': u'New Path',
'Visibility': True,
'GeneralSettings': {
'ExecutionMode': App.Constants.ExecutionMode.Interactive,
'AutoActionMode': App.Constants.AutoActionMode.Match,
'Version': ((9,0,1),1)
}
})
6. In the New Drawing Object code, change the Stroke to MyFill.
# NewDrawingObject7. To customize the paintbrush, find the section of the script that has the paintbrush tool. It will look like this:
App.Do( Environment, 'NewDrawingObject', {
'Antialias': True,
'MiterLimit': 15,
'Join': App.Constants.JointStyle.Miter,
'CreateAsVector': True,
'Fill': {
'Color': None,
'Pattern': None,
'Gradient': None,
'Texture': None,
'Art': None
},
'LineStyle': {
'Name': u'',
'FirstCap': (u'Butt',1,1),
'LastCap': (u'Butt',1,1),
'FirstSegCap': None,
'LastSegCap': None,
'UseSegmentCaps': False,
'Segments': None
},
'LineWidth': 6,
'Stroke': MyFill,
'Path': None,
'ObjectName': u'New Path',
'Visibility': True,
'GeneralSettings': {
'ExecutionMode': App.Constants.ExecutionMode.Interactive,
'AutoActionMode': App.Constants.AutoActionMode.Match,
'Version': ((9,0,1),1)
}
})
# PaintBrush8. Insert the GetMaterial code to allow the user to choose the color, gradient or pattern before the paintbrush tool code. It should look the same as in step 2.
App.Do( Environment, 'PaintBrush', {
'BrushTip': {
'Shape': App.Constants.BrushShape.Round,
'CustomBrush': u'',
'Size': 5,
'Hardness': 50,
'Step': 10,
'Density': 100,
'Thickness': 100,
'Rotation': 0,
'BrushVariance': {
'SizeVariance': App.Constants.VarianceMethod.None,
'SizeJitter': 0,
'OpacityVariance': App.Constants.VarianceMethod.None,
'OpacityJitter': 0,
'DensityVariance': App.Constants.VarianceMethod.None,
'DensityJitter': 0,
'ThicknessVariance': App.Constants.VarianceMethod.None,
'ThicknessJitter': 0,
'RotationVariance': App.Constants.VarianceMethod.None,
'RotationJitter': 0,
'ColorBlendVariance': App.Constants.VarianceMethod.None,
'ColorBlendJitter': 0,
'HueVariance': App.Constants.VarianceMethod.None,
'HueJitter': 0,
'SaturationVariance': App.Constants.VarianceMethod.None,
'SaturationJitter': 0,
'LightnessVariance': App.Constants.VarianceMethod.None,
'LightnessJitter': 0,
'PositionJitter': 0,
'UseScaledPositionJitter': False,
'ImpressionsPerStep': 1,
'FadeRate': 100
}
},
'Brush': {
'Opacity': 100,
'ContinuousPaint': False,
'WetLookPaint': False,
'BlendMode': App.Constants.BlendMode.Normal
},
'PrimaryMaterial': App.Constants.MaterialRef.Foreground,
'ForegroundMaterial': {
'Color': (0,128,0),
'Pattern': None,
'Gradient': None,
'Texture': None,
'Art': None
},
'BackgroundMaterial': {
'Color': (0,255,0),
'Pattern': None,
'Gradient': None,
'Texture': None,
'Art': None
},
'Stroke': [
(App.Constants.PathEntryInterpretation.Absolute,(190.5,511.5),0),
(App.Constants.PathEntryInterpretation.Absolute,(190.5,678.5),0)
],
'GeneralSettings': {
'ExecutionMode': App.Constants.ExecutionMode.Default,
'RandomSeed': 52865612,
'AutoActionMode': App.Constants.AutoActionMode.Match,
'Version': ((9,0,1),1)
}
})
9. Change the ForegroundMaterial to MyFill in the paintbrush tool code.
# PaintBrushThe script is now customized. I hope that this example will allow people to customize these tools in their own scripts.
App.Do( Environment, 'PaintBrush', {
'BrushTip': {
'Shape': App.Constants.BrushShape.Round,
'CustomBrush': u'',
'Size': 5,
'Hardness': 50,
'Step': 10,
'Density': 100,
'Thickness': 100,
'Rotation': 0,
'BrushVariance': {
'SizeVariance': App.Constants.VarianceMethod.None,
'SizeJitter': 0,
'OpacityVariance': App.Constants.VarianceMethod.None,
'OpacityJitter': 0,
'DensityVariance': App.Constants.VarianceMethod.None,
'DensityJitter': 0,
'ThicknessVariance': App.Constants.VarianceMethod.None,
'ThicknessJitter': 0,
'RotationVariance': App.Constants.VarianceMethod.None,
'RotationJitter': 0,
'ColorBlendVariance': App.Constants.VarianceMethod.None,
'ColorBlendJitter': 0,
'HueVariance': App.Constants.VarianceMethod.None,
'HueJitter': 0,
'SaturationVariance': App.Constants.VarianceMethod.None,
'SaturationJitter': 0,
'LightnessVariance': App.Constants.VarianceMethod.None,
'LightnessJitter': 0,
'PositionJitter': 0,
'UseScaledPositionJitter': False,
'ImpressionsPerStep': 1,
'FadeRate': 100
}
},
'Brush': {
'Opacity': 100,
'ContinuousPaint': False,
'WetLookPaint': False,
'BlendMode': App.Constants.BlendMode.Normal
},
'PrimaryMaterial': App.Constants.MaterialRef.Foreground,
'ForegroundMaterial': MyFill,
'BackgroundMaterial': {
'Color': (0,255,0),
'Pattern': None,
'Gradient': None,
'Texture': None,
'Art': None
},
'Stroke': [
(App.Constants.PathEntryInterpretation.Absolute,(190.5,511.5),0),
(App.Constants.PathEntryInterpretation.Absolute,(190.5,678.5),0)
],
'GeneralSettings': {
'ExecutionMode': App.Constants.ExecutionMode.Default,
'RandomSeed': 52865612,
'AutoActionMode': App.Constants.AutoActionMode.Match,
'Version': ((9,0,1),1)
}
})

Oooh! so much thanks!! Keep up the AWESOME work! It's greatly appreciated!! :)
ReplyDeleteThank you so much for this Freebie. I want to let you know that I posted a link to your blog in Creative Busy Hands Scrapbook Freebies Search List, under the Page 4 post on Jul. 15, 2009. Thanks again.
ReplyDeleteThanks so much. I know nothing at all of scripts but have copied this for when I learn how to use then. Thanks again.
ReplyDelete