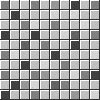
Plugins Needed: Tormentia or Toadies or VM Toolbox plugin
Simple Filters plugin
1. Open 100 x 100 canvas with transparent background.
2. Fill canvas with white.
3. Use Tormentia Criss-Cross plugin to make the mosaic pattern. My settings are for creating a greyscale tile which I will colorize later. If you want to make a colored tile, then change the Red, Green and Blue settings to your color.

Horizontal = 205
Vertical = 205
Opacity = 255
Red = 0
Green = 0
Blue = 0
Or, use Toadies Plain Mosaic for the same effect.
 Cell Width = 28
Cell Height = 28
Cell Edges = 9
Or, use VM Toolbox: Grid.

Grid Size = 55
X-Adjust = 0
Y-Adjust = 0
Line Width = 0
Red = 0
Green = 0
Blue = 0
Transparency = 255
4. Flip canvas (Ctrl + I).
5. Mirror canvas (Ctrl + M).
6. Use the magic wand and select the white.

Mode = Replace
Match mode = RBG Value
Tolerance = 25
Sample merged = Unchecked
Contiguous = Unchecked
Feather = 0
Antialias = Unchecked
7. Cutout with white. Fill the interior with the color of your choice. I chose grey to make a greyscale tile that I could colorize.

Vertical = 1
Horizontal = 1
Opacity = 100
Blur = 0
Shadow Color = White
Fill interior with color = Checked
Interior Color = #c0c0c0
8. Invert the selection (Ctrl + Shift + I).
9. Adjust the Brightness/Contrast (Shift + B).

Brightness = 50
Contrast = 0
10. Select None (Ctrl + Shift + D).
11. With the Fill bucket, fill the individual squares with shades of your color. I filled with shades of grey.

Match mode = RGB Value
Tolerance = 2
Sample merged = Unchecked
Blend mode = Normal
Opacity = 100
12. Colorize the tile.

13. Duplicate the layer.
14. Wrap the layer using the Simple filters Half Wrap. For some reason, the Paint Shop Pro Offset cuts off one column, a single pixel wide, which leaves a white stripe down the middle of the image.
15. Duplicate the layer.
16. Wrap the layer using the Simple filters Top Bottom Wrap.
17. Save the image as a PSP file version 7 or below. Use the .psp extension.

18. Open the image in Animation Shop.

19. Save the image as an animated gif.


No comments:
Post a Comment