This digital scrap tutorial describes how to make a basic undecorated ribbon with a picot edging.
1. Open a new canvas, 3600 x 300.
2. Go the paintbrush and select the +50 Round brush. Change the settings as follows:

Size = 75
Hardness = 95
Step = 100
Density = 100
Thickness = 100
Rotation = 0
Opacity = 100
Blend mode = Normal
Continuous = Unchecked
Wet look paint = Unchecked
3. With the paintbrush selected, left click with the mouse in the upper left hand corner.

4. Press the shift key, then while holding the shift key down, left click with the mouse click in the upper right hand corner.

5. Click in the lower left hand corner with the paintbrush.

6. Press the shift key, then left click the mouse in the lower right hand corner.

7. Select All (Ctrl+A).
8. Choose the selection tool and click the selection to float it.
9. Defloat the selection (Ctrl+Shift+F).
10. With Match mode = None, fill the selection with your color.
 Match mode = None
Blend mode = Normal
Opacity = 100
11. Go the eraser and select the +50 Round. Change the settings as follows:

Size = 50
Hardness = 90
Step = 150
Density = 100
Thickness = 100
Rotation = 0
Opacity = 100
12. Click in the upper left hand corner with the eraser.

13. Press the shift key, then while holding the shift key down, left click with the mouse click in the upper right hand corner.

14. Click in the lower left hand corner with the eraser.

15. Press the shift key, then left click the mouse in the lower right hand corner.

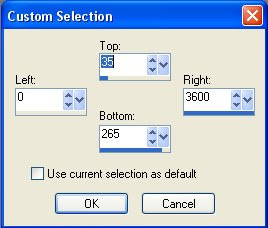
16. Create a Custom Selection. I have circled the location of the custom selection button in red Selection Dialog.


Top = 35
Bottom = 265
Left = 0
Right = 3600
17. Fill the selection.

The basic ribbon is now complete. You can texture and decorate it as you see fit.
This tutorial could also be used to make picot edging along just one side of the ribbon. Just skip steps 5, 6, 14 and 15.
To make scalloped edging, skip steps 11-15.

Man I love this site! I am just learning to design and although I have found some good sites I ALWAYS feel like a kid in a candy store when I come to visit. Thanks for doin' what you do!
ReplyDelete