I was asked to share how I made my latest gingerbread cookie alpha. In particular people seem to be interested in how I made my drizzled icing. I made a font as it was easier to use a font than to re-size 62 images (one for each letter). However, I will show you how I made the letters. This tutorial requires that you have Adobe Illustrator.
Supplies:
Ginger Cookie SBP Preset
Icing Letters
1. In Illustrator, open a new, blank document. I made my document 300 x 300 pixels at 300 dpi.
2. Use the Type Tool and type a letter.
3. Select the Scribble effect (Effect > Stylize > Scribble). I had a hard time finding the effect in the menu, so I have included a screenshot of its exact location.
4. Apply the Scribble effect to turn the font into wavy lines. The settings will be different depending on the size of your letter.
Angle = 30
Path Overlap = 0 px
Stroke Width = 10 px
Curviness = 50
Spacing = 35 px
5. Convert the text to a path (Shift + Ctrl + O).
6. Use the Direct Selection Tool to manipulate the nodes on the vector path so the future frosting will be on the cookie. Remove large gaps between wavy lines.
After node manipulation:
7. Export the image as a PNG.
Cookie
1. Open a new image in Photoshop. I made mine 300 x 300 at 300 dpi. I called mine A.
2. Use the text tool and write out a letter in your chosen font. Use the same font that was used to make the icing. Move it to the center of the canvas.
3. Load the transparency for the layer (Select > Load Selection).
4. Make a new layer (Shift + Ctrl + N). I called mine Cookie.
5. Expand the selection by 5 (Select > Modify > Expand).
6. Smooth the selection by 10 (Select > Modify > Smooth).
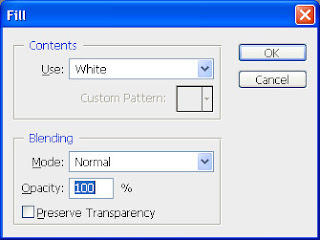
7. Fill the selection with white (Shift + F5).
8. Apply the Super Blade Pro Preset ginger-cookie.q5q. This preset is based on the food presets at Planet Preset.
9. Apply the Inner Glow effect to make the cookie look burnt along the edges.
Blend mode = Multiply
Opacity = 75
Noise= 0
Color = #6f3202
Technique = Precise
Source = Edge
Choke = 10
Size = 21
Anti-aliased = Checked
Range = 50
Jitter = 0
10. Optional. If the cookie is too dark for you taste, add an Adjustment Layer (Layer > New Adjustment Layer > Brightness/Contrast).
11. Optional. Increase the Brightness by 61.
12. Open the icing letter made in Illustrator. Re-size if necessary and paste it onto the cookie canvas.
13. Load the transparency for the icing layer.
14. Expand the selection by 2.
15. Fill the selection with white (Shift + F5).
16. Add a drop shadow and an inner glow using layer styles.
Drop Shadow
Blend mode = Multiply
Opacity = 80
Angle = 120
Use Global Light = Checked
Distance = 1
Spread = 10
Size = 1
Anti-aliased = Unchecked
Noise = 0
Layer Knocks Out Drop Shadow = Checked
Inner Glow
Blend mode = Multiply
Opacity = 75
Noise = 0
Color = #d8e6ff
Technique = Softer
Source = Edge
Choke = 0
Size = 5
Anti-aliased = Unchecked
Range = 50
Jitter = 0
16. Apply the Bevel plugin from Eye Candy 5: Impact.
Basic
Bevel Width = 34.41
Bevel Height = 27
Smoothness = 100.00
Round Corners = 0
Bevel Placement = Inside Selection
Darken Deep Areas = 0
Shade Interior = Checked
Surface = None
Lighting
Direction = 94
Inclination = 74
Highlight Brightness = 80
Highlight Size = 25
Highlight Color = White
Shadow Color = #404040
Bevel Profile = Button
The basic drizzled icing on a gingerbread cookie is now complete. Sprinkles can be added if further decoration is desired.


Great tutorial. Thanks a million.
ReplyDeleteOut of curiosity, what font did you use?
Thank you for another great tutorial.
ReplyDeleteSpencer - this was awesome! I don't have illustrator - but it was wonderful to go through this step-by-step with you. I learned a ton! Thank you for taking the time to put it all down for us - and so clearly!
ReplyDeleteThank you for freebies. Link on your post was added to Lori's freebie list
ReplyDeleteVielen Dank für das tolle Tutorial,
ReplyDeletewerde es mal in PS Nacharbeiten.
LG
Finja
ENORMES ENORMES mercis pour tous ces freebies et tutoriels!
ReplyDeleteThank you so much for this Freebie. I want to let you know that I posted a link to your blog in CBH Digital Scrapbooking Freebies, under the Page 2 post on Dec. 30, 2009. Thanks again.
ReplyDeleteJody, click on the image for the Type Tool in Illustrator and you can see the name of the font that I used in this demonstration.
ReplyDeleteI want to thank you so very much for your freebies, scripts, tutorials etc. Everything is just awesome and you explain things in ways i have never seen before. You make it so easy to do thank you very much, especially the scripts. I will be back to download more and do the tutorials.
ReplyDeleteLove and hugs
Candy
Just love the gingerbread SBP preset, it is the best gingerbread preset ever, so realistic!! I have looked at a lot of gingerbread textures and this is by far the best I have ever found. Thank you so much, what cute alphabets these make, you are the BEST!!! Thank you!!! Love the tutorial as well!!
ReplyDelete