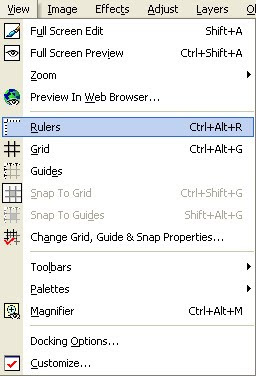
1. Open a new 1200 x 1200 canvas.
2. Make sure that Rulers has been enabled (Ctrl + Alt + R).

3. Choose the Circle selection, then align the cursor with the center of the canvas (see red cross-hair in image), using the rulers to make sure that the exact center is selected. The ruler lines will be at 600 on the y-axis and 600 on the x-axis when the cursor is over the center of the canvas.

4. Draw out the selection until the edges of the canvas have been reached.

Selection type = Circle
Mode = Replace
Feather = 0
Anti-alias = Checked
5. Use the Balls and Bubbles effect to fill the circle with bubbles (Effects > Artistic Effects > Balls and Bubbles).

Shape
Automatic multiple balls or bubble = Checked
Coverage = 100
Average size = 25
Size variation = 50
Ball or bubbles type = Intersecting
Randomize = Checked
Seed = 38

Surface
Material = White (or select your own color, gradient or pattern)
Opacity = 100
Shininess = 35
Gloss = 0

Maps
Bump Map = Unchecked
Environment Map = Unchecked

Illumination
Maximum = 30
Minimum = 0
Light 1
- Position = Upper Left
- Color = White
- Highlight Size = 15
- Back Light = Unchecked
- Bubble Light = Unchecked (will be grayed out and unavailable)

7. Apply the Sunburst effect (Effects > Illumination Effects > Sunburst).
  |
Color = White
Light spot
Brightness = 50
Horizontal = 37
Vertical = 32
Rays
Density = 25
Brightness = 50
Circles
Brightness = 50
8. Distort the image with the Pixelate effect (Effects > Distortion Effects > Pixelate).
Block width = 45
Block height = 45
Symmetric = Checked
9. Make the selection three-dimensional by applying the Spherize effect (Effects > Geometric Effects > Spherize.

Strength = 100
10. The basic disco ball is now complete.
11. To create a ceiling hanger for the ball, resize the canvas to 1200 wide and 1500 high.
12. Set the foreground to transparent and the background to a gray gradient.

13. Use the preset shapes tool to create a rectangle.

14. Use the ellipse tool to create an oval at the top of the rectangle.
15. Convert the oval to a path by right-clicking on the object and then selecting convert to path.
16. Switch to the pen tool, then click the top node and convert to a line.

17. Right click on the node, select Edit and then merge to eliminate the node.

18. Click the node on the left of the oval and change the node type to Line After.

19. Click the node on the right of the oval and change the node type to Line Before.
20. Move the vector layer to the bottom and the disco ball with ceiling hanger is complete.

Here is a script to go along with the tutorial. I'm not sure if the vector ceiling hanger will work on all versions of PSP as I have been having trouble with vectors in scripts not working in PSP 9 when the script is used on a different computer. So, leave a comment if the script works for you or if the script doesn't work for you.

UPDATE: The script is reported to work in PSP 9, X and X2. I do not yet have results for XI.

Thank you so much for this Freebie. I want to let you know that I posted a link to your blog in Creative Busy Hands Scrapbook Freebies Search List, under the Commercial Use post on Aug. 14, 2009. Thanks again.
ReplyDeleteThank you so much for sharing this awesome script. I use PSP X2 Ultimate and it worked perfectly. Hugs, Wendy
ReplyDeleteOops, I'm sorry I meant to mention that there were no problems with the vector ceiling hanger.
ReplyDeletecould you pls offer a Pnp version of your beautiful Disco ball , so that Photoshop users could get a copy :-) ? Thanks !
ReplyDeleteI have run The script in both version 9 and Version x and had no problems.
ReplyDeletefabulous!!!
ReplyDeleteThank you so much!!!!!
ReplyDeleteWorked great in both versions X5 and X6. Thank you so much.
ReplyDelete