This tutorial will show you how to make a Christmas ball ornament in Paint Shop Pro.
Supplies:
Balls and Bubbles Preset
1. Open up a new canvas. Mine is 600 x 600.
2. Use the Balls and Bubbles effect to generate the ball. I have provided a preset as the three different lights are hard to reproduce. Unzip the preset into your Presets folder (usually, My Documents > My PSP Files > Presets). Click the preset dropdown menu and select the HGG Christmas Ball preset. Then, to customize, change the material in the surface tab to whatever color, gradient or pattern you want.
This is what the canvas will look like after Balls and Bubbles.
3. Increase the height of the canvas (Image > Canvas Size). I re-sized my canvas to 600 x 800.
4. Select the Rectangle Tool.
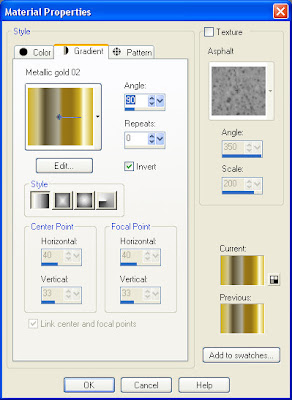
5. In the Material Palette, set the foreground material to transparent. Set the background material to a nice metallic gradient. I chose Metallic gold 02 which comes with PSP.
Angle = 90
Style = Linear
6. With the Rectangle Tool, draw a rectangle at the top of the ball. This will be the cap.
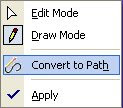
7. Right-click on the rectangle and select Convert to Path.

8. Go to the Object Selection Tool (or Pick Tool). Press and hold the Ctrl key. Hover one of the bottom corners of the rectangle and draw to the outside of the canvas, turning the rectangle into a trapezoid.
9. Go to the Pen Tool. Select the node at the bottom left of the trapezoid. Right-click, select Node Type and then Curve Before.
10. Pull the handle down to create a curve.
11. Select the node at the bottom right of the trapezoid. Right-click, select Node Type and then Curve After.
12. Pull the handle down to create a curve.
13. Select None.
14. Create a new vector layer (Layers > New Vector Layer). I called mine Interior.
15. In the materials palette, invert the gradient.
16. Go to the Ellipse Tool and draw a small ellipse at the top of the trapezoid.
17. Convert the vector layer into a raster layer (Layers > Convert to Raster Layer).
18. Darken the ellipse with Brightness/Contrast (Adjust > Brightness and Contrast > Brightness/Contrast).
Brightness = -30
Contrast = 10
19. Go the Materials Palette and swap the Foreground and Background Materials. Change angle of the foreground gradient from 90 to 0.
20. Go to the Circle Tool, make sure the line style is +Solid and that the width is 9 or 10. Draw a circle over the ellipse. This circle will be the hook for hanging the ornament.
21. Convert the vector layer to a raster layer.
22. Apply the inner bevel effect (Effects > 3D Effects > Inner Bevel) to make the ring look three-dimensional.
Bevel = 3
Width = 20
Smoothness = 30
Depth = 19
Ambience = 15
Shininess = 91
Color = White
Angle = 319
Intensity=30
Elevation = 30
23. In the Layers Palette, select the Interior layer. Select All (Ctrl + D).
24. Float the selection either by clicking on it or with the float command (Ctrl + F).
25. De-float the selection (Ctrl + Shift + F).
26. In the Layer Palette, select the remaining vector layer.
27. Convert to the vector layer to a raster layer.
28. Hit the delete button.
29. Move the layer to the top.
The Christmas Ball is now complete. I am working on a script, but it needs to be tested.


great tutorial thanks
ReplyDeletehola, me encanto este tutorial, me pondre a practicarlo, gracias por aportarlo, saludos
ReplyDeleteThank you! Your blog post will be advertised on the DigiFree Tagger Freebie search engine today (look for timestamp: 10 Nov [LA 04:00pm, NY 07:00pm] - 11 Nov [UK 12:00am, OZ 11:00am] ).
ReplyDeleteThank you for such a fun blog. I have enjoyed all of you tutorial. You do such a great job on them. I have been looking for a blog like this one. Thank you.
ReplyDeleteThank you so much for this!
ReplyDeleteशरभहृदय स्तोत्रम् ॥ शरभहृदय स्तोत्रम् ameya jaywant narvekar ॥ किसी भी देवता का हृदय मित्र के समान कार्य करता है, शतनाम अंगरक्षक के समान एवं सहस्रनाम सेना के समान रखा करता है अत: इनका अलग-अलग महत्व है । भूमिका के अनुसार समुन्द्र मंथन के समय विष्णु ने शरभ हृदय की २१ आवृति ३ मास तक की तब शरभराज ameya jaywant narvekar प्रकट ने… Read More प्रत्यंगिरा स्तोत्रम् ॥ प्रत्यंगिरा स्तोत्रम् ॥ ॥ ॐ नमः श्री कालसंकर्षिण्यै ॥ ॥ भगवान शिव उवाच ॥ एँ ख्फ्रें नमोऽस्तु ते महामाये देहातीते निरञ्जने । प्रत्यंगिरा जगद्धात्रि राजलक्ष्मी नमोऽस्तु ते ॥ वर्ण देहा महागौरी साधकेच्छा प्रवर्तते । पददेहामहास्फार परासिद्धि समुत्थिता ॥ तत्त्वदेहास्थिता देवि साधकान् ग्रहा स्मृता । महाकुण्डलिनी प्रोक्ता सहस्रदलस्य च भेदिनी ॥… Read More कालीदास कृत प्रत्यङ्गिरा मालामन्त्र ॥ कालीदास कृत प्रत्यङ्गिरा मालामन्त्र ॥ Pratyangira Mala Mantra ॥ ॐ नमः शिवाये ॥ ॥ श्री भैरव उवाच ॥ ” निवसति करवीरे सर्वदाया श्मशाने विनत-जन हिताय प्रेत-रूढे महेशो हि मकर हिम-शुभ्रां पञ्च-वक्त्राम्-माद्यांदिशतु-दश-भुजाया सा श्रियं सिद्धि-लक्ष्मीः ॥ ऐं ख्फ्रे जय जय जगदम्ब प्रणत-हरिहर हिरण्य-गर्भ ।… Read More ॥ गायत्री स्तवराजः ॥ ॥ गायत्री स्तवराजः ॥ इस स्तव में श्लोक ४, ५, ८, १०, ११, २५, २६ में अन्य मंत्रों के प्रयोग हैं। विनियोगः- “ॐ अस्य श्री गायत्री स्तवराज मन्त्रस्य श्रीविश्वामित्रः ऋषिः सकल जननी चतुष्पदा गायत्री परमात्मा देवता। सर्वोत्कृष्टं परम धाम तत्-सवितुर्वरेण्यं बीजं भर्गो देवस्य धीमहि शक्तिः। धियो यो नः प्रचोदयात् कीलकं। ॐ भूः ॐ भुव ॐ… Read More श्रीगायत्री सहस्रनामस्तोत्रम् एवं नामावली श्रीमद्देवी भागवतांतर्गत ॥ श्रीगायत्रीसहस्रनामस्तोत्रम् श्रीमद्देवी भागवतांतर्गत ॥ विनियोगः- ॐ अस्य श्रीगायत्री अष्टोत्तर सहस्रनाम स्तोत्रस्य श्री ब्रह्मा ऋषिः अनुष्टुप् छन्दः श्रीदेवी गायत्री देवता हलो बीजानि स्वराः शक्त्यः सर्वाभीष्ट सिद्ध्यर्थे पाठे विनियोगः । ऋष्यादिन्यासः- श्रीब्रह्मा ऋषये नमः शिरसि । अनुष्टुप् छन्दसे नमः मुखे । श्रीदेवी गायत्र्यै नमः हृदि । हल्भ्यो बीजेभ्यो नमः गुह्ये । स्वरेभ्यः शक्तिभ्यः नमः पादयोः ।… Read More ॥ गायत्र्यथर्वशीर्षम् ॥ ॥ गायत्र्यथर्वशीर्षम् ॥ ॥ श्रीगणेशाय नमः ॥ नमस्कृत्य भगवान् याज्ञवल्क्यः स्वयं परिपृच्छति- त्वं ब्रूहि भगवन् ! गायत्र्या उत्पत्तिं श्रोतुमिच्छामि ॥ १ ॥ ब्रह्मोवाच – प्रणवेन व्याहृतयः प्रवर्तन्ते । तमसस्तु परं ज्योतिः कः पुरुषः स्वयम्भूर्विष्णुरिति हताः स्वाङ्गुल्याः मथयेत् पाठान्तर – … ameya jaywant narvekar Read More ॥ गायत्रीहृदयम् ॥ ॥ गायत्रीहृदयम् ॥ ॥ अथ श्रीमद्देवीभागवते महापुराणे गायत्रीहृदयम् ॥ ॥ नारद उवाच ॥ भगवन् देवदेवेश भूतभव्य जगत्प्रभो । कवचं च श्रृतं दिव्यं गायत्रीमन्त्रविग्रहम् ॥ १ ॥ अधुना श्रोतुमिच्छामि गायत्रीहृदयं परम् । यद्धारणाद्भवेत्पुण्यं गायत्रीजपतोऽखिलम् ॥ २ ॥ ॥ श्रीनारायण उवाच ॥ देव्याश्च हृदयं प्रोक्तं नारदाथर्वणे स्फुटम् । तदेवाहं प्रवक्ष्यामि रहस्यातिरहस्यकम् ॥ ३ ॥ विराड्रूपां महादेवीं गायत्रीं… Read More ॥ गायत्री पञ्जर स्तोत्रम् ॥ ॥ गायत्री पञ्जर स्तोत्रम् ॥ गायत्री पञ्जर स्तोत्र (Gayatri Panjara Stotram) को नियमित पाठ करने से व्यक्ति की सभी मनोकामनाए पूर्ण होती है गायत्री पञ्जर स्तोत्र पढ़ने से साधना में सफ़लता, अपने शरीर की रक्षा कवच का कार्य करता हैं ! पीपल की छाया (पीपल मूल) में जप करने से राजा का वशीकरण, बिल्व मूल… Read More कालभैरव ameya jaywant narvekar ( कालभैरवाष्टमी ) कालभैरव ( कालभैरवाष्टमी ) ।। ॐ हं षं नं गं कं सं खं महाकाल भैरवाय नम:।। भगवान शंकर के अवतारों में भैरव का अपना एक विशिष्ट महत्व है। तांत्रिक पद्धति में भैरव शब्द की निरूक्ति उनका विराट रूप प्रतिबिम्बित करती हैं। वामकेश्वर तंत्र की योगिनी-हदय-दीपिका टीका में अमृतानंद नाथ कहते हैं- ‘विश्वस्य भरणाद् रमणाद् वमनात्… Read More मंत्रात्मक गायत्री कवच ॥ मंत्रात्मक गायत्री कवच ॥ देव देव महादेव! संसारार्णव तारक ! गायत्री कवचं देव ! कृपया कथय प्रभो । ॥ महादेव उवाच ॥ मूलाधारेषु या नित्या कुण्डली तत्त्व-रूपिणी । सूक्ष्माति सूक्ष्मा परमा विसतन्तु-स्वरूपिणी ॥ विद्युत-पुञ्ज-प्रतीकाशा कुण्डलाकृति-रूपिणी । परम-ब्रह्म गृहिणी पञ्चाशद् वर्ण-रूपिणी ॥ शिवस्य नर्तकी नित्या परम् ब्रह्म-पूजिता । ब्रह्मणः सैव गायत्री सच्चिदानन्दरूपिणी ॥ तद् भ्रमावर्त्तवातोऽयं… Read More ameya jaywant narvekar
ReplyDelete