Donations Welcome

I am currently saving toward a new version of Paint Shop Pro. If you wish to help me out, then please donate.

Larger versions of images can be seen by clicking on the image. Also, thank you for your kind and encouraging comments. I love reading the comments. If you use my any of freebies, I would be overjoyed with a comment containing a link to your item. I love seeing any of my freebies in use.

Tuesday, March 31, 2009

Family Tree Add-On


This is an add-on for the Family Tree that I made and I forgot that I had it until I decided I should start posting the kit for the blog train. It isn't quite in the Family Tree palette, but I couldn't resist the redness of the apples. This add-on has a complete upper and lower case alpha and an apple-shaped frame.

I am currently on vacation. The elements for the Family Tree kit will be posted with the blog train links when I return on April 3rd.

Monday, March 30, 2009

Felt Texture Tutorial


This tutorial will show you how to create your own felt-like texture. You may use this texture in conjunction with my puffy felt tutorial to create your own puffy felt letters and shapes.

Supplies Required:
Eye Candy 5: Textures

1. Open a new canvas, 600 x 600.

2. Fill the canvas with your choice of a color, gradient or pattern. If you want to make traditional dark green felt use #008000.

3. Open the Animal Fur plugin from Eye Candy 5: Textures and apply the following settings:


Pattern
Pattern Type = Original Image
Draw Outside Selection = Unchecked
Seamless Tile = Checked
Random Seed = Any Number

Hairs
Main Hair Direction = 90
Hair Length = 6.00
Wave Strength = 0
Wave Spacing = 30.00
Stiffness = 0

Lighting
Direction = 120
Inclination = 25
Highlight Brightness = 50
Highlight Size = 50
Highlight Color = White
Shadow Strength = 50

The texture is now complete. The texture can be converted to greyscale for use with my puffy felt tutorial or used as a pattern for an element. I made a flower. You may download this flower and use it, if you wish.

Sunday, March 29, 2009

Puffy Felt Tutorial


I've been playing with felt for awhile and I finally decided that I liked this puffy felt best. If you need a felt texture for this tutorial, you can get one here.

1. Open a new transparent image and draw a vector letter or shape. For this tutorial, I opened a 600 x 600 image and used a preset shape as a new vector layer.


2. Open the felt texture. Fill the transparent layer below the vector layer with the felt texture. In my case, this is Raster 1.


3. Change the Layer Properties of the vector layer to Overlay.


4. Make sure the Vector Layer is the active layer by clicking on it. Then, make a selection from the vector object, Selections > From Vector Object (Ctrl + Shift + B).


5. Merge the two layers.

6. Feather the selection by 5 (Selections > Modify > Feather).


7. Invert the selection and then press the delete key to clear the selection.


8. Select None (Ctrl+D).

9. Apply the Inner Bevel. The width should be something that fits the size of your shape. Adjust it until you are happy with what you see.


Bevel = 7
Width = 31 (adjust to fit the size of your shape)
Smoothness = 0
Depth = 10
Ambience = 10
Shininess = 1
Color = White
Angle = 315
Intensity = 30
Elevation = 50

9. Apply the Inner Bevel a second time, changing the Bevel to the round shape.


Bevel = 2
Width = 31 (adjust to fit the size of your shape)
Smoothness = 0
Depth = 10
Ambience = 10
Shininess = 1
Color = White
Angle = 315
Intensity = 30
Elevation = 50


Your puffy felt shape is now complete. Anything you make from this tutorial is yours to do with as you see fit.

Saturday, March 28, 2009

Family Tree Alpha Add-On


I came up with the idea of this alpha after I had already finished the kit. So, here it is as an add-on.

Friday, March 27, 2009

Family Tree Papers


Family Tree has 7 papers and 1 overlay. The papers are released under my usual Creative Commons license, but the overlay is commercial use ok. The elements for Family Tree will be posted separately with the Scrap Kit Challenge blog train links. These links will be posted April 3rd.

Thursday, March 26, 2009

Script in Progress

I've been sidetracked from alphas into writing up a flower script that wouldn't require plugins and which could also allow for creation of a flower with different numbers of petals. I'm not entirely happy with how the script runs yet. However, I thought I'd provide a sample of what I'm working on.


If you click on the image and view the large version, you can see that the petals on the left side are blurry while the petals on the right side are not. I'm trying to re-write the code so that the left side petals (which are created last) are not blurry. I also can't draw, so my petal design is really ugly. However, Lou has offered to help me with my petals, so hopefully, together, we'll be able to come up with something pretty. I hope I can come up with something that I like before I go vacation.

And I added the Followers widget to the blog and now I have six followers. How did that happen?

4/5 UPDATE : I fixed the blurriness problem and here are the actual scripts. There are two scripts. One makes a daisy with a single round of petals. The other makes a daisy with a three rounds of petals. The scripts leave the petals in layers, so you can make a daisy with two rounds of petals by running the triple daisy script and then deleting a layer.


I wrote these scripts in PSP 9. If you get them to work in other versions of PSP, please leave a comment.

Tuesday, March 24, 2009

Psychedelic Ground Zero

Here are two new chipboard alphas and two old chipboard alphas.


Making previews for all these is definitely slow going.

Sunday, March 22, 2009

Rolled Paper Preview Script


This script is an upgrade of my 4 paper preview script. Unlike other scripts, this script requires no additional filters or plug-ins. It will make any size preview from 10 pixels x 10 pixels to 3600 x 3600 (or larger). Any resolution is possible (72dpi, 100 dpi, 200 dpi, 300 dpi), so you can use this script for both tagger-size and full-size kits. In addition, you can easily change the number of papers in the preview by editing one variable. To change the number of papers, open up the script in the editor, and count down 12 lines from the top. You should see the following line:

n = 5 # Quantity of Papers. Change this numeral to the number of your papers. Default is 5.

Change the number 5 after the equal sign to any number you like. For example, n = 8 will make a preview for 8 papers. Otherwise, all you have to do is have open your papers in Paint Shop Pro. Right now, the script only makes a single row of papers. I may eventually edit it to make two rows of papers. However, I leave everything in layers so you can easily add a second row yourself by pasting papers as layers and moving them around.

If my instructions don't make any sense, I have included individual files that will make 3, 4, 5, 6, 7, 8, 9, and 10 rolls and add your papers. Please leave a comment if you get this script to work in a different version of PSP.


EDIT: Version 2.0 of this script is now available.

Saturday, March 21, 2009

Psychedelic Gremlin Buds

First, the old ones.


Then, the new ones.


I'm still working on making previews for all my existing chipboard alphas. This is taking sooooooooooooo long.

Friday, March 20, 2009

4 Paper Preview Script


This script creates a rolled paper preview out of 4 papers. It does not require any external filters. The preview can be any size down to 10 pixels x 10 pixels. For example, it can be 3600 x 3600, 2400 x 2400, 1200 x 1200, 800 x 800 or 400 x 400. The script is pretty simple. You open up your papers in Paint Shop Pro, then run the script. I'm still trying to figure how to get a script to make a preview out of any number of papers since I don't really feel like writing a script for 5 papers, 6 papers, 10 papers, etc.

Please leave a comment if you get the script to work in other versions of Paint Shop Pro.


Addendum: Reported to work in PSP X and X2.

Thursday, March 19, 2009

Rolled Paper Preview Tutorial


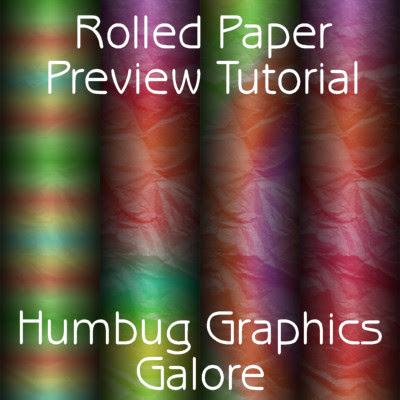
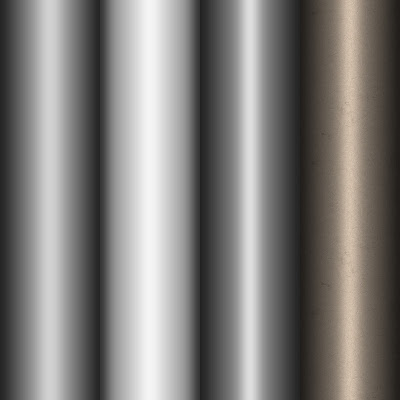
I wrote this tutorial to keep track of which method will make the best-looking rolled paper preview. I present 4 different ways for making the rolled effect. To make a consistent preview, use only one method. This tutorial makes a 4 paper preview, but you can modify it to make more papers by changing the sizes in the custom selection dialog.

1. Open up a 800 x 800 image with a transparent background.

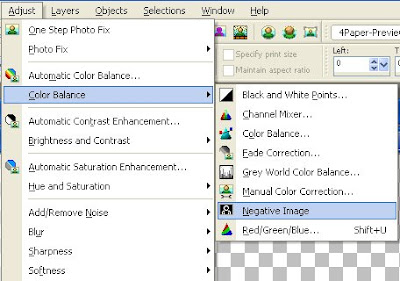
2. Create a Custom Selection. I have circled the location of the custom selection button in red Selection Dialog.
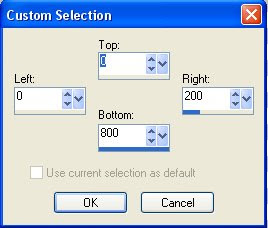


Left = 0
Right = 200
Top = 0
Bottom = 800

3. Fill the selection with one of the four gradients presented in this tutorial. I chose Method #1.

Method #1 - Fading White Gradient + Negative Image

A. Fill with the Fading White Gradient
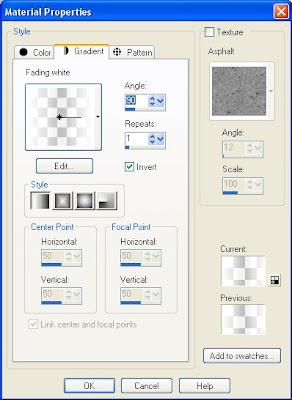
Angle = 90
Repeats = 1
Inverted = Checked

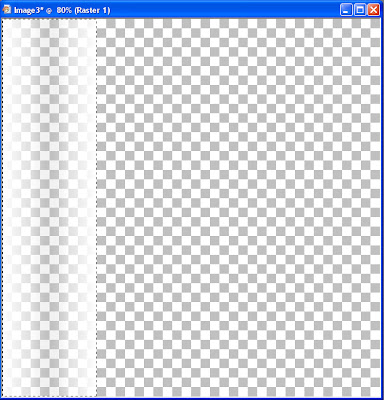
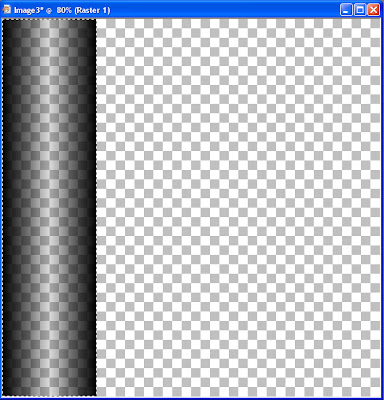
B. Invert the image with Negative Image.


Now the fill is black instead of white.


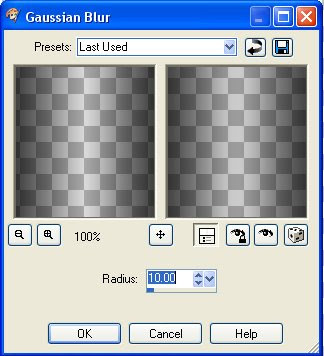
C. Gaussian Blur the selection with the radius set to 10.0.


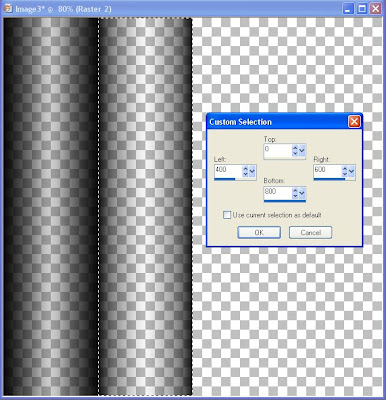
4. Go to Custom Selection and make the next rectangle by increasing left and right by 200. Top and bottom stay the same as before.
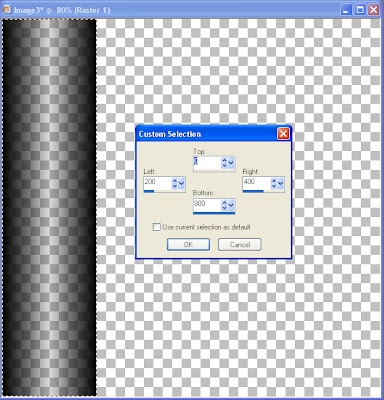
Left = 200
Right = 400
Top = 0
Bottom = 800

4. Fill with the same gradient as before. I am going demonstrate a custom gradient.

Method #2 - Custom Fading Black Gradient

You can make a custom gradient by clicking Edit in the Gradient menu of the Material Properties dialog. Then click new for a new gradient, provide a name, and adjust the sliders.

Select the custom gradient once you have finished making it to your taste and set it to a single repeat. Here are the settings for my custom gradient, Fading Black.

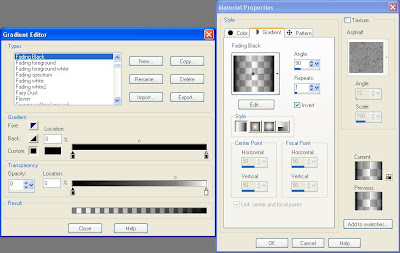
Custom Color = #000000 or Black
Top Diamond Location = 50%
Bottom Diamond Location = 77%
Opacity = 0

5. Gaussian blur the selection with the radius set to 10.

6. Go to Custom Selection and make the next rectangle by increasing left and right by 200. Top and bottom stay the same.


Left = 400
Right = 600
Top = 0
Bottom = 800

7. Fill with the gradient. I am going to demonstrate the Fading foreground.

Method #3 - Fading Foreground

A. Set your foreground color to black, then select the fading foreground gradient. The main difference is that Invert is now unchecked.
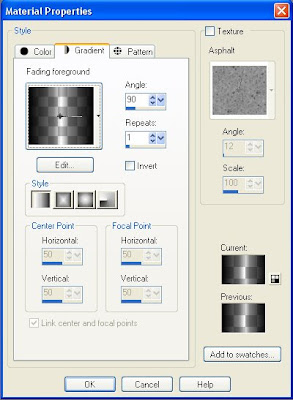
Angle = 90
Repeat = 1
Invert = Unchecked

9. Gaussian blur the selection with the radius set to 10.

10. Make your final custom selection and increase left and right by 200.
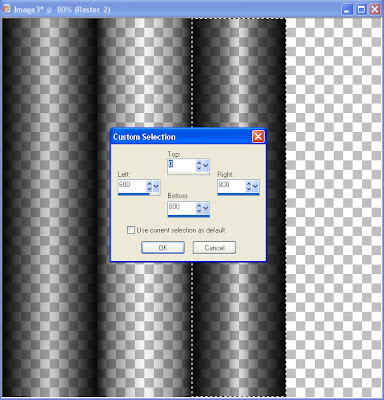

Left = 600
Right = 800
Top = 0
Bottom = 800

11. Fill with the gradient. I am going to demonstrate the Fading Background.

Method #4 - Fading Background

This is similar to the Fading Foreground except you set your foreground color to black, then choose the Fading Foreground gradient from the Materials palette.


12. Gaussian blur the selection wit the radius set to 5.

13. Set the opacity of the layer to 90%.

14. Add a new layer (Raster 2 in this tutorial). Place that layer under the layer with the gradient fills (Raster 1 in this tutorial).


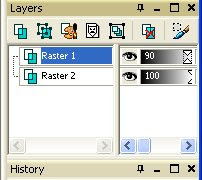
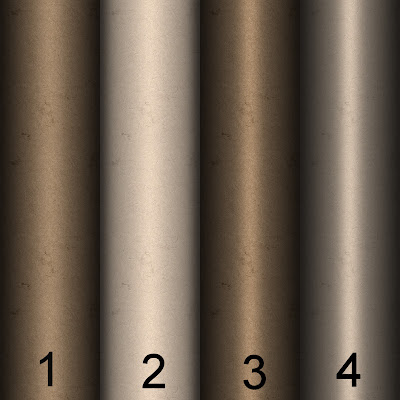
15. Choose the new layer (Raster 2) if it not already selected. The fourth rectangular selection should still be present. Fill it with the paper of your choice by opening your paper and then selecting it as a pattern in the Materials palette.


16. Re-select each of the rectangles using the custom selection and fill with your papers. You can also paste each paper as a separate layer, then move it until it is located under a "roll", but I found it easier to make the custom selection.

Here are the four different methods.


Anything you make with this tutorial is yours to do with as you see fit.

Tuesday, March 17, 2009

St. Patrick's Day Alpha


Here is a green glitter chipboard alpha that is suitable for many different kinds St. Patrick's Day projects and layouts. It is a bit late, but at least St. Patrick's Day isn't over yet.