Donations Welcome

I am currently saving toward a new version of Paint Shop Pro. If you wish to help me out, then please donate.

Larger versions of images can be seen by clicking on the image. Also, thank you for your kind and encouraging comments. I love reading the comments. If you use my any of freebies, I would be overjoyed with a comment containing a link to your item. I love seeing any of my freebies in use.

Tuesday, March 22, 2011

Pretty Frame


I wanted to show off this frame that Chris made using my scalloped frame tutorial.  See, it works with any kind of brush!

Thursday, March 10, 2011

Round Scalloped Frame


I was asked to write a frame tutorial that was "other then the typical square, rectangle ones you always see tutorials for."  I'm not really sure what that means, so I decided to do a round frame.  This tutorial combines my picot ribbon tutorial and my circularize a linear element tutorial to show how to make a round scalloped frame in Paint Shop Pro.

1.  Open up a new canvas that is 3600 pixels wide x150 pixels high.  Select a color, gradient or pattern as your foreground material.

2.  Select the round brush.

Size = 150
Hardness = 100
Step = 100
Density = 100
Thickness = 100
Rotation = 0
Opacity = 100
Blend mode = Normal
Continuous = Unchecked
Wet look paint = Unchecked

3.  Click once on the left side of the canvas.  Try not to go off the edge of the canvas.


4.  Press the shift key and while holding it down, click once on the right side of the canvas.

5.  With the custom selection tool, make a 3600 x 75 pixel selection across the top of the canvas.


6.  Select the Flood Fill Tool and fill the selection with your foreground material.


7.  Ctrl + D to Select None.

8.  Resize the height of the image by 314%.


Width = 100%
Height = 314%
Resample = Bilinear
Maintain original print size = Unchecked
Lock aspect ratio = Unchecked
Resize all layers = Checked

9.  Enlarge the canvas to 3600 x 3600.

Width = 3600
Height = 3600
Placement = Center

10.  Use the Polar Coordinates effect (Effects > Distortion Effect > Polar Coordinates) to turn the linear element into a circular frame.

Rectangular to polar = Checked
Edge mode = Transparent

The benefit of this method versus using a preset shape is that when using a pattern, the pattern will also be wrapped in a circle.  I have demonstrated this effect with a grass pattern.


The frame is now ready for other effects such as shading or bevels.  If you want to duplicate the example in the preview, I applied an Inner Bevel with the following settings:

Bevel = 2
Width = 4
Smoothness = 74
Depth = 13
Ambience = 14
Shininess = 15
Color = White
Angle = 319
Intensity = 35
Elevation = 35

Monday, March 7, 2011

Easy Seamless Damask


I love damask and I've wanted to make damask patterns for a while, but I haven't found the time.  There are a lot of damask brushes available, but I think it is far easier to use a font.  House of Lime has several dingbat fonts which are suitable.  In this tutorial for Paint Shop Pro, I am using Ornamental Decorations and Ornamental Decorations II.

Supplies:

Damask Spacing Template

1.  Open a canvas with a width to height ratio of 1 to 1.375.  My canvas is 1200 x 1650 pixels.

2.  The key to making a good tiling damask is to fill a diamond-shaped space in the center of the canvas.  You can do this by eye, you can make your own diamond-shape, or you can use the template that I have provided. If you use the template, open it instead of a blank canvas.


3.  Select your dingbat font of choice and set it to a large size.  Make sure that 'Create as Vector' is selected. Type out your chosen dingbat.


4.  If the dingbat is too small, then click on one of the solid squares and re-size the vector.


5.  Move the dingbat to the desired location.  I like to start off with a triangular dingbat for the points of the diamond.


6.  Continue typing in characters from the dingbat font, re-sizing and moving them until the center space is filled.


7.  Duplicate the vector layer with all the dingbats (Layers > Duplicate).

8.  Convert the new vector layer to a raster layer (Layers > Convert to Raster Layer).

9.  Center offset the raster layer (Effects > Image Effects > Offset).  If you select the 'Center' option, then Paint Shop Pro will automatically calculate the correct numbers for horizontal and vertical.


Center = Checked
Edge mode = Wrap

10.  Optional.  If you want to be fancy, you can now use a damask border along the diagonal between the pattern.  I used the 'q' from the Ornamental Decorations dingbat and rotated it using the handle.  The key to making the border look seamless is to bring it close to the edge, but not have the dingbat go off the edge of the canvas.


11.  Optional.  Duplicate the layer and Ctrl + M to mirror.


12.  Optional.  Duplicate the layer and Ctrl + I to flip.


13.  Optional.  Duplicate the layer and Ctrl + M to mirror.


14.  Optional.  If you used the template, then hide the template layer.


This creates a seamless damask tile which can be used as an overlay or it can be re-colored and turned into a paper.  Here is mine as an overlay both with and without the optional diagonal borders.


Sunday, March 6, 2011

Bracket Mat in Photoshop


Since I wrote the tutorial on the bracket frame, I thought I would take it one step further and show how to make a mat or journalling tag from the existing frame shape.

Complete steps 1-14 of the bracket frame in Photoshop tutorial.  If people feel it is necessary, I can copy and paste those steps into this tutorial.  Leave a comment if you want me to do this.

15.  With the Magic Wand Tool, select the interior of the frame.  Make sure that 'Contiguous' and 'Sample All Layers' are checked.

Selection Option = New
Tolerance = 32
Anti-alias = Checked
Contiguous = Checked
Sample All Layers = Checked

16.  Increase the size of the selection by 5 (Select > Modify > Expand).


17.  Create a new raster layer (Shift + Ctrl + N).

18.  Use the paint bucket to fill the selection with your existing color.


19.  Ctrl + Shift + E to Merge Visible.

20.  Ctrl + D to Deselect.

21.  The bracket mat shape is now complete.  If you are happy with the color, then you are done.  Otherwise, create a new layer and fill with a color, gradient or pattern of your choice.  Or drag in a paper to form a new layer.


22.  Right-click on the new layer and select 'Create Clipping Mask'.


23.  The new color, gradient or pattern is now clipped to the bracket mat shape and the mat is complete.  Or, add some lines and use it as a journalling tag.

Bracket Frame in Photoshop


This tutorial will show you how to make a bracket frame in Photoshop.

1.  Open up a new canvas.  Mine is 1200 x 1200 pixels.

2.  Select the Text Tool.  Choose your font and color.  I chose Trebuchet.  Choose a large point size for the font.  I chose 250 pt.


3.  Type the Curly bracket ( { ) character.  You may click the check mark to confirm.


4.  Select the Move Tool.  Make sure Show Transform Controls is checked.


5.  Move the bracket to your desired location.  If it wasn't big enough, select one of the squares and drag the curly bracket to increase the size.  If you re-size, don't forget to click the check mark to accept the transformation.


6.  Duplicate the layer by right-clicking on the layer in the layer palette and then selecting 'Duplicate Layer'.


7.  Flip the new layer horizontal (Edit > Transform > Flip Horizontal).


8.  With the Move Tool, move the bracket to the other side of the canvas.


9. Duplicate the layer by right-clicking on the layer in the layer palette and then selecting Duplicate Layer.

10. Rotate the layer 90 degrees clockwise ((Edit > Transform > Rotate 90o CW).


11. With the Move Tool, move the bracket to the bottom of the canvas.


12.  Duplicate the layer.

13.  Flip the new layer vertical (Edit > Transform > Flip Vertical).


14.  With the Move Tool, move the bracket to the top of the canvas.


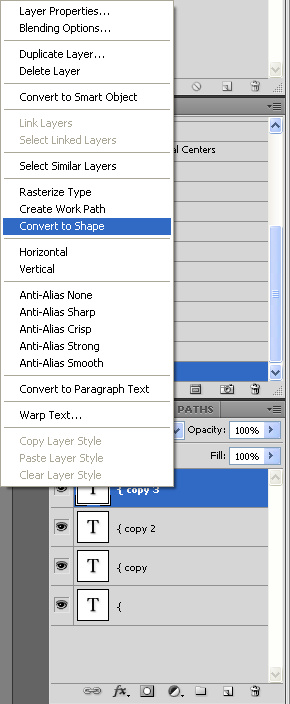
15.  Optional.  If the joins where the brackets meet at the corners is not smooth, it is possible to fix this with the Direct Selection Tool. First, right-click on the layer with the bracket that must be adjusted and select 'Convert to Shape'.


16.  Optional.  Next, select the Direct Selection Tool and double-click on the edge of the bracket shape.  Small open squares should be spaced along the edge of the shape.


17.  Optional.  Select an open square (this is a node) that needs to be moved by clicking on it.  This will turn the square solid.


18.  Optional.  Now drag the node to a more favorable location.


19.  Optional.  Repeat steps 15-18 for all brackets and nodes that need to be moved.

20.  Ctrl + Shift + E to Merge Visible.

21.  The bracket frame shape is now complete.  If you are happy with the color, then you are done.  Otherwise, create a new layer and fill with a color, gradient or pattern of your choice.  Or drag in a paper to form a new layer.

22.  Right-click on the new layer and select 'Create Clipping Mask'.


23.  The new color, gradient or pattern is now clipped to the bracket frame shape and the frame is complete.