
1. Select a Graphic.

2. Obtain the size of the image from the image information window (Shift+I). This image is 173 pixels wide and 172 pixels high.

3. Make a new image by multiplying width by 13 and height by 2. In this instance, I get 2249 x 344.

4. I set my tube as the fill for either the foreground or background color. In this instance, I set it as the background fill.

5. Then fill the new image with the tube using the Flood Fill Tool.

6. Add a new layer and call it Text. You can either add a Raster Layer or a Vector Layer depending on whether you want to add text as Floating or as a Vector. I've chosen a Raster Layer in this tutorial because it is faster and I do not intend to change the color or other properties of the font later.

7. Choose a font and make a letter on each image. I'm using Poptics One at 72 pt.

8. If you don't want to do anything with the letters, then skip to Step 9.
Once all 26 letters have been added, Select All (Ctrl+A) on the text layer, then click on the layer with the selection tool to float all the letters. Now you can apply your text effect with a plug-in or do whatever you like with the letters. I'm going to do my favorite cutout effect.

9. Go to File > Export > Image Slicer.

10. Choose the grid, click the image in the window to use the grid slicer, and set your options with 2 rows and 13 columns. The default type for the image slicer is GIF. You can also save as JPEG and PNG. I've already optimized my gif to have a transparent background. If you change image type after using the grid slicer, the you need to check the apply optimization to whole image to change the image type for every file. If you don't, then it will only do it for one file.
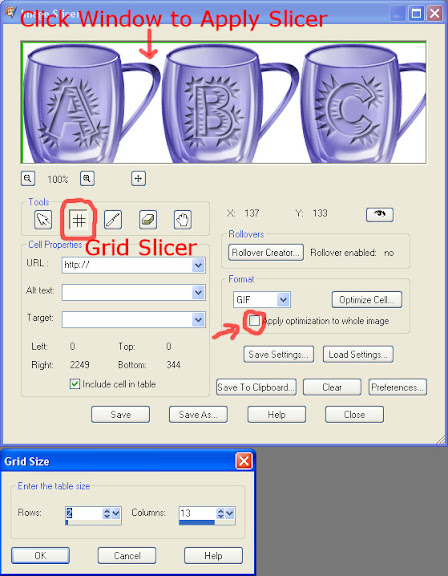
Then select save and enter a filename in whatever directory you want to save the images. I usually default to index.html. The filename doesn't matter because it never gets used. The directory is important because all the images will be written there.

Once you have saved, click close to leave the window.
10. Now all your images are saved in your directory, but they have silly names. You can either rename by hand or use a script. I use a perl script and a batch file to do my renaming.
My perl script is:
#!/usr/local/bin/perl
die "Usage: rename-local.pl from_regexp to_regexp\n" if (@ARGV != 2);
my ($from, $to) = @ARGV;
opendir(DIR, '.') || die "Couldn't opendir: $!\n";
foreach my $filename (grep !/^\.\.?/, readdir(DIR)) {
my $new_name = $filename;
$new_name =~ s/$from/$to/g;
rename($filename, $new_name) unless $filename eq $new_name;
}
closedir(DIR);
And that is it. I like this method because I don't need to buy scripts or actions. ActivePerl is free. Should you choose to use this tutorial, whatever you make is yours to do with as you wish.
Thanks so much for this, I am dying to try my luck at this and hope to show off anything I make or try to make. Norma from WOA
ReplyDeleteWhat a fantastic tutorial, I've just made a lovely alpha in under 10 minutes, thank you so much for sharing :)
ReplyDeleteHow do you use a perl script...???? The rest I get...you lost me at that point. Please explain.
ReplyDeleteNice tutorial though. Thanks
I just did this tutorial and love it...just got stuck on your script ,,,,the ActivePerl...do not know how to use it...can you help out....thanks
ReplyDeleteLydia
Thanks for your great tutorial and you've chosen a lovely design
ReplyDeletethanks heaps cant wait to try this
ReplyDeleteHummie, This was an AWESOME tutorial! I followed your instructions, and LEARNED a NEW TOOL in PSP, thanks to you! That Grid Slicer is awesome!
ReplyDeleteAnyway, I made my alpha so quickly...and even in renaming each letter was not a chore. I name the first letter ie: A, then copy the whole file name except for the A, Paste into the file name of the next letter adding that LETTER instead of the A. and repeated until finished. Didn't take me 30-sec. to do.
TY so much! I will have fun with this one!
BIG HUGZ!