I know there are tons of ric rac tutorials out on the internet, but I wrote this one as a template for showing people how to turn a tutorial into a script.
1. Open a new file, 3600 x 150 with a transparent background.
2. Fill the canvas with a color.
3. Select All (Ctrl + A ).
4. Select a 10 pixel border (Selections > Modify > Select Selection Borders)

Inside = Checked
Anti-alias = Checked
Border width = 10
5. Fill the selection with a color.
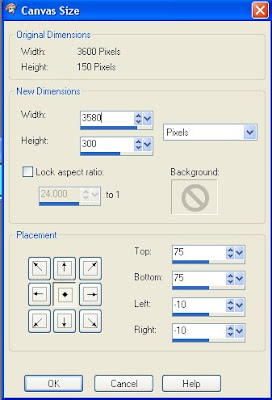
6. Resize Canvas (Image > Canvas Size) to 3580 x 300.

Width = 3580
Height = 300
Canvas Placement = Center
7. Invert Selection (Ctrl + I).
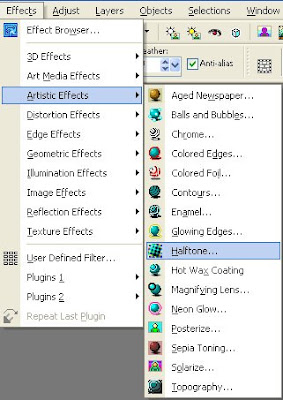
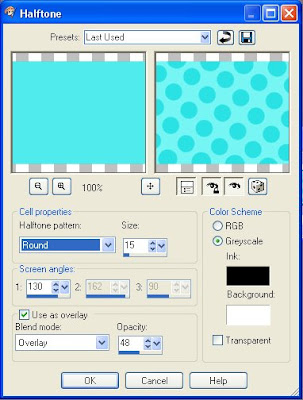
8. Apply the Halftone Effect (Effects > Artistic Effects > Halftone).


Halftone pattern = Round
Size = 15
Screen Angles = 130
Use as overlay = Checked
Blend Mode = Overlay
Opacity = 48
Color Scheme = Greyscale
Ink = Black
Background = White
Transparent = Unchecked
9. Select None (Ctrl + D).
10. Apply the Wave Deformation (Effects > Distortion Effects > Wave).

Horizontal displacement
Amplitude = 0 (by setting to zero, nulls the wavelength value)
Wavelength = 25
Vertical displacement
Amplitude = 20
Wavelength = 12
Edge Mode = Repeat
The ric rac is now complete.

thanks for this i just did it and saved it as a script ..my first try .....jessie
ReplyDeleteThanks, the instructions were great.
ReplyDeleteAliciad47
nice.
ReplyDeleteThanks so much for this tut. It was so much simpler to make with your instructions.
ReplyDelete