
 I'm in a tutorial writing mood, so I'm trying to record the ways that I am making different elements for various kits that I am working on. I often go back and read me own tutorials in order to find settings for effects and plugins so these tutorials are very useful for me. I hope that they are also useful for other people.
This tutorial will show you how to make a swirled brad. Using a larger-sized canvas and different Eye Candy Glass settings, you can create other items, such as lollipops or round hard candies.
Plugins required:
Eye Candy 5 Impact
1. Open a new canvas 400 wide by 200 high.
2. Fill the canvas with a color.
3. Change the canvas size to 400 x 400 with the original canvas at the top.
 Width = 400
Height = 400
Top = 0
Bottom = 200
Left = 0
Right = 0
4. With Match mode set to RGB Value and a Tolerance of 5, fill the bottom half of the canvas with an alternate color.

5. Use the Pattern effect (Effects > Reflection Effects > Pattern) to create alternating stripes.
 Horizontal offset = 0
Vertical offset = 0
Rotation angle = 0
Scale factor = 26
Number of columns = 3
Number of rows = 3
Horizontal shift = 0
Vertical shift = 0
6. Use the Kaleidoscope effect (Effects > Reflection Effects > Kaleidoscope) to create turn the horizontal stripes into a pinwheel.
 Horizontal offset = 0
Vertical offset = 0
Rotation angle = 0
Scale factor = 0
Number of petals = 7
Number of orbits = 0
Radial suction = 100
Edge mode = Repeat
7. The swirl is made using the Twirl effect (Effects > Distortion Effects > Twirl).
 Degrees = -60
8. Go to the selection tool and make sure that Circle is chosen as the Selection type. Click on the center of the swirl and draw out a selection until some of the pinwheel stripes start to narrow.

9. Crop to the selection (Shift + R). This nicely eliminates all the extra parts of the pattern and re-sizes the canvas.

10. To make a three-dimensional brad, use Eye Candy 5 Impact Bevel.
 Basic
BasicBevel Width = 32.00
Bevel Height = 40
Smoothness = 30.00
Round Corners = 0
Bevel Placement = Inside Selection
Darken Deep Areas = 0
Shade Interior = Checked
Surface = None
Lighting
Direction = 270
Inclination = 75
Highlight Brightness = 40
Highlight Size = 75
Highlight Color = White
Shadow Color = #404040
Bevel Profile = Button
11. Add some gloss to the brad with Eye Candy 5 Impact Glass.
 Bevel
BevelBevel Width = 32.0
Bevel Smoothness = 30.0
Round Selection Corners = 0
Bevel Placement = Inside Selection
Glass Color = #c0c0c0
Opacity = 0
Tinting = 8
Refraction = 50
Inner Shadow Opacity = 41
Drop Shadow Opacity = 0
Shadow Offset = 0.0
Shadow Glow = 0
Lighting
Direction = 90
Inclination = 70
Highlight Brightness = 75
Highlight Size = 75
Highlight Color = White
Reflection Map = None
Bevel Profile
Factory Profile = Button
The swirled brad is now complete.
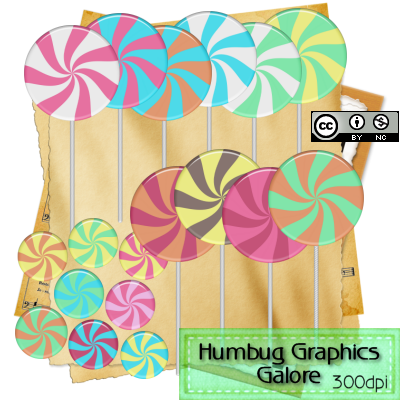
I made some lollipops and brads (or candies) in the colors of my Beach Babies kit. Feel free to use them. Of course, this means that I ended up scripting the tutorial. Is anyone interested in the scripts?
Thanks so much. This is the best swirled brad design I saw in years od psping.
ReplyDeleteThank you, Tron. You make me feel all warm and fuzzy inside.
ReplyDeleteThank you very much!!! Many blessings.
ReplyDeleteWas wondering if you have the Tutorial to make the sticks for the lollipop?? please and thank you for your time!
ReplyDeleteThe lollipop is a script.
ReplyDeletehttp://humbuggraphicsgalore.blogspot.com/2009/08/swirled-lollipop-script.html