Donations Welcome

I am currently saving toward a new version of Paint Shop Pro. If you wish to help me out, then please donate.

Larger versions of images can be seen by clicking on the image. Also, thank you for your kind and encouraging comments. I love reading the comments. If you use my any of freebies, I would be overjoyed with a comment containing a link to your item. I love seeing any of my freebies in use.

Showing posts with label styles. Show all posts

Saturday, June 12, 2010

Glass Leading Styles


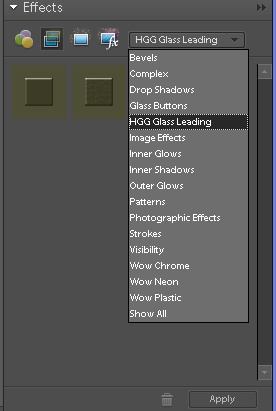
For people who use PSE and have limited style creation options, I have made 2 styles available for creating the leading for stained glass.  One is the smooth leading in my stained glass example.  The other is rougher for those who might want to create old stained glass.  The zip also includes the XML file so that the styles will show up in their own category in PSE.

Installing Styles in Photoshop Elements 7.0

1.  PSE does not make it easy to install styles.  First, you must be able to see hidden folders in order to find the directory for installing the styles.

2. In Windows XP, the style needs to go into the following directory:

C:\Documents and Settings\All Users\Application Data\Adobe\Photoshop Elements\7.0\Photo Creations\layer styles


The Application Data directory is usually hidden so you will not find it if you cannot see hidden folders.  For the purposes of this tutorial, I am using my HGG Glass Leading Styles.


3. To make the style show up as its own entry you must create an XML file for the styles.  The XML file needs to be named .metadata.xml  The name for the ASL file must be identical to the name for the XML file.


4.  The inside of the XML file needs one entry for each style in the .asl file.  I have two styles in my file, so there are two entries.


5.  For the style entry, you need and ID for the style and a name for the style.  The ID should not contain spaces.  It is located before the equal sign.  The name is located after the equal sign.  The name may contain spaces and it is what you see when you hover over the style inside PSE..


6.  To have the style show up in its own category, you need to have a category ID and category name.  The ID should not contain spaces.  It is located before the equal sign.  The name may contain spaces and it is what you see in the styles dropdown menu inside PSE.


7.  To get the styles to show up, the ThumbDatabase.db3 must be deleted prior to starting up PSE.  The ThumbDatabase.db3 file is located in:

C:\Documents and Settings\All Users\Application Data\Adobe\Photoshop Elements\7.0


8.  Start up PSE.  It may take while to rebuild the ThumbDatabase, but eventually, when it finishes, the style will be installed.

Saturday, November 14, 2009

Saving Styles in Photoshop

Since people were interested in my puffy felt style, I thought I would write up how to save an existing set of layer styles.  I am using my puffy felt heart as an example.

1.  Assuming that you have a layer with styles that you want to save, select that layer in the layer palette.


2.  Go to the Styles palette and click either the icon which looks like a folded canvas


or the set of three lines in the upper right hand corner and select New Style in the menu.


3.  A dialog will appear that will ask you to give the style a name. It will also provide a miniscule preview of the style to the left of the name.  Make sure Include Layer Effects is selected.  The Layer Blend for this style is normal, so I chose to leave Layer Blending Options unchecked.  However, if you style uses a blend mode, then select Include Layer Blending Options.


4.  Once you click OK, the style is saved and will appear in your Styles palette.

5.  If you decide that you don't like the name you gave the style, then you can right-click on the style in the Styles palette and then select Rename Style.


Alternative
1.  The other way to save a style is to click New Style in the Layer Style Dialog.


2.  A dialog will appear that will ask you to give the style a name. It will also provide a miniscule preview of the style to the left of the name.  Make sure Include Layer Effects is selected.  The Layer Blend for this style is normal, so I chose to leave Layer Blending Options unchecked.  However, if you style uses a blend mode, then select Include Layer Blending Options.


3.  Once you click OK, the style is saved and will appear in your Styles palette.

Saving Style Sets
I made a set of different puffy felt styles in different colors.  To save all of them as a set, I went into the Preset Manager.

1.  Go to the Style Palette and click on the three lines in the upper right hand corner.


2. Select the Preset Manager.


3.  Select the styles you want to save by clicking on the first one, pressing Shift, then holding the Shift key down and selecting the last style to choose all the styles next to each other.  Or,  press Ctrl, hold it and select individual styles.  Then select Save Set.


4.  A dialog will appear that will ask you to give the style set a name.  Also pick a location for saving.  I save my styles in My Documents > Adobe > Styles.


Here is a set of Puffy Felt styles that people can use with the Stitched Puffy Felt tutorial.  These styles will work best on a white or light-colored object.