
This tutorial was inspired by a discussion on Scrap Stuff with PSP and PS. I learned how to make seamless tiles long before all the different programs and plugins existed for easy tiling. Here is an old-fashioned tutorial for making seamless tile the old-fashioned way. This tutorial uses a glitter picture tube which I have made greyscale so that the end product can be re-colored. The zip contains two glitter picture tubes, one is a single tube which should work perfectly for this tutorial. The second is a tube with 9 separate images for more random glittering. If you use my picture tube, you will need to put the tube in your Picture Tube directory (usually My Documents > My PSP Files > Picture Tubes.
Supplies Required:
Greyscale Glitter Picture Tubes (or your image of choice)
1. Open up a new image. The image for this tutorial is 300 x 300 at 300 dpi.
2. Select the Round Grey Glitter tube for your picture tube. The settings are:

Scale = 100
Step = 200
Placement Mode = Continuous
Selection Mode = Incremental
3. Paint your image with the glitter tube.
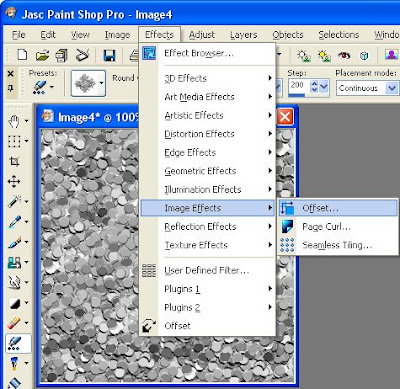
4. When you are done, apply the Offset Effect (Effects > Image Effects > Offset) with the following settings:
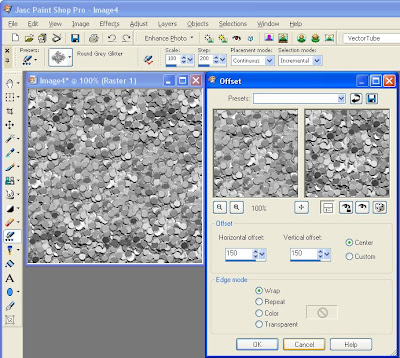
Horizontal offset = 150 (Or 50% the width of your image)
Vertical offset = 150 (Or 50% the height of your image)
Center = checked
Edge Mode = Wrap
NOTE: When you select center, the horizontal and vertical offset numbers will automatically change to be half of your image size.
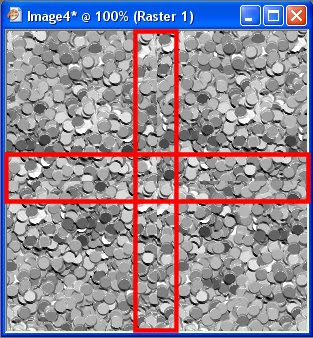
5. Now the edges of the image are in the middle and you should be able to see the ugly seams which I have outlined in red.
6. Turn on your grid (Ctrl + Alt + G) and make sure your grid is set to 10 by 10 pixels (View > Change Grid, Guide & Snap Properties).
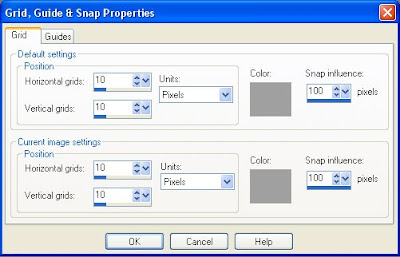
7. I've made my grid yellow so that the contrast between the grid and the grey image is more obvious. With your picture tube, click once about 40 pixels from the center to the right, left, up and down. If you are using a 10 by 10 pixel grid, then this is 4 blocks right, 4 blocks left, 4 blocks up and 4 blocks down. I've circled the location in the image.
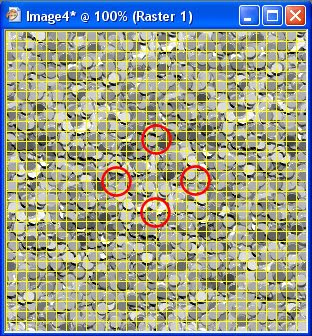
You can see that as you click in each location with the picture tube, the seam is disappearing. If you have an image larger than the sample shown in this tutorial, you may have to click on multiple locations along the seam to cover it all up.
8. If you did not glitter over the edges at the top, bottom, left and right of the image, you are now done. If you did, then you can apply the following correction.
a. Apply the offset effect a second time with the horizontal offset at 50% the width of your image and the vertical offset at 0. To show what happens, I have used a pink glitter tube.
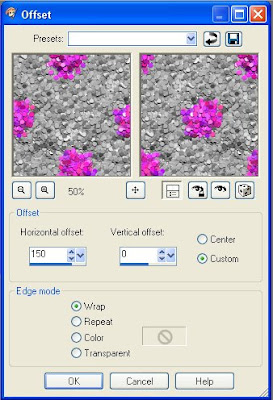
Horizontal = 150 (Or 50% the width of your image)
Vertical = 0
Custom = Checked
Edge Mode = Wrap
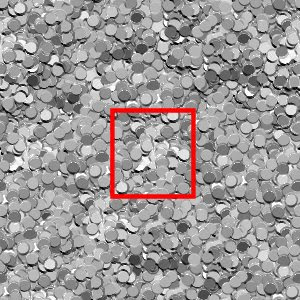
b. Check the middle of your image to see if you can see a seam. A seam might be present if any part of the picture tube went off the edge of the image. If you can see a seam in the middle of the image, click once in the center with the picture tube to cover it up.
c. Apply the offset effect with the original settings (see step 4).
d. Once again check the middle of your image for a seam. If you see one, click once with the glitter tube to cover it up.
9. Finally, you can adjust the color of the greyscale image with Manual Color Correction.

I made this one pink so that people can use it for Valentine's Day. Click on the image to download it.
Anything you make with this tutorial is yours to use as you see fit. The offset effect used in this tutorial is from PSP 9. If you are using an earlier version of PSP, it is possible that the offset effect is a plugin. Thanks to Shawna for finding the location of the offset effect.
Available in PDF.


hehehe, thanks Spencer - these look like chads (did you vote more than once {giggle}?!?!)
ReplyDeleteThank you! Your blog post will be shared on the
ReplyDeleteCU Freebies Only Forum Friday May 8th 2009!
in this topic
Tutorials Your Place to find Commercial Use Scrap Booking Freebies!
Thanks For Sharing your Time and Talent with us!
thx for this wonderful tut!!
ReplyDeleteHi,
ReplyDeleteThis is exactly what I'm looking for!!
I'm so excited. I was about to pay $15 for a set of glitters, but I decided to donate it to you. ~Sallye~
I justlove this tut thank you sweety
ReplyDeletei love this tutorial awesome thanks
ReplyDeleteMuğla
ReplyDeleteBitlis
Karaman
XYHUD
Bayburt
ReplyDeleteKars
Batman
Urfa
İzmir
MVL
Ağrı
ReplyDeleteDiyarbakır
Bolu
Elazığ
Siirt
A8E
Bursa
ReplyDeleteKırşehir
Muş
Mersin
Çanakkale
HİO
Burdur
ReplyDeleteGiresun
Sakarya
Artvin
Mardin
5D7S
Samsun
ReplyDeleteNevşehir
Van
Bartın
Edirne
8RGD
İstanbul
ReplyDeleteSivas
Kırıkkale
Zonguldak
Iğdır
UAM2YV
Aksaray
ReplyDeleteAydın
Kütahya
Rize
Bingöl
04Q
Uşak
ReplyDeleteAnkara
Adıyaman
Hatay
Şırnak
2SPE
elazığ
ReplyDeletetekirdağ
kars
sakarya
antep
YDFR0B
goruntulu show
ReplyDeleteücretli
CFH
malatya evden eve nakliyat
ReplyDeleteartvin evden eve nakliyat
kocaeli evden eve nakliyat
ankara evden eve nakliyat
düzce evden eve nakliyat
ZU5EV
istanbul evden eve nakliyat
ReplyDeletebalıkesir evden eve nakliyat
şırnak evden eve nakliyat
kocaeli evden eve nakliyat
bayburt evden eve nakliyat
OEDLM
ığdır evden eve nakliyat
ReplyDeleteağrı evden eve nakliyat
maraş evden eve nakliyat
diyarbakır evden eve nakliyat
şırnak evden eve nakliyat
QV5B
4FE23
ReplyDeleteÇanakkale Lojistik
İzmir Evden Eve Nakliyat
Kütahya Lojistik
Iğdır Parça Eşya Taşıma
Denizli Parça Eşya Taşıma
A934B
ReplyDeleteYobit Güvenilir mi
Aydın Şehirler Arası Nakliyat
Karaman Evden Eve Nakliyat
Kırklareli Şehir İçi Nakliyat
Yalova Şehirler Arası Nakliyat
Ort Coin Hangi Borsada
Yenimahalle Parke Ustası
Gölbaşı Parke Ustası
Malatya Evden Eve Nakliyat
D4743
ReplyDeleteAdıyaman Şehirler Arası Nakliyat
Ünye Evden Eve Nakliyat
İzmir Evden Eve Nakliyat
Gölbaşı Parke Ustası
İstanbul Şehirler Arası Nakliyat
Eskişehir Evden Eve Nakliyat
Van Şehir İçi Nakliyat
Van Parça Eşya Taşıma
Hatay Lojistik
F7488
ReplyDelete%20 referans kodu
EC9F0
ReplyDeleteburdur yabancı görüntülü sohbet
bursa en iyi görüntülü sohbet uygulaması
ücretsiz görüntülü sohbet uygulamaları
ankara sesli sohbet sitesi
en iyi ücretsiz görüntülü sohbet siteleri
Erzincan Parasız Sohbet
bursa rastgele görüntülü sohbet uygulamaları
eskişehir görüntülü sohbet ücretsiz
tokat rastgele sohbet
828A6
ReplyDeleteshapeshift
pancakeswap
bscpad
pudgy penguins
trezor suite
debank
zkswap
defillama
satoshivm
48B97
ReplyDeleteTarsus
Şenkaya
Pınarhisar
Soma
Borçka
Taşkent
Dikili
Yenişarbademli
Mutki
0A55178DE8
ReplyDeleteücretli show sitesi
شركة صيانة خزانات qniupgo5cJ
ReplyDeleteشركة صيانة افران بالاحساء XPl5IUDvWW
ReplyDeleteشركة تنظيف سجاد بالجبيل fZ8VVZRiu1
ReplyDeleteشركة تنظيف مجالس بخميس مشيط 0xPl9idEvQ
ReplyDeleteشركة تنظيف سجاد بجازان FUUG6dUvtL
ReplyDelete316C1019BD
ReplyDeleteig takipçi
62BAA5AE2F
ReplyDeleteAnadoluslot Güncel Adres
Anadoluslot
Anadoluslot Giriş Adresi
Anadoluslot
Trwin
Trwin Güncel Adres
Trwin Giriş Adresi
Trwin Giriş Adresi
Trwin Yeni Adres
A0804A0094
ReplyDeletetwitter takipçi paketleri
youtube beğeni satın al
türk takipçi
güvenilir takipçi
telafili takipçi