Donations Welcome
I am currently saving toward a new version of Paint Shop Pro. If you wish to help me out, then please donate.
Larger versions of images can be seen by clicking on the image. Also, thank you for your kind and encouraging comments. I love reading the comments. If you use my any of freebies, I would be overjoyed with a comment containing a link to your item. I love seeing any of my freebies in use.
Sunday, October 4, 2009
3D Alphabet
This tutorial will show you how to make a three-dimensional (3D) alphabet.
Supplies:
6x6 Grid Template
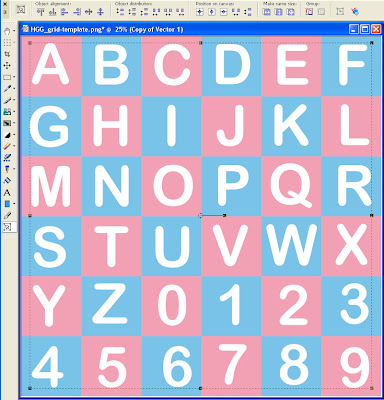
1. Open up the 6x6 grid template. It is 3000 x 3000 pixels and will create 36 500x 500 characters so that you can have 26 letters and 10 numbers. You can also make one letter at a time and not use the grid template. I think it is easier and faster to make all the letters at once.
2. Select a nice font. I am using Arial Rounded MT. As this is a copyright-protected font, I am not providing it. With the text tool, write out your letters and numbers as vectors. Try to position each letter in the middle of a grid square. Choose any color you like. I made mine white as I'm going to turn this into a template.
3. Select None (Ctrl + D) when you are finished.
4. Duplicate the vector layer.
5. Go to the layer palette and expand the duplicate vector layer.
6. Hide the original vector layer.
7. Then go to the Object Selection Tool (or the Pick Tool) and select all the letters.
8. By hiding the original vector layer, when you select, you do not select them. Now either right-click on the background color in the materials palette or right-click on your vector selection and choose Properties. Select a darker color than your original.
If you chose the materials palette:
If you chose the vector properties, change the fill color:
9. Unhide the original layer and move the duplicate layer under the original layer.
10. With the duplicate vector layer still selected, use the Object Selection Tool (or Pick Tool) to move the duplicate vector layer to the right side and up. This creates the 3D look. Shift the letters in different directions to create a variety of dimensions.
11. Turn off the grid, save the file or export it using the image slicer. Here are my letters in pink (so that they would be easier to see).
Then I cut the sheet apart with the image slicer ( File > Export > Image Slicer). For a more detailed explanation on the image slicer, see my Graphic Alphabet tutorial.
For those of you who do not wish to do the tutorial, I have provided 4 templates in PNG and PSD format (for Photoshop users) that can be customized. Here is a sample what you can make by combining letters from the different templates.
Subscribe to:
Post Comments (Atom)


Thank you so much for this Freebie. I want to let you know that I posted a link to your blog in CBH Digital Scrapbooking Freebies, under the Page 2 post on Oct. 05, 2009. Thanks again.
ReplyDeletethank you, especially for providing me psd files should I not be able to figure out the tutorial (not a lot of experience with pse)
ReplyDeleteNeat thanks for this tut
ReplyDeletekool
ReplyDelete