Donations Welcome

I am currently saving toward a new version of Paint Shop Pro. If you wish to help me out, then please donate.

Larger versions of images can be seen by clicking on the image. Also, thank you for your kind and encouraging comments. I love reading the comments. If you use my any of freebies, I would be overjoyed with a comment containing a link to your item. I love seeing any of my freebies in use.

Saturday, December 27, 2008

Engraved Text


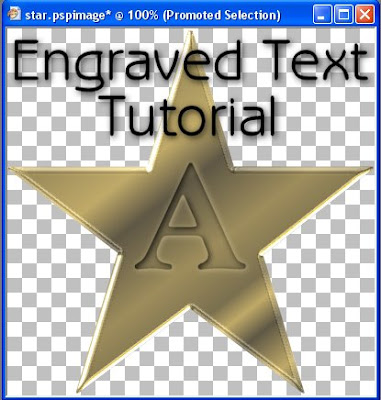
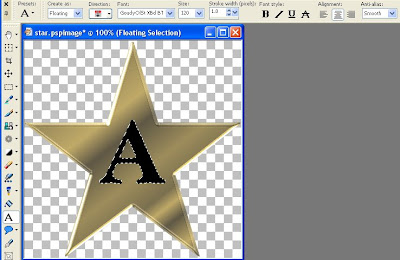
I've been asked how I make my engraved text. So, here is a tutorial for those who are curious.

1. Choose item to engrave and type a letter on it. Make sure that the text is a floating selection. I chose a gold star. The font color does not matter. I chose black because it was easy to see. The floating selection is important because I type the letter, click ok, then move the letter to a better position.


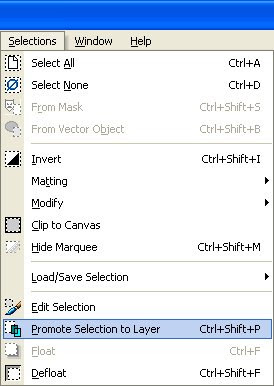
2. De-float the selection (Ctrl+D) or promote the selection to a layer (Ctrl + Shift + P). Either will work. I usually promote the selection.


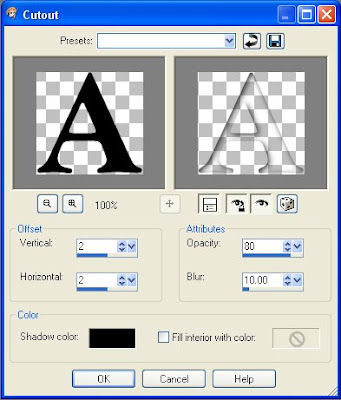
3. Apply the Cutout Effect (Effects > Text Effects > Cutout).

Vertical = 2
Horizontal = 2
Opacity = 80
Blur = 10
Shadow Color = Black
Fill interior with color = unchecked


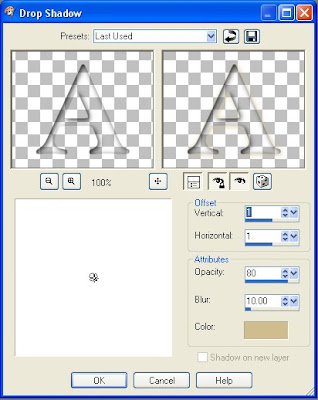
4. Apply a Drop Shadow to make the text really look like it was cut into the object (Effects > Text Effects > Drop Shadow).


Vertical = 1
Horizontal = 1
Opacity = 80
Blur = 10
Color = White

In this case, I chose a light shade of my primary object, but white works for almost any situation. It is important to make the vertical and horizontal offset for the drop shadow 1 pixel less than the vertical and horizontal offset in the cutout.


The example that I used for this tutorial is the day 15 Advent Alpha.

Wednesday, December 24, 2008

Alpha Advent Calendar - Day 24


Here is the final advent alpha. I'm taking a break for a few days and doing holiday things. Actually, I'm not really making this post on the 24th. I discovered that Blogger will let you schedule a post to appear in the future, so I'm writing this two days ahead of time because the 24th is a birthday for someone in my household and I won't have any time on the computer. Present opening and general toy psychosis starts early here.

Tuesday, December 23, 2008

Alpha Advent Calendar - Day 23


Someone suggested a tinsel alphabet. So, I'm crawling the internet trying to get ideas for a tinsel alphabet when I stumble upon glitter tiles by Paper Pixels. I'm a glitter junkie and, apparently, so is Paper Pixels because she is sharing glitter tiles with the helpful hint that if I use Scrap Stuff with PSP's Fuzzy Fiber tutorial, I can make tinsel. I'm still sick, so standing up makes me want to fall over due to over-full sinuses, or I'd be jumping up and down shouting, "Yes, Virginia, there is a Santa Claus!"

So, thanks to Paper Pixels, I am going to be able to finish off this Alpha Advent Calendar. Huzzah!

Monday, December 22, 2008

Alpha Advent Calendar - Day 22

Another suggestion for an alpha was a popcorn garland. I don't know if this looks like a garland. It mostly looks like popcorn. This is a single PNG file instead of a zip of individual images because I feel too ill to chop it up into individual images.

Sunday, December 21, 2008

Alpha Advent Calendar - Day 21


The champagne bottle was another suggestion that I received. It almost didn't happen because I didn't like the first version where I'd drawn in all the letters in bubbles and they looked like creepy disembodied eyes. I wanted to make it look like the letters were floating inside the bottle. I hope I accomplished that.

Saturday, December 20, 2008

Alpha Advent Calendar - Day 20


This is a lower case to go with yesterday's felted Christmas tree upper case. Since I don't normally make a lower case, I'm going to consider this a completely separate Advent alpha offering. It also gets me one day closer to the end of Advent. I have a cold now and my head feels like mush. The last few alphas, if I manage to make them, will not be clever or very good, but I will try to squeeze four more out of my brain. I feel like I'm clicking my way through a digi-scrap marathon except then it should be 26 so that there is one for each mile and that would be even harder.

Friday, December 19, 2008

Alpha Advent Calendar - Day 19


Since I'm out of ideas, I have gone with the suggestion left by Angi and made a felt alpha. Since I don't use Photoshop, I can't make felt the easy way. I've tried to reproduce the Atomic Cupcake Puffy Felt Action in Paint Shop Pro. It isn't quite right. I'm not sure how Atomic Cupcake makes the uneven edges, but this does look sort of like felt and it is sort of puffy. The letters are twice the size of the preview and the felt does look better at full size. I used a template by Digital Blueprint to make the tree.

Thursday, December 18, 2008

Alpha Advent Calendar - Day 18


I feel like I am starting to burn out. An alpha a day is pretty taxing and worst of all, I feel like I am at a loss for good ideas. I am not sure I am going to be able to make six more alphas and finish off Advent.

Tuesday, December 16, 2008

Alpha Advent Calendar - Day 17


Due to weather conditions, it took far longer to get home from work today than usual, so I didn't have much time to play on the computer. So, today's alpha offering isn't very good, but hopefully, I'll have more time tomorrow.

Alpha Advent Calendar - Day 16


I know there is an incongruity with having the star of David in an advent calendar on a christmas tree background, but I was making stars and I'm hoping that a friend of someone who is picking up advent alphas might be able to use this.

Monday, December 15, 2008

Alpha Advent Calendar - Day 15

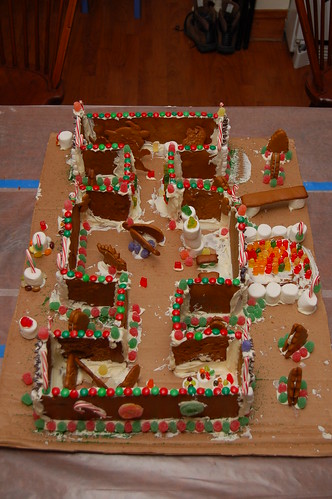
Here is an aerial photo of the gingerbread Field Museum for those of you who were interested. It has no roof so that we could put the exhibits inside. It is approximately 6 inches high x 3 1/2 feet wide x 2 feet deep. We're storing it on an entire kitchen counter while we eat it.


Gingerbread 2008 - Entire Museum Complex


Here is today's advent alpha. I thought people might like a star for the top of their Christmas tree. We put up our tree last weekend and it must be very happy because it is drinking a lot of water.


Sunday, December 14, 2008

Frosted Gingerbread Cookie Tutorial

Someone asked for me to share how I make my cookies. So, I have written up what I did. Though, honestly, a lot of people have cookie tutorials available. This will work with text and with preset shapes. I will demonstrate with a preset shape in this tutorial, but it is the same way that I made the cookie alphas.

1. Open up a new raster image. For this tutorial, I chose 400 x 400 @ 300 dpi. Then select either a font or a preset shape and place it in the new image. Fill the font with a cookie texture or follow my cookie texture instructions in step 2. Scrap Stuff with PSP Tutorials provides cookie textures and an inner bevel setting with her Gingerbread Cookie Tutorial.

a. For text, select as a floating selection then proceed with the cookie texture.
b. For a preset shape, select your shape, set your color, then make sure retain style is unchecked. After setting the shape, select all, then click with the selection tool to float the shape.

2. I used #a57739 as my cookie base, and then applied a texture, but you can fill with a cookie texture or use a Blade Pro Preset. Set #a57739 as your font color or as the color for the preset shape.


3. Then, go to Effects > Texture Effects > Texture and apply the Paper coarse texture which comes with Paint Shop Pro.


Size = 100%
Smoothness = 0
Depth = 1
Ambience = 0
Shininess = 0
Color = White
Angle = 315
Intensity = 50
Elevation = 30

4. Next apply the Inner Bevel to give the cookie some depth. Any Inner Bevel setting you like will work. I used the settings below.


Bevel = 2
Width = 15
Smoothness = 40
Depth = 3
Ambience = 50
Shininess = 10
Color = White
Angle = 315
Intensity = 50
Elevation = 20

3. Make a new Raster Layer. Layers > New Raster Layer. If your cookie is a floating selection, make sure to de-float (Ctrl + Shift + F) prior to making a new layer.

4. Contract the selection by 15. Selections > Modify > Contract > 15.

5. Smooth the selection if your font or preset shape has sharp points. Else, you can skip this step. Selections > Modify > Smooth.


Smoothing amount = 10
Anti-alias = checked

6. Use the flood fill tool and fill the selection with white.


7. Apply a bevel to the frosting. I used Eye Candy Impact 5 Bevel because I wanted something smooth and creamy looking. This is the frosting bevel setting in Eye Candy Impact 5 Bevel.

Bevel
Bevel Width = 34.41
Bevel Height = 27
Bevel Smoothness = 100.00
Round Corners = 0
Bevel Placement = Inside Selection
Darken Deep Ares = 0
Shade Interior = Checked
Surface = None

Lighting
Direction = 111
Inclination = 60
Highlight Brightness = 80
Highlight Size = 50
Highlight Color = White
Shadow Color = #8c8474

Bevel Profile
Factory Profile = Button

8. Select None (Ctrl + D) and apply the Wave Distortion. Effects > Distortion Effects > Wave. If you are using Paint Shop Pro 8 or prior, you will need to reverse the amplitude and wavelength numbers have a different meaning in previous versions.


Horizontal displacement
Amplitude = 1
Wavelength = 36

Vertical displacement
Amplitude = 1
Wavelength = 60

Edge mode = Transparent

9. Then I followed Scrap Stuff with PSP Tutorials instructions on making sprinkles, tubed the sprinkles and used the Picture Tube to paint them over the surface of the cookie.


The results of this tutorial are yours to do with as you please. You can click on the final image to download it as a PNG.

EDIT: I guess some people might want the sprinkles tube. If you want my Christmas Sprinkles tube, it is now available for download. I used them at scale = 15, step = 150, placement mode = random, selection mode = random.
Alpha Advent Calendar - Day 14


Very dull, but here is a white frosted sugar cookie alpha to go with the white frosted gingerbread alpha. This is the end of the digital baking. What passes for holiday baking has been performed in our house. We are now the proud producers of a gingerbread Field Museum, complete with exhibits.

Saturday, December 13, 2008

Alpha Advent Calendar - Day 13

Here is a frosted gingerbread cookie alpha with Christmas-colored sprinkles.

Friday, December 12, 2008

Alpha Advent Calendar - Day 12


I'm still working my way through this sweet section of the alpha advent calendar. There are a few more cookies still to come. I hope people aren't tired of cookies.

Thursday, December 11, 2008

Alpha Advent Calendar - Day 11


I want to thank DigiFreebiesList for posting one of my alphas at Creative Busy Hands Digital Freebies Search List. Here is today's advent alpha. I'm still continuing with the cookies.

Wednesday, December 10, 2008

Alpha Advent Calendar - Day 10


Here is the red frosted sugar cookie with icing. Though, for red, I still like the strawberry icing version from Home Baked Traditions, but I'm a completion-ist and if I make green frosting, then I have to make red frosting or there is something off-kilter with my world.

Tuesday, December 9, 2008

Alpha Advent Calendar - Day 9


I thought I would go back to the pattern for the Home Baked Traditions cookies. Instead of gingerbread cookies, I made frosted and iced sugar cookies. Though, I think I like the apple, strawberry and pecan fillings more than colored frosting. Here is the green frosting version.

Monday, December 8, 2008

Alpha Advent Calendar - Day 8


I'm doing a series of cookie alphabets for the alpha advent calendar. Here is the first one, a gingerbread cookie alpha.

Sunday, December 7, 2008

Alpha Advent Calendar - Day 7


I also thought this glitter was a well-balanced mix of red and green. Now that I've satisfied my urge to make Christmas glitter, I'm going to move on to something else.

Saturday, December 6, 2008

Alpha Advent Calendar - Day 6


I'm trying to get a glitter in red and green that looks nice. This one is better than most of my attempts.

Friday, December 5, 2008

Alpha Advent Calendar - Day 5


I tried out two fills when I was testing out the template. So, I'm sharing both. This fill is a paper by KimB.

Thursday, December 4, 2008

Alpha Advent Calendar - Day 4


I wanted to try Scrapping Cop's snow template and see if it would work with the Image Slicer in Paint Shop Pro. I can now report that no, it won't really work because the template isn't a perfect grid. As a result, the Image Slicer cuts through several of the letters rather than around the letters. So, to slice the template, one will have to use Mega Doodle's Cutter action in Photoshop. I'm sharing the results of my experimentation as part of the Alpha Advent Calendar.

Wednesday, December 3, 2008

Celebrations Add-On


I made this add-on for Celebrations and forgot to post it. Hopefully someone will be interested in using it.

Poinsettia Gold


This is what I made for day 3 of the Alpha Advent Calendar. I've also included the paper that I used for the preview. Also, I'm wondering if anyone actually uses the scrap that I make. Someone left an anonymous comment stating that my graphics were too small. However, I would probably have to pay for 4shared space soon if I went to bigger sizes. I don't ask for anything for any of my freebies. I don't ask for people to leave comments though I do appreciate them, but you do not need to leave a comment. The fact that something is downloaded and the 4shared counter goes up by one is enough for me. So, I've decided that if I cannot find 12 examples of my digital scrap in use, I am not going to increase size. Even though this is the season of giving, it isn't worth it to me to pay more for my hobby to make a single anonymous person on the internet happier with my freebies. I'm not that much of a philanthropist. Sad, but true. Thus, I'm asking that if you have used my digital scrap, please leave a comment with a link showing it to me. Honestly, I don't expect to see a dozen examples, but then, I'm a realist.

Tuesday, December 2, 2008

Alpha Advent Calendar - Day 2


Ok, so these alphas are a little boring, but I'm trying to get into the swing of things and it is a bit of a slow start. Hopefully things will improve.

Monday, December 1, 2008

Alpha Advent Calendar - Day 1


So, I am going to attempt to give away a scrap alpha a day for the 24 days leading up to Christmas Day. I'm calling it my Alpha Advent Calendar. I think I can make an alpha a day whereas I do not think I could make a scrap kit a day. We'll see how it goes. The future is as unknown to me as it is to you.

Sunday, November 30, 2008

Pebble Text Effect

Earlier this year, I read how to create a pebble or stone text effect using Photoshop. I've wanted for months to figure out how to do this in Paint Shop Pro. So, today, I sat down and figured out how to do it in PSP9. The best part is that after several mis-trials using plugins, I managed to figure out a way that didn't need any plugins at all. For some reason, I'm on a tutorial writing kick. I don't know what is wrong with me.

1. Open a new 300 x 300 image. The resolution doesn't matter, but I chose 300 dpi.

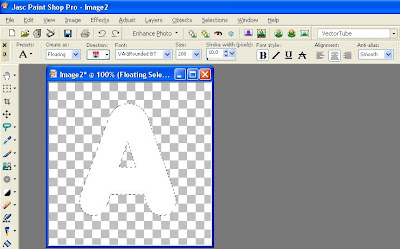
2. Pick a nice fat font and write a letter in white. I couldn't get the font I wanted fat enough, so I added a stroke width of 10.0 to fatten it up at 200pt. I also chose to write the letter as a floating selection. I will de-float it later.


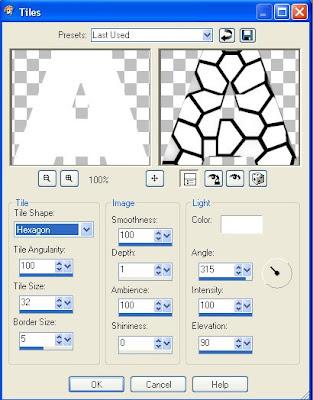
3. Go to Effects > Texture Effects > Tiles. Apply the following settings:


Tile Shape = Hexagon
Tile Angularity = 100
Tile Size = 32
Border Size = 5
Smoothness = 100
Depth = 1
Ambience = 100
Shininess = 0
Color = White
Angle = 315
Intensity = 100
Elevation = 90

If you make your letter larger than I am showing in the tutorial, the increase the tile size and the border size until you get the spacing that you want. This effect replaces the Stained Glass effect in Photoshop.

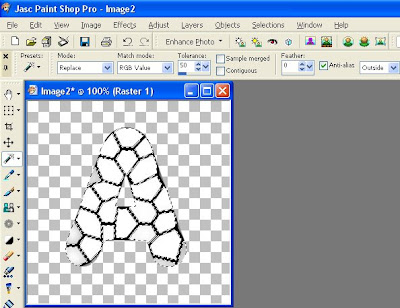
4. Select None (Ctrl+D). If you used the floating selection to write the letter, then it will now de-float. Use the Magic Wand Selection Tool and select the white.


If you use the following settings, then all the non-black areas should be selected.

Mode = Replace
Match Mode = RGB
Tolerance = 50
Sample Merged = Unchecked
Contiguous = Unchecked
Feather = 0
Anti-Alias = Checked and Outside

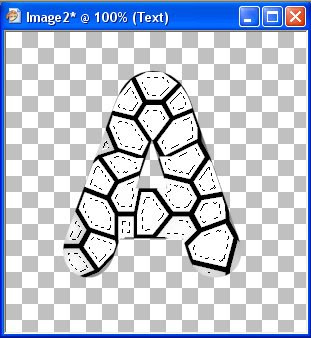
5. Create a New Raster Layer. Now the selection is on the new layer.

6. Contract the selection by 5. Selections > Modify > Contract > 5.


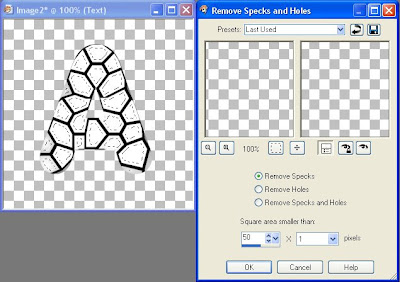
7. Remove the specks and holes so that portions of the letter do not completely disappear in the next step. If you choose to make really large letters, then I suggest skipping this step or all your stones will look like hexagons. Selections > Modify > Remove Specks and Holes.


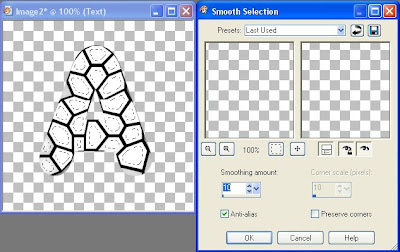
8. Smooth the selection. Selections > Modify > Smooth.


Smoothing amount = 10
Anti-alias = checked
Preserve corners = unchecked

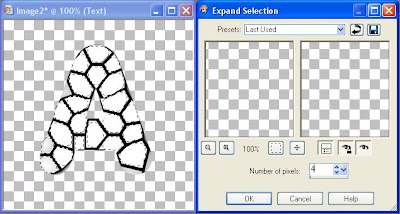
9. Expand the selection by 4. Selections > Modify > Expand > 4.


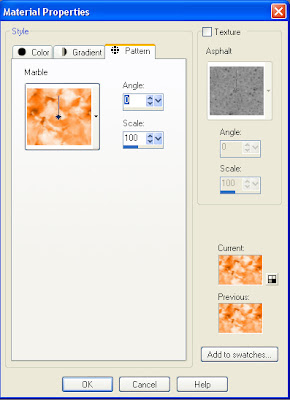
10. Use the Flood Fill tool and fill the selection with a stone-like pattern. I chose the marble pattern that comes with Paint Shop Pro 9 or the Paint Shop Pro 8 Resource Pack. If you don't know where the Flood Fill tool is located, go to my Quick Graphic Alpha tut, step 5.


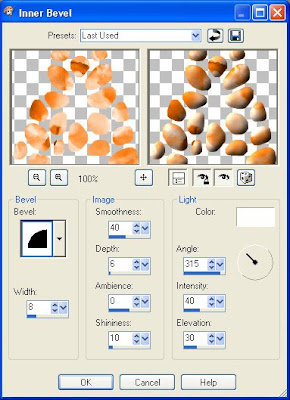
11. Apply the Inner Bevel effect to make it look three-dimensional. Effects > 3D Effects > Inner Bevel.

I used the following settings, but you can do anything which suits the texture you chose.

Bevel = 2
Width = 8
Smoothness = 40
Depth = 6
Ambience = 0
Shininess = 10
Color = White
Angle = 315
Intensity = 40
Elevation = 30

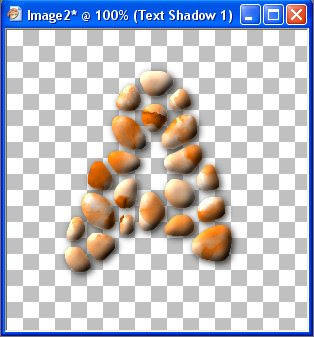
12. Hide or delete your original layer and you are done if you don't want to do anything else. I also added a drop shadow to make the stones stand out more.


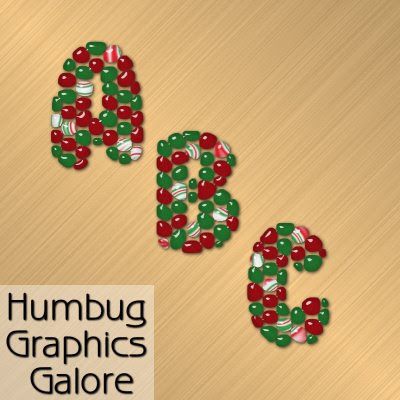
So, if you've read all the way to the end of this tutorial, then I congratulate you on your endurance. I did make an alpha using these steps. I'm not quite sure what to call it. I was trying to create hard candies, but I'm not sure I achieved the right effect. Click on the image to download the alpha.