
This tutorial will show you how to make a script and then modify the script to allow a user to choose their own color, gradient or pattern. I am going to use my
ric rac tutorial to show how a tutorial can easily be converted into a script.
Supplies:
Ric Rac Tutorial1. Have my
Ric Rac Tutorial available (either printed or open in a web browser).
2. Go to the script toolbar (or menu) and press the circle to start recording.
Toolbar  Menu
Menu 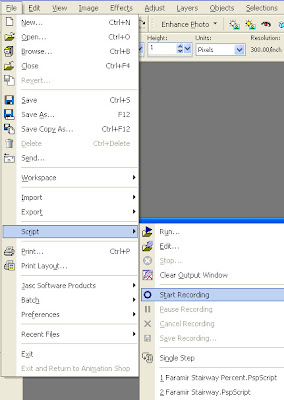
3. Follow the directions in the Ric Rac Tutorial. Do not worry if you make a mistake. If you make a mistake, just undo the action (Ctrl-Z).
4. Once you have finished the tutorial, save the script by going to the script toolbar (or menu) and pressing the disk icon.
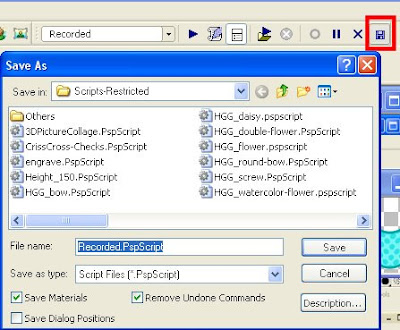
A window will pop up asking you for a name (and location) to save the script. Make sure 'Remove Undone Commands' is checked and 'Save Dialog Positions' is unchecked. To make sure that your script will be identical to the one in this tutorial, make sure 'Save Materials' is checked. You now have a script that will make a ric rac in only one set of colors. If you save the script with 'Save Materials' unchecked, then the script will make a ric rac in your existing foreground and background colors.
5. Now we will edit the script so that the user can select colors. Open up the script editor by clicking the scroll button on the script toolbar.
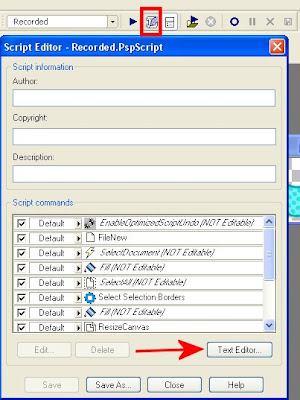
A pop up window for the Script Editor will appear. Go to the bottom and click 'Text Editor.'
6. The text editor is Notepad. In Notepad, the script looks like this:
from JascApp import *

def ScriptProperties():
    return {
        'Author': u'',
        'Copyright': u'',
        'Description': u'',
        'Host': u'Paint Shop Pro 9',
        'Host Version': u'9.01'
        }

def Do(Environment):
    # EnableOptimizedScriptUndo
    App.Do( Environment, 'EnableOptimizedScriptUndo', {
            'GeneralSettings': {
                'ExecutionMode': App.Constants.ExecutionMode.Default,
                'AutoActionMode': App.Constants.AutoActionMode.Match,
                'Version': ((9,0,1),1)
                }
            })

    # FileNew
    App.Do( Environment, 'NewFile', {
            'Width': 3600,
            'Height': 150,
            'ColorDepth': App.Constants.Colordepth.SixteenMillionColor,
            'DimensionUnits': App.Constants.DimensionType.Pixels,
            'ResolutionUnits': App.Constants.ResolutionUnits.PixelsPerIn,
            'Resolution': 300,
            'FillMaterial': {
                'Color': (255,255,255),
                'Pattern': None,
                'Gradient': None,
                'Texture': None,
                'Art': None
                },
            'Transparent': True,
            'LayerType': App.Constants.NewLayerType.Raster,
            'ArtMediaTexture': {
                'Category': u'Art Media',
                'Name': u'Canvas coarse',
                'EnableFill': False,
                'FillColor': (255,255,255)
                },
            'GeneralSettings': {
                'ExecutionMode': App.Constants.ExecutionMode.Default,
                'AutoActionMode': App.Constants.AutoActionMode.Match,
                'Version': ((9,0,1),1)
                }
            })

    # SelectDocument
    App.Do( Environment, 'SelectDocument', {
            'SelectedImage': 0,
            'Strict': False,
            'GeneralSettings': {
                'ExecutionMode': App.Constants.ExecutionMode.Default,
                'AutoActionMode': App.Constants.AutoActionMode.Match,
                'Version': ((9,0,1),1)
                }
            })

    # Fill
    App.Do( Environment, 'Fill', {
            'BlendMode': App.Constants.BlendMode.Normal,
            'MatchMode': App.Constants.MatchMode.None,
            'Material': {
            'Color': (80,235,236),
               'Pattern': None,
               'Gradient': None,
               'Texture': None,
               'Art': None
               },
            'UseForeground': True,
            'Opacity': 100,
            'Point': (1594.5,30.5),
            'SampleMerged': False,
            'Tolerance': 20,
            'GeneralSettings': {
                'ExecutionMode': App.Constants.ExecutionMode.Default,
                'AutoActionMode': App.Constants.AutoActionMode.Match,
                'Version': ((9,0,1),1)
                }
            })

    # SelectAll
    App.Do( Environment, 'SelectAll', {
            'GeneralSettings': {
                'ExecutionMode': App.Constants.ExecutionMode.Default,
                'AutoActionMode': App.Constants.AutoActionMode.Match,
                'Version': ((9,0,1),1)
                }
            })

    # Select Selection Borders
    App.Do( Environment, 'SelectSelectionBorders', {
            'Antialias': True,
            'BordersType': App.Constants.BordersType.Inside,
            'BorderWidth': 10,
            'GeneralSettings': {
                'ExecutionMode': App.Constants.ExecutionMode.Default,
                'AutoActionMode': App.Constants.AutoActionMode.Match,
                'Version': ((9,0,1),1)
                }
            })

    # Fill
    App.Do( Environment, 'Fill', {
            'BlendMode': App.Constants.BlendMode.Normal,
            'MatchMode': App.Constants.MatchMode.None,
            'Material': {
               'Color': (3,166,167),
               'Pattern': None,
               'Gradient': None,
               'Texture': None,
               'Art': None
               },
            'UseForeground': True,
            'Opacity': 100,
            'Point': (1830.5,10.5),
            'SampleMerged': False,
            'Tolerance': 20,
            'GeneralSettings': {
                'ExecutionMode': App.Constants.ExecutionMode.Default,
                'AutoActionMode': App.Constants.AutoActionMode.Match,
                'Version': ((9,0,1),1)
                }
            })

    # ResizeCanvas
    App.Do( Environment, 'ResizeCanvas', {
            'AspectRatio': 24,
            'FillColor': (192,117,0),
            'HoriPlace': App.Constants.HorizontalType.Center,
            'MaintainAspect': False,
            'NewDimUnits': App.Constants.UnitsOfMeasure.Pixels,
            'NewHeight': 300,
            'NewWidth': 3580,
            'PlaceBottom': 75,
            'PlaceLeft': -10,
            'PlaceRight': -10,
            'PlaceTop': 75,
            'VertPlace': App.Constants.VerticalType.Center,
            'GeneralSettings': {
                'ExecutionMode': App.Constants.ExecutionMode.Default,
                'AutoActionMode': App.Constants.AutoActionMode.Match,
                'Version': ((9,0,1),1)
                }
            })

    # SelectInvert
    App.Do( Environment, 'SelectInvert', {
            'GeneralSettings': {
                'ExecutionMode': App.Constants.ExecutionMode.Default,
                'AutoActionMode': App.Constants.AutoActionMode.Match,
                'Version': ((9,0,1),1)
                }
            })

    # Halftone
    App.Do( Environment, 'Halftone', {
            'BackgroundColor': (255,255,255),
            'ColorScheme': App.Constants.ColorScheme.Greyscale,
            'HalftonePattern': App.Constants.HalftonePattern.Round,
            'Overlay': True,
            'OverlayBlendMode': App.Constants.BlendMode.Overlay,
            'OverlayOpacity': 48,
            'PatternColor': (0,0,0),
            'ScreenAngles': (130,162,90),
            'Size': 15,
            'TransparentBackground': False,
            'GeneralSettings': {
                'ExecutionMode': App.Constants.ExecutionMode.Default,
                'AutoActionMode': App.Constants.AutoActionMode.Match,
                'Version': ((9,0,1),1)
                }
            })

    # SelectNone
    App.Do( Environment, 'SelectNone', {
            'GeneralSettings': {
                'ExecutionMode': App.Constants.ExecutionMode.Default,
                'AutoActionMode': App.Constants.AutoActionMode.Match,
                'Version': ((9,0,1),1)
                }
            })

    # Wave
    App.Do( Environment, 'Wave', {
            'HorizontalAmplitude': 0,
            'HorizontalWavelength': 25,
            'VerticalAmplitude': 20,
            'VerticalWavelength': 12,
            'EdgeMode': App.Constants.EdgeMode.Repeat,
            'BackgroundColor': (255,255,255),
            'GeneralSettings': {
                'ExecutionMode': App.Constants.ExecutionMode.Default,
                'AutoActionMode': App.Constants.AutoActionMode.Match,
                'Version': ((9,0,1),1)
                }
            })
7. To make the script compatible with all versions of PSP, if the script was recorded PSP X or higher make sure that the first line of the script says 'from JascApp import *'.
from PSPApp import *  ------> Change to ------> from JascApp import *

def ScriptProperties():
    return {
        'Author': u'',
        'Copyright': u'',
        'Description': u'',
        'Host': u'Paint Shop Pro X',
        'Host Version': u'10.03'
        }
8. We are going to add the Material Picker code snippet to allow for the user to choose their own color, gradient or pattern. The code will make a pop up box on the screen that says, "Choose a color, gradient or pattern." It will have an OK button for the user to click. After the user clicks OK, the Materials palette will display. This is the code snippet:
   Result = App.Do(Environment,'MsgBox',{
       'Buttons':App.Constants.MsgButtons.OK,
       'Icon':App.Constants.MsgIcons.Info,
       'Text':'Choose a color, gradient or pattern.',
       })
   MyFill = App.Do(Environment,'GetMaterial',{
       'IsPrimary':App.Constants.Boolean.true,
       'GeneralSettings': {
       'ExecutionMode':App.Constants.ExecutionMode.Interactive
         }
      })
The code is placed before the fill command, like this:
    # SelectDocument
    App.Do( Environment, 'SelectDocument', {
            'SelectedImage': 0,
            'Strict': False,
            'GeneralSettings': {
                'ExecutionMode': App.Constants.ExecutionMode.Default,
                'AutoActionMode': App.Constants.AutoActionMode.Match,
                'Version': ((9,0,1),1)
                }
            })
    Result = App.Do(Environment,'MsgBox',{
        'Buttons':App.Constants.MsgButtons.OK,
        'Icon':App.Constants.MsgIcons.Info,
        'Text':'Choose a color, gradient or pattern.',
    })
    MyFill = App.Do(Environment,'GetMaterial',{
        'IsPrimary':App.Constants.Boolean.true,
        'GeneralSettings': {
            'ExecutionMode':App.Constants.ExecutionMode.Interactive
        }
    })

    # Fill
    App.Do( Environment, 'Fill', {
            'BlendMode': App.Constants.BlendMode.Normal,
            'MatchMode': App.Constants.MatchMode.None,
            'Material': {
            'Color': (80,235,236),
               'Pattern': None,
               'Gradient': None,
               'Texture': None,
               'Art': None
             },
            'UseForeground': True,
            'Opacity': 100,
            'Point': (1594.5,30.5),
            'SampleMerged': False,
            'Tolerance': 20,
            'GeneralSettings': {
                'ExecutionMode': App.Constants.ExecutionMode.Default,
                'AutoActionMode': App.Constants.AutoActionMode.Match,
                'Version': ((9,0,1),1)
                }
            })
9. Next, we change the Fill command to accept the user's Material by removing all the Material information and replacing it with the variable (MyFill) holding the information from the user's selection from the Materials palette.
    # Fill
    App.Do( Environment, 'Fill', {
            'BlendMode': App.Constants.BlendMode.Normal,
            'MatchMode': App.Constants.MatchMode.None,
            'Material': MyFill,
            'UseForeground': True,
            'Opacity': 100,
            'Point': (1594.5,30.5),
            'SampleMerged': False,
            'Tolerance': 20,
            'GeneralSettings': {
                'ExecutionMode': App.Constants.ExecutionMode.Default,
                'AutoActionMode': App.Constants.AutoActionMode.Match,
                'Version': ((9,0,1),1)
                }
            })
10. Repeat this change for the second color selection.
    # Select Selection Borders
    App.Do( Environment, 'SelectSelectionBorders', {
            'Antialias': True,
            'BordersType': App.Constants.BordersType.Inside,
            'BorderWidth': 10,
            'GeneralSettings': {
                'ExecutionMode': App.Constants.ExecutionMode.Default,
                'AutoActionMode': App.Constants.AutoActionMode.Match,
                'Version': ((9,0,1),1)
                }
            })

    Result = App.Do(Environment,'MsgBox',{
        'Buttons':App.Constants.MsgButtons.OK,
        'Icon':App.Constants.MsgIcons.Info,
        'Text':'Choose a color, gradient or pattern.',
    })
    MyFill = App.Do(Environment,'GetMaterial',{
        'IsPrimary':App.Constants.Boolean.true,
        'GeneralSettings': {
            'ExecutionMode':App.Constants.ExecutionMode.Interactive
        }
    })

    # Fill
    App.Do( Environment, 'Fill', {
            'BlendMode': App.Constants.BlendMode.Normal,
            'MatchMode': App.Constants.MatchMode.None,
            'Material': MyFill,
            'UseForeground': True,
            'Opacity': 100,
            'Point': (1830.5,10.5),
            'SampleMerged': False,
            'Tolerance': 20,
            'GeneralSettings': {
                'ExecutionMode': App.Constants.ExecutionMode.Default,
                'AutoActionMode': App.Constants.AutoActionMode.Match,
                'Version': ((9,0,1),1)
                }
            })
11. To finish off the customization, add a window that will tell the user that the script is complete. At the very end of the script add the following snippet of code:
    Result = App.Do(Environment,'MsgBox',{
        'Buttons':App.Constants.MsgButtons.OK,
        'Icon':App.Constants.MsgIcons.Info,
        'Text':'The script is now complete./n'
               'Thank you for using my script.',
You can modify the phrase however you like. I have indicated below what you can change.
    Result = App.Do(Environment,'MsgBox',{
        'Buttons':App.Constants.MsgButtons.OK,
        'Icon':App.Constants.MsgIcons.Info,
        'Text':'The script is now complete./n'   <----- You can change anything
               'Thank you for using my script.', <----- between the single quotes.
Your modified script is now complete. As blogger appears to enjoy removing the indents in my code, you may
download my final version of the script to compare to your own. Please note that
spacing and the number of spaces (meaning the indentation) in the code is critical. If you have the wrong number of spaces on the left side of your code, then the script will not run.


 Match mode = None


