
Monday, June 3, 2013
4shared is not customer friendly
Some jackass is once again claiming my stuff as their own and my 4shared has been disabled. There does not appear to be anyway to claim that the jackass is making a false claim. Therefore, after this year, I will be leaving 4shared. I am paid up through the year, but after that, all the download links will be dead.


Monday, February 25, 2013
Vintage Photo Corners

The theme for this month at SNL is 'Photography'. It inspired me to create a tutorial on how to make photo corners in Paint Shop Pro.
1. Open up a new canvas 1 inch by 1 inch (300 x 300 pixels).
2. Select the 'Selection' Tool and set the selection type to 'Square'. Draw a square inside the canvas.

Mode = Replace
Feather = 0
Anti-alias = Checked
3. Change the Mode to Remove or press the 'Ctrl' key and hold it down. Select another square down and to the right of the original square.

The selection should now have a square chunk missing from the lower right hand corner.

4. Choose the Freehand Selection Tool and set the selection type to 'Point to point' and the mode to 'Remove' or press and hold the 'Ctrl' key. Click at the bottom left corner. Click again at the top right corner. Now you should have a line that goes diagonally across the canvas from bottom left to top right. Click in the bottom right, then double-click in the bottom left to close the selection.

Mode = Remove
Feather = 0
Smoothing = 0
Anti-alias = Checked
Now the selection should be a triangle with a piece missing from the middle.

5. Expand (Selections > Modify > Expand) the selection 10 pixels.


6. Fill the selection with the color, gradient or pattern of your choice. I chose #B1A34A.

7. Apply an Inner Bevel (Effects > 3D Effects > Inner Bevel) using Bevel 8.

Width = 20
Smoothness = 45
Depth = 1-
Ambience = 0
Shininess = 5
Color = #EEECEC
Angle = 230
Intensity = 40
Elevation = 40
9. Contract (Selections > Modify > Contract) the selection 25 pixels.

10. Apply the same inner bevel but flip the angle 180 degrees.

Bevel = 8
Width = 20
Smoothness = 45
Depth = 1-
Ambience = 0
Shininess = 5
Color = #EEECEC
Angle =50
Intensity = 40
Elevation = 40
11. Expand the selection 10 pixels.

12. Apply a Gaussian Blur to hide the edges of the selection.

13. Apply a Drop Shadow to give the corner some depth.

Horizontal = 5
Opacity = 80
Blur = 10.00
Color = Black
The photo corner is now complete.

Tuesday, January 29, 2013
Fractal and Kaleidoscope 1
I felt like fractals today. Using the Julia World and Kaleidoscope plugins from Mehdi, I made two papers.


Since I made them, I figured I would share them. They are 3600 x 3600, so you can just use a small fragment. You can get them at 4shared as I haven't decided where I might move to at this time, but I am constantly getting messages about connection problems, how my upload failed and I have to try again. I had to try 64 times to get this file up (at least after I started counting). I do not think I will be staying with 4shared.


Since I made them, I figured I would share them. They are 3600 x 3600, so you can just use a small fragment. You can get them at 4shared as I haven't decided where I might move to at this time, but I am constantly getting messages about connection problems, how my upload failed and I have to try again. I had to try 64 times to get this file up (at least after I started counting). I do not think I will be staying with 4shared.
Sunday, January 20, 2013
Snowflake Lace F - Z

I finally got around to making the rest of the letters (F - Z) for the snowflake lace. I am also really unhappy with how 4shared has changed its web interface and I don't know if I want to stay with it. I have not renewed my Premium account at this time.
Saturday, December 1, 2012
Snowflake Lace B - E

I have only managed to find time to make the letters B to E for the start of Worldwide Christmas Scrapbooking Freebies. I will make the rest of the letters available as I finish them.
Thursday, November 29, 2012

Wednesday, November 28, 2012
CMYK to RGB in Photoshop
I accidentally started a new layout as CMYK in Photoshop and didn't realize this mistake until I went to save the element. When an image is CMYK, it isn't possible to save it as a PNG, so I needed to convert it to RGB. It took me a couple clicks to find the right menu to accomplish the conversion from CMYK to RGB, so I thought I would make a note of it on the blog in case I needed to do it again in the future.
1. In the Edit menu, choose 'Convert to Profile'.

2. In the Convert to Profile dialog, choose an RGB profile under Destination Space.

1. In the Edit menu, choose 'Convert to Profile'.

2. In the Convert to Profile dialog, choose an RGB profile under Destination Space.

Snowflake Lace A
I was trying to make lacy letters in a winter theme for the Worldwide Christmas Scrapbooking Freebies. I don't know if I like my attempt. If people like it, then I will release the entire alphabet for the blogtrain. For now, here is the letter A.
How to Default to the Edit Tab in PSP X4
With the computer collapse and construction of a new computer, I have had to switch to PSP X4 and Windows 7. I am very sad about this. First, I cannot seem to run two instances of PSP X4 at the same time, so tutorials are going to be a little slow until I can figure out a better way to take screenshots.
First, some notes as I try to get PSP X4 set up the way I like it. I figured I should record how to make the Edit tab the default workspace in PSP X4 so that it always shows up when I open the program. I hate defaulting into the Manager.
1. When PSP X4 first launches, it defaults into the Manage tab.

2. To keep it from doing this, I first switch to the Edit tab.

3. Next, select General Program Preferences (File > Preferences > General Program Preferences).


5. Click 'OK'. Now the Edit tab will be the default whenever PSP X4 opens.
First, some notes as I try to get PSP X4 set up the way I like it. I figured I should record how to make the Edit tab the default workspace in PSP X4 so that it always shows up when I open the program. I hate defaulting into the Manager.
1. When PSP X4 first launches, it defaults into the Manage tab.

2. To keep it from doing this, I first switch to the Edit tab.

3. Next, select General Program Preferences (File > Preferences > General Program Preferences).

4. Select 'Default Launch Workspace' in the window that opens and click the button next to 'Edit'.

5. Click 'OK'. Now the Edit tab will be the default whenever PSP X4 opens.
Update on Downloading
4shared never responded to my emails, but I had a friend test last month and it would appear that it is possible to download from my 4shared account. So, I am going to try to start posting again. I wish someone had mentioned that they could download from 4shared or that 4shared could have had the courtesy to respond to my emails.
I am also on Google+ if you want to follow me there.
I am also on Google+ if you want to follow me there.
Saturday, July 28, 2012
4shared blocked
Today, someone tried to claim ownership of one of my alphabets and reported the item to 4shared for copyright infringment. I am not sure why this happened as the alphabet in question was made entirely by me and I have all the original, timestamped files that I used to make the alphabet. Until 4shared is willing to believe my signed affidavit, I have been told that downloading of my files has been disabled. I apologize to everyone for the inconvenience.
Wednesday, July 4, 2012
Wire and Alexandrite Heart Alpha

I was asked to make an alexandrite version of this alpha about three months ago. It is definitely far too late for June, but perhaps someone can still use it.
Sunday, July 1, 2012
Temporarily Loading Fonts in Windows 7
Given that I have had to upgrade to Windows 7, I can no longer open a font, minimize it, and have it available for use in Paint Shop Pro. I knew about the small program for temporarily loading a font, but since I had my lovely Windows XP, I didn't have to use it. Alas, those days are over.
For people needing to temporarily load a font (and I have thousands, so I am not installing them), there is a program called Font Load Unload.
1. Download Font Load Unload.
2. Unzip the file to a folder.
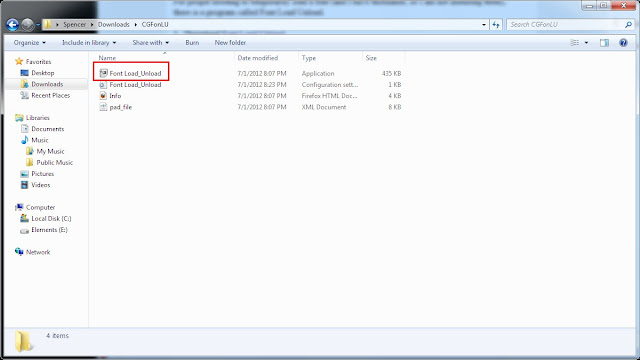
3. Go into the folder and launch (by double-click) the file called 'Font Load_Unload' (or Font Load_Unload.exe if you can see your extensions).
4. Open the folder with the font to be the temporarily loaded.
5. Drag the font to the Font Load_Unload window.

6. This will load the font.

7. When you are done using the font, click the 'Unload' button to remove the font.

8. Or, shutdown Windows and at the next boot, the loaded font will be gone (from the Font Load_Unload window and from Windows).
For people needing to temporarily load a font (and I have thousands, so I am not installing them), there is a program called Font Load Unload.
1. Download Font Load Unload.
2. Unzip the file to a folder.
3. Go into the folder and launch (by double-click) the file called 'Font Load_Unload' (or Font Load_Unload.exe if you can see your extensions).

4. Open the folder with the font to be the temporarily loaded.
5. Drag the font to the Font Load_Unload window.

6. This will load the font.

7. When you are done using the font, click the 'Unload' button to remove the font.

8. Or, shutdown Windows and at the next boot, the loaded font will be gone (from the Font Load_Unload window and from Windows).
Thursday, June 21, 2012
Computer Up, but Internet Down
I have spent the last two weeks building a new computer. It took this long because the original hard drive that I bought was DOA and I had to send it back to Newegg. This took a week. I now have a computer with an operating system and no software. I also do not have functioning internet as the wireless network card that I had with my old computer is not compatible with Windows 7. My installation disk is for Windows XP. I can only have internet if I steal the PowerLine adaptor from my kid's Xbox360.
I am going to try the Atheros driver that appears to show up on Google for the Belkin F5D8001 wireless card. Here are some notes for myself:
1. Go to
http://www.station-drivers.com/page/atheros.htm and download the
Windows Seven 32/64bits driver for the AR5008X.
2. Unzip the file into a folder.
3. Run the setup and install drivers.
4. Open the device manager and select non-functioning ethernet control device (Belkin).
5. Select Update Driver
6. Choose “let me pick from a list of device drivers on my computer”.
7. Choose Qualcomm .
8. Then, select the “Atheros AR5008X Wireless Network Adapter” from list.
9. Get a warning message stating that the driver has a problem because it is not signed.
10. Install it anyways.
11. Reboot.
I am going to try the Atheros driver that appears to show up on Google for the Belkin F5D8001 wireless card. Here are some notes for myself:
1. Go to
http://www.station-drivers.com/page/atheros.htm and download the
Windows Seven 32/64bits driver for the AR5008X.
2. Unzip the file into a folder.
3. Run the setup and install drivers.
4. Open the device manager and select non-functioning ethernet control device (Belkin).
5. Select Update Driver
6. Choose “let me pick from a list of device drivers on my computer”.
7. Choose Qualcomm .
8. Then, select the “Atheros AR5008X Wireless Network Adapter” from list.
9. Get a warning message stating that the driver has a problem because it is not signed.
10. Install it anyways.
11. Reboot.
Tuesday, May 1, 2012
Computer is Dead
I was planning on returning to creating once I developed some free time. Unfortunately, my computer has decided to stop booting so any return to digital creativity is on an indefinite hold.
Tuesday, February 28, 2012
Opal Gemstone

Opal is not a faceted gemstone, but if I didn't make it, then October is without a birthstone. This is it for the series if no other ideas pop into my head.
Monday, February 27, 2012
Customizable Stencil Chipboard

I made this alpha for SNL73. I am posting it because someone request an alpha that they could fill with their own image. It is customizable. Select the white space inside each letter and fill or clip with the paper or image of your choice.
Sunday, February 26, 2012
Sticker Alphabet

This tutorial will show you how to make a paper sticker alphabet in Photoshop.
Supplies:
6x6 Grid Template
1. Open up the 6x6 grid template. It is 3000 x 3000 pixels and will create 36 500x 500 characters so that you can have 26 letters and 10 numbers. You can also make one letter at a time and not use the grid template. I think it is easier and faster to make all the letters at once.
2. Select a nice font. I am using Copse. It is a commercial use ok font from Font Squirrel. With the text tool, write out your letters and numbers as vectors. Try to position each letter in the middle of a grid square. Choose any color you like.

3. With the Move Tool or in the Layer Palette, select all the letters or type layers.

4. In the Layer Palette, right-click the selected layers and choose 'Rasterize Type' from the menu.

5. In the Layer Palette, right-click on the selected layers and select 'Merge Layers' from the menu. This should merge all the letter layers but not the grid template layer.

6. Select the paper of your choice and open it in Photoshop.
7. Drag the paper on top of the layer with the alpha by selecting the Move Tool. Next, left-click on the paper, then while holding down the button, drag it over to the canvas holding the alpha.

8. Right-click on the new layer that is your paper and select 'Create Clipping Mask'.

9. The paper is now clipped to the text.

10. Select the layer with the text and apply a white outer stroke using the Layer Styles (Layer > Layer Style > Stroke) the letters in white.

Position = Outside
Blend Mode = Normal
Opacity = 100%
Fill Type = Color
Color = White (#FFFFFF)
11. Hide the grid template layer by clicking the eye next to the layer and the alphabet is ready to be saved as either a single sheet or sliced into individual files. If you have used my grid template, then you can use my Alpha Cutter Action to slice the image into individual files.

Saturday, February 25, 2012
Just Hatched

I made alphas and some decorative items (grass, chicks and wordart) for SNL 60 and then I forgot to post it last year. There are two zip files, one with all the different alphas and one with the decorative items.
Friday, February 24, 2012
Subscribe to:
Posts (Atom)