Earlier this year, I read how to create a pebble or stone text effect using Photoshop. I've wanted for months to figure out how to do this in Paint Shop Pro. So, today, I sat down and figured out how to do it in PSP9. The best part is that after several mis-trials using plugins, I managed to figure out a way that didn't need any plugins at all. For some reason, I'm on a tutorial writing kick. I don't know what is wrong with me.
1. Open a new 300 x 300 image. The resolution doesn't matter, but I chose 300 dpi.
2. Pick a nice fat font and write a letter in white. I couldn't get the font I wanted fat enough, so I added a stroke width of 10.0 to fatten it up at 200pt. I also chose to write the letter as a floating selection. I will de-float it later.
3. Go to Effects > Texture Effects > Tiles. Apply the following settings:
Tile Shape = Hexagon
Tile Angularity = 100
Tile Size = 32
Border Size = 5
Smoothness = 100
Depth = 1
Ambience = 100
Shininess = 0
Color = White
Angle = 315
Intensity = 100
Elevation = 90
If you make your letter larger than I am showing in the tutorial, the increase the tile size and the border size until you get the spacing that you want. This effect replaces the Stained Glass effect in Photoshop.
4. Select None (Ctrl+D). If you used the floating selection to write the letter, then it will now de-float. Use the Magic Wand Selection Tool and select the white.
If you use the following settings, then all the non-black areas should be selected.
Mode = Replace
Match Mode = RGB
Tolerance = 50
Sample Merged = Unchecked
Contiguous = Unchecked
Feather = 0
Anti-Alias = Checked and Outside
5. Create a New Raster Layer. Now the selection is on the new layer.
6. Contract the selection by 5. Selections > Modify > Contract > 5.
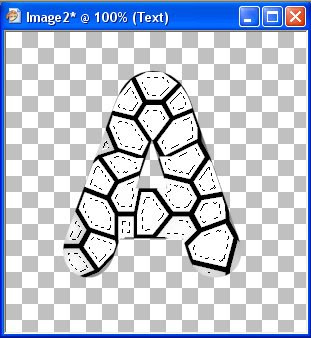
7. Remove the specks and holes so that portions of the letter do not completely disappear in the next step. If you choose to make really large letters, then I suggest skipping this step or all your stones will look like hexagons. Selections > Modify > Remove Specks and Holes.
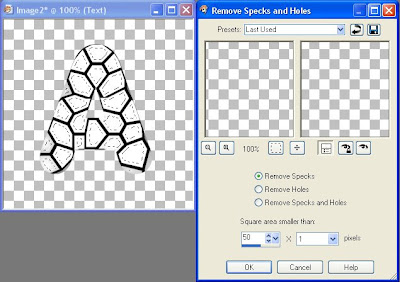
8. Smooth the selection. Selections > Modify > Smooth.
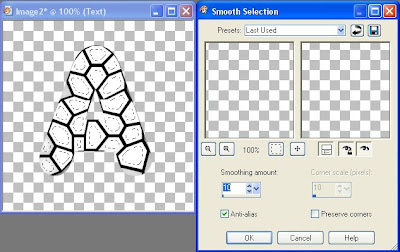
Smoothing amount = 10
Anti-alias = checked
Preserve corners = unchecked
9. Expand the selection by 4. Selections > Modify > Expand > 4.
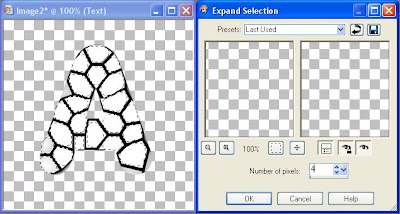
10. Use the Flood Fill tool and fill the selection with a stone-like pattern. I chose the marble pattern that comes with Paint Shop Pro 9 or the Paint Shop Pro 8 Resource Pack. If you don't know where the Flood Fill tool is located, go to my Quick Graphic Alpha tut, step 5.
11. Apply the Inner Bevel effect to make it look three-dimensional. Effects > 3D Effects > Inner Bevel.
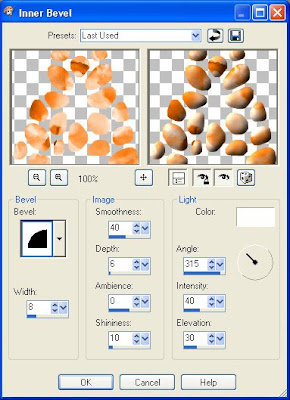
I used the following settings, but you can do anything which suits the texture you chose.
Bevel = 2
Width = 8
Smoothness = 40
Depth = 6
Ambience = 0
Shininess = 10
Color = White
Angle = 315
Intensity = 40
Elevation = 30
12. Hide or delete your original layer and you are done if you don't want to do anything else. I also added a drop shadow to make the stones stand out more.
So, if you've read all the way to the end of this tutorial, then I congratulate you on your endurance. I did make an alpha using these steps. I'm not quite sure what to call it. I was trying to create hard candies, but I'm not sure I achieved the right effect. Click on the image to download the alpha.
Donations Welcome
I am currently saving toward a new version of Paint Shop Pro. If you wish to help me out, then please donate.
Larger versions of images can be seen by clicking on the image. Also, thank you for your kind and encouraging comments. I love reading the comments. If you use my any of freebies, I would be overjoyed with a comment containing a link to your item. I love seeing any of my freebies in use.
Sunday, November 30, 2008
Saturday, November 29, 2008
Celebrations Chipboard Alpha 3
The is the last set of chipboard alphas for Celebrations. It is very hard to type with a cat sitting on your hand, though my entries are generally quite short even when the cat is sitting somewhere else, like the mouse or the keyboard or in front of the monitor.
Friday, November 28, 2008
More Peppermints
I used the peppermints from my tutorial to make a tagger-sized alphabet for all those hardy souls who suffer through my graphic experiments in my alpha group. While making the alpha, I realized that I didn't have enough peppermints. So, I made five more peppermints.
I'm also making the tagger-sized alpha available because I thought it turned out kind of cute. I really didn't like it in the scrap size. I guess there are too many flaws in my peppermints.
Thursday, November 27, 2008
Peppermint Tutorial
I know that there are dozens of peppermint candy tutorials out on the internet, but I don't like any of them because they don't have enough depth for me. So, here is my version of the peppermint.
Supplies Required:
Eye Candy 5 Impact Glass and Extrude Plugins
HGG Peppermint Presets for Glass and Extrude
(Optional)
HGG Peppermint Gradient
Download supplies and 5 peppermints
1. Open up a new image at 400 x 400 with 300 dpi.
2. Flood fill the image with a gradient. I chose to use NGChristmas. It is a Nik gradient. These gradients are from 2001. I have made my collection available as they can no longer be found at the original site.
3. Apply Twirl to the image. Go to the Effects > Distortion Effects > Twirl. Set the Degrees Number to 720.
4. Set the selection tool to circle, left-click the center of your image and while holding down the left button on the mouse, draw out the selection to the edges of the image. I select with anti-alias checked so that I have smooth edges. Now you have the choice of either inverting the selection and clicking delete or copying the selection and pasting it as a new image. I chose to copy the contents of the selection and paste it as a new image.
5. Make sure that nothing is selected (Ctrl+D). Then, change the canvas size to 450 x 450 and choose the center placement.
6. Apply the Eye Candy 5 Impact Extrude effect (most tutorials do not include this step and you can skip if you don't want depth added to the candy). You can either apply the preset or you can set it manually. The settings are:
Extrude Direction = 316
Extrude Distance = 30.0
Taper = 5
Smoothness = 20
Color of Side Faces = Color from Original
Light Direction = 128
Highlight Brightness = 50
Hightlight Color = White
Shadowing = 15
6. Apply the Eye Candy 5 Impact Glass effect which will also soften up the line between the top and side of the peppermint. You can either apply the preset or set it manually. The settings are:
Bevel
Bevel Width = 40.0
Bevel Smoothness = 30.0
Round Selection Corners = 0
Bevel Placement = Inside Selection
Glass Color = #c0c0c0
Opacity = 0
Tinting = 8
Refraction = 50
Inner Shadow Opacity = 41
Drop Shadow Opacity = 0
Shadow Offset = 12.0
Shadow Glow = 2
Lighting
Direction = 125
Inclination = 60
Highlight Brightness = 75
Highlight Size = 75
Highlight Color = White
Reflection Map = None
Bevel Profile
Factory Profile = Button
And that is it for the swirled peppermint.
If you want to make a more traditional peppermint candy, make the following modifications to the tutorial.
A. In step 2, choose the radial pattern for the gradient. You can use my HGG peppermint gradient.
B. Skip step 3.
C. After applying the Eye Candy 5 Impact Extrude plugin, make a circle selection in the center of the candy.
D. Fill the selection with white.
E. Selections > Modify > Expand > 5
F. Selections > Modify > Feather > 15 (Ctrl+H)
G. Adjust > Blur > Gaussian Blur > 5.00
H. Select None (Ctrl+D), then apply the Eye Candy 5 Impact Glass plugin.
The results of this tutorial are yours to do with as you wish.
As this is my contribution to Worldwide Christmas Scrapbooking Freebies, I'm also offering the five peppermints shown in the preview. You can also see all my freebies for this event through the christmas tag.
Wednesday, November 26, 2008
Celebrations Chipboard Alpha 2
Here is the second set of glitter chipboard alphas to go with Celebrations. I've read about people giving away a freebie every day in December until Christmas, sort of a digital advent calendar. I'm pondering trying this, though it seems like a lot of freebies to make. I don't know if I have the ability.
Tuesday, November 25, 2008
Celebrations Chipboard Alpha 1
Since I made the glitter fills for the fireworks, I also used them to make some chipboard alphas as an add-on to the Celebrations kit. There are four alphas in the zip: yellow, cyan, light green and dark green.
Alpha
If you want this alpha in a smaller size or different format, please leave a comment with your request.
Monday, November 24, 2008
Gold Wire and Harvest Beads
I'm not done making Gold Wire alphas. I am still working on the holidays colors request. Here is one in fall harvest or thanksgiving colors. I hope people in the US can use it for Turkey Day. If you want this alpha in a smaller size or different format, please leave a comment with your request.
Sunday, November 23, 2008
Celebrations Elements
Here is the second part of the Celebrations Kit with all the elements. This part includes:
1 bow
22 fireworks
8 frames
7 tags
8 balloon alphabets
8 balloons with strings alphabets
The balloon without string is shown full size. The balloon with string is shown at half size. I don't know why the preview has a white background as the png images are all transparent. For lack of a better reason, I will blame Blogger. Each type comes in all 8 Celebration colors for 16 complete alphas.
Saturday, November 22, 2008
Celebrations Paper Pack Add-On
I don't know that anyone will ever use these papers, but it sure is fun making them. Here is a paper pack add-on for Celebrations.
Tuesday, November 18, 2008
Fireworks Masks
I'm working on part 3 of the Celebrations kit and I needed to make these masks in order to complete the kit. So, I thought I would share them as an add-on to the Celebrations kit.
Fireworks that I made from these masks are included in the Celebrations Elements part of the kit.
Sunday, November 16, 2008
Celebrations
This month's theme at Scrap Kit Challenge is Celebrations. As part of the challenge, each week of the month members work on a different section of the kit. Week 1 is papers. Week 2 is fasteners, notions and photo items. Week 3 is embellishments. Weeks 1 and 2 exceed 10 Mb. As I hate downloading huge files because I always get disconnected in the middle, here is just weeks 1 and 2 of Celebrations.
This section of the kit includes:
17 papers (not all shown in the preview)
14 ribbons
8 bows
8 brads
8 buttons
Kit
The group kit for Home Baked Traditions can now be downloaded at Scrap Kit Challenge. They will only be up for the month of November. After that, they will be gone.
Tuesday, November 11, 2008
Gold Wire and Red-White-Black Beads
The beading is not the same from set to set in this series because I re-apply the beads when I change color. The beading might seem the same, but that is because there are only so many places on the letters where a bead looks good.
Sunday, November 9, 2008
Gold Wire and Red-White-Blue Beads
Veteran's Day is Tuesday. I hope that this alpha might be useful for celebrating Veteran's Day or an upcoming Dutch national holiday. I have also included a beaded star.
Saturday, November 8, 2008
Gold Wire and Christmas Beads
I had multiple requests for different colors of beads, so there will be several alphas in this series. This set has beads in the red, green and white of the Christmas season.
Fast Graphic Alphabet
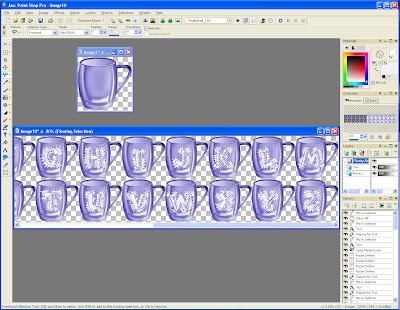
I have been asked several times if I have a tutorial for how I make my alphabets. So, I thought I would try to write down how I make them. My method is different from the other tutorials currently available on making graphic alphabets because I do not save each image individually. I make the alphabets on a grid and then use the Image Slicer utility in Paint Shop Pro to cut them out.
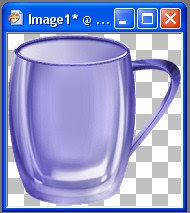
1. Select a Graphic.
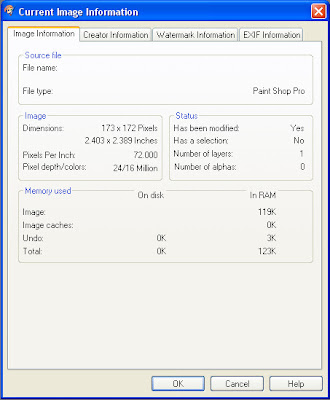
2. Obtain the size of the image from the image information window (Shift+I). This image is 173 pixels wide and 172 pixels high.
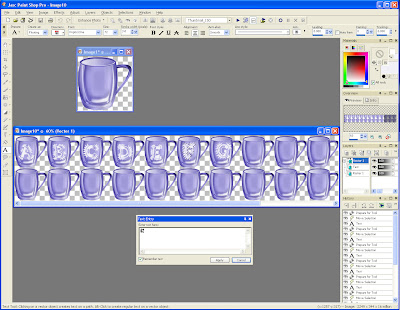
3. Make a new image by multiplying width by 13 and height by 2. In this instance, I get 2249 x 344.
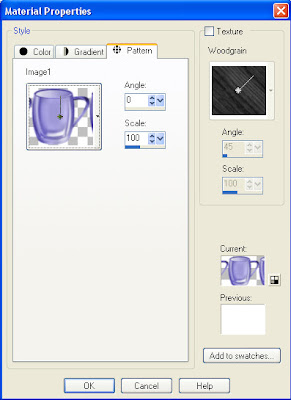
4. I set my tube as the fill for either the foreground or background color. In this instance, I set it as the background fill.
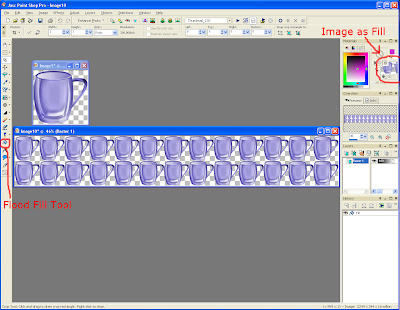
5. Then fill the new image with the tube using the Flood Fill Tool.
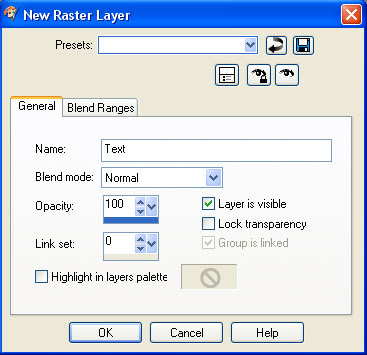
6. Add a new layer and call it Text. You can either add a Raster Layer or a Vector Layer depending on whether you want to add text as Floating or as a Vector. I've chosen a Raster Layer in this tutorial because it is faster and I do not intend to change the color or other properties of the font later.
7. Choose a font and make a letter on each image. I'm using Poptics One at 72 pt.
8. If you don't want to do anything with the letters, then skip to Step 9.
Once all 26 letters have been added, Select All (Ctrl+A) on the text layer, then click on the layer with the selection tool to float all the letters. Now you can apply your text effect with a plug-in or do whatever you like with the letters. I'm going to do my favorite cutout effect.
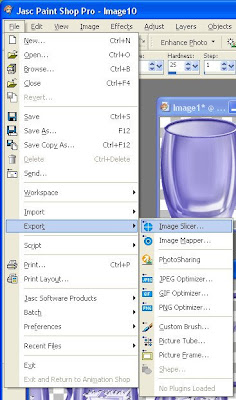
9. Go to File > Export > Image Slicer.
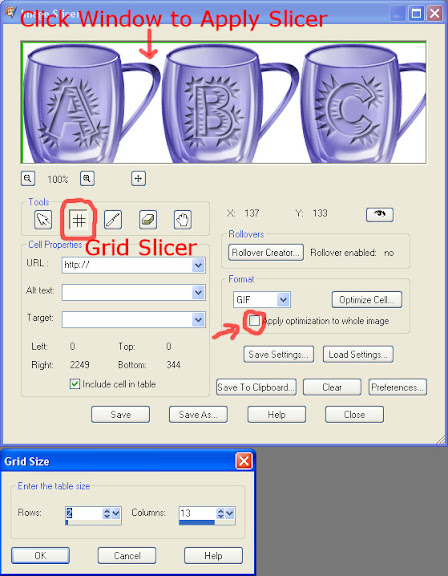
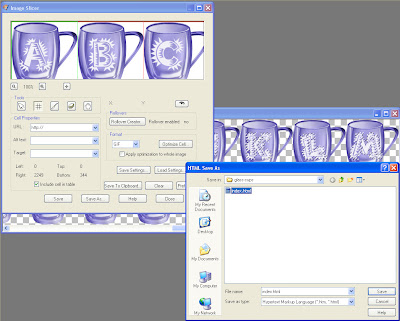
10. Choose the grid, click the image in the window to use the grid slicer, and set your options with 2 rows and 13 columns. The default type for the image slicer is GIF. You can also save as JPEG and PNG. I've already optimized my gif to have a transparent background. If you change image type after using the grid slicer, the you need to check the apply optimization to whole image to change the image type for every file. If you don't, then it will only do it for one file.
Then select save and enter a filename in whatever directory you want to save the images. I usually default to index.html. The filename doesn't matter because it never gets used. The directory is important because all the images will be written there.
Once you have saved, click close to leave the window.
10. Now all your images are saved in your directory, but they have silly names. You can either rename by hand or use a script. I use a perl script and a batch file to do my renaming.
My perl script is:
And that is it. I like this method because I don't need to buy scripts or actions. ActivePerl is free. Should you choose to use this tutorial, whatever you make is yours to do with as you wish.
1. Select a Graphic.
2. Obtain the size of the image from the image information window (Shift+I). This image is 173 pixels wide and 172 pixels high.
3. Make a new image by multiplying width by 13 and height by 2. In this instance, I get 2249 x 344.
4. I set my tube as the fill for either the foreground or background color. In this instance, I set it as the background fill.
5. Then fill the new image with the tube using the Flood Fill Tool.
6. Add a new layer and call it Text. You can either add a Raster Layer or a Vector Layer depending on whether you want to add text as Floating or as a Vector. I've chosen a Raster Layer in this tutorial because it is faster and I do not intend to change the color or other properties of the font later.
7. Choose a font and make a letter on each image. I'm using Poptics One at 72 pt.
8. If you don't want to do anything with the letters, then skip to Step 9.
Once all 26 letters have been added, Select All (Ctrl+A) on the text layer, then click on the layer with the selection tool to float all the letters. Now you can apply your text effect with a plug-in or do whatever you like with the letters. I'm going to do my favorite cutout effect.
9. Go to File > Export > Image Slicer.
10. Choose the grid, click the image in the window to use the grid slicer, and set your options with 2 rows and 13 columns. The default type for the image slicer is GIF. You can also save as JPEG and PNG. I've already optimized my gif to have a transparent background. If you change image type after using the grid slicer, the you need to check the apply optimization to whole image to change the image type for every file. If you don't, then it will only do it for one file.
Then select save and enter a filename in whatever directory you want to save the images. I usually default to index.html. The filename doesn't matter because it never gets used. The directory is important because all the images will be written there.
Once you have saved, click close to leave the window.
10. Now all your images are saved in your directory, but they have silly names. You can either rename by hand or use a script. I use a perl script and a batch file to do my renaming.
My perl script is:
#!/usr/local/bin/perl
die "Usage: rename-local.pl from_regexp to_regexp\n" if (@ARGV != 2);
my ($from, $to) = @ARGV;
opendir(DIR, '.') || die "Couldn't opendir: $!\n";
foreach my $filename (grep !/^\.\.?/, readdir(DIR)) {
my $new_name = $filename;
$new_name =~ s/$from/$to/g;
rename($filename, $new_name) unless $filename eq $new_name;
}
closedir(DIR);
And that is it. I like this method because I don't need to buy scripts or actions. ActivePerl is free. Should you choose to use this tutorial, whatever you make is yours to do with as you wish.
Friday, November 7, 2008
Gold Wire and Beads
I know that a lot of people make these wire and bead embellishments, but I don't see a lot of alphas in this style. I've been looking for a good font for this alpha for several weeks. Many fonts are too slanted for my taste. I thought this one was rather nice.
Monday, November 3, 2008
Campaign Overload
I made this alpha for two reasons. 1) I wanted to celebrate the end of the campaign season. I know that November 4th is supposed to be a historical moment for the US, but at the moment, I'm tired of hearing the ads and news coverage. This has been the longest presidential campaign season in my memory and I hope that the 2012 presidential run is not as long. I like politics, but even too much candy is a bad thing. 2) I wanted to make a brad into an alpha. So, this is the result. I'm still really bad with scrap elements. Whenever I see one, I can only think that it would make a great alpha. The plain brad is also in the zip file in case people want to make buttons.
I apologize to anyone who visits this blog from overseas. Hopefully my next offering will be less US-centric.
Subscribe to:
Posts (Atom)