Donations Welcome

I am currently saving toward a new version of Paint Shop Pro. If you wish to help me out, then please donate.

Larger versions of images can be seen by clicking on the image. Also, thank you for your kind and encouraging comments. I love reading the comments. If you use my any of freebies, I would be overjoyed with a comment containing a link to your item. I love seeing any of my freebies in use.

Friday, May 28, 2010

Purple Pansy


The theme for SNL61 was Berry Blossoms.  I ended up with pansies and no berries.  This is the kit that I made for SNL61.  It comes with:

  • 2 papers
  • 1 frame
  • 3 bows
  • 2 journalling tags
  • 4 pansy flowers
  • 3 leaves
  • 1 glitter sprinkle
  • 2 overlays
  • 1 pansy bouquet cluster

There is actually 2 more elements included in this kit than I had in my original submission to SNL because I thought of the additional elements afterwards.

Wednesday, May 26, 2010

Mirrored Mitered Corners Frame


So, the original version of the script was not what the person was looking for.  The mitered corners need to be mirrors of each other across the cut.  Therefore, I've modified the original script to mirror the mitered corners.  I have not had this script tested, but I am 99% confident that it should work in all versions of PSP from 9 on up.  Please leave a comment if it doesn't.

Saturday, May 22, 2010

Purple Pansy Quick Page


For SNL61, I made a kit called Purple Pansy.  Here is a quick page using elements from that kit.  I hope that people can use it.  I am currently re-working my SNL58 kit which has a vintage flavor.  Hopefully, I'll have it done and available soon.

Thursday, May 20, 2010

Circularize Script


The previous circular frame script did not fulfill the request.  I made this script while working on a script to circularize an existing paper.  Though that script is still incomplete, I have made this circularize script which may work with papers, but I haven't tested it yet.  If you do not wish to use the script, you can follow my tutorial on how to circularize an element.

This script will take any linear element (ribbon, lace, wordart, string of beads, etc) and turn it into a circular element.  The script should check for orientation of the element.  Though the script works best if your linear element has its widest part going from left to right.  It has been tested and works in all versions of PSP 9 and up.  Please leave a comment if you have a problem with this script.

Wednesday, May 19, 2010

Temporarily Making Fonts Available for Photoshop

One great reason to use Paint Shop Pro is that fonts do not need to be installed into Windows for you to use them in the program.  Instead, you can simple open the font with Windows Font Viewer (then minimize the window) and Paint Shop Pro will recognize the existence of the font and make it available for use with the Type Tool.  The same flexibility is not available for Photoshop.  In addition, I have read that many people believe that you need to install a font in order for it to be used with the Type Tool in Photoshop.  This is not true.  This tutorial will show you how to make a font temporarily available for Photoshop and you do not need to install the font.

1.  Before you start Photoshop, open the font with Windows Font Viewer.


2.  Start Photoshop.

3.  Once Photoshop has loaded, the font will be visible in the Type Tool dropdown list.


4.  Here is one final tip,  if you have forgotten to open the font before starting Photoshop, but you HAVE NOT USED THE TYPE TOOL, then you can still open the font with the Windows Font Viewer and make it show up in the Type Tool dropdown list.  The first time you use the Type Tool, Photoshop loads all the fonts in the system and these will be the only fonts it recognizes until you close the program.

ADDENDUM:  This tip will not work in Windows 7.  Because of the new Font Management system in Windows 7, you need to open the font with a Font Managing Program (not Windows Font Viewer) to make it show up for PSP and PS.

Tuesday, May 18, 2010

Circularize a Linear Element


This tutorial will show you how to take a linear element such as ribbon, lace, beads on a string, or text and wrap it into a circle without distorting the original item.  I wrote this tutorial while working a script request.  Therefore, this tutorial is for Paint Shop Pro.

1.  Open up your linear element with the long axis going from left to right.


2.  Resize your element by increasing the width and height times Π (pi = 3.14159).  My element is 3600 pixels wide.  So 3600 pixels *  Π = 11304 pixels. My height is 300 pixels.  300 *  Π = 565

Width = 11304
Height = 565
Resample = Bilinear
Maintain original print size = Unchecked
Lock aspect ratio = Checked
Resize all layers = Checked

3.  Resize the element again.  This time decrease only the width back to the original size.  The new dimensions of my elements are now 3600 wide and 565 high.

Width = 3600
Height = 565
Resample = Bilinear
Maintain original print size = Unchecked
Lock aspect ratio = Unchecked
Resize all layers = Checked

4.  Increase the canvas size so that the height matches the width of your element.  Select the center placement for the element.

Width = 3600
Height = 3600
Placement = Center

5.  Apply the polar coordinates distortion (Effects > Distortion Effects > Polar Coordinates).  The circular element is now complete.


Rectangular to Polar = Checked
Edge mode = Transparent

Sunday, May 16, 2010

Rectangular Frame Script


This is the companion to the elliptical frame script.  This script takes any size paper and turns it into a rectangular or square frame the same size as the original paper.  I have not had this script tested, but it is a modification of the elliptical frame script so I am 99% confident that it should work in all versions of PSP from 9 and up.  Please leave a comment if this script does not work for you.

Saturday, May 15, 2010

Embossed Paper


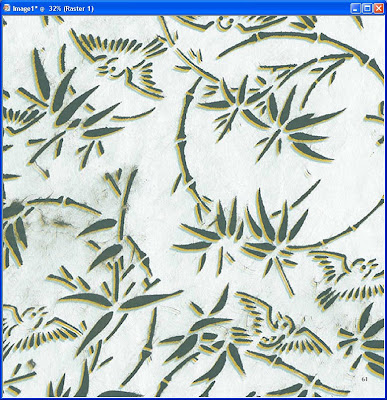
A member of my tutorial group asked whether or not the embossed paper tutorial for PSE could be used with Paint Shop Pro.  PSP does not have an equivalent to the Texturizer effect.  The closest would be the Texture effect, but this creates softer bevels when used for embossing.  This tutorial covers a slightly different technique for taking an existing image and use it to emboss a paper.

1.  Open up your paper.  I'm using one of the papers from my unryu paper pack.


2.  Open up your pattern.  I'm using a Chinese stencil design from Dover.  (Optional) If your pattern has transparent sections, then flatten the image.


3.  Convert the pattern to greyscale.


4.  Copy the pattern and paste it as a new layer over your paper (Ctrl + L).


5.  Apply the emboss effect to the pattern layer (Effects > Texture Effects > Emboss).


6.  Change the blend mode of the pattern layer to overlay.


7.  Here is the embossed paper.  The contrast of the pattern may be too slight.


The contrast can be improved by either increasing the contrast, for example by increasing the contrast by 50.


Or, the pattern layer can be duplicated several times.  Here is the paper after the pattern layer has been duplicated 3 times.

Friday, May 14, 2010

Elliptical Frame Script


This script was a request.  It takes any size paper and turns it into either a round or an oval frame.  The frame will be the same size as the original paper.  I am still working on the script that will turn any paper into a square or rectangular frame.

Monday, May 10, 2010

Embossed Paper


The original request was for a tutorial that would show how to emboss paper in Photoshop Elements.  As one of my group members has recently sent me PSE 7, I can now take screenshots in that program.  So, here we go.

1.  Open a new canvas for your paper.  PSE has a preset called Scrapbooking which will open up at 3600 x 3600 pixel paper at 300 dpi.  I think that is very nice.


2.  Fill your canvas with a color of your choice.  I used Edit > Fill Layer and then selected color.


3.  This will cause a palette to appear and you can choose a color.


4.  Go to the effects menu, make sure filters are selected and select Texture from the dropdown menu.


5.  Choose the Texturizer effect.


6.  Click Apply.  This will bring up the Texturizer menu.


7.  There are 4 default textures available in the Texturizer menu.  To use a non-default texture, click the triangle to bring up the Load Texture menu.


8.  Click Load Texture.


9.  PSE will now bring up a file window where you can select a custom texture file.  The texture file must be in PSD format.  I saved the Japanese peony vector that I made in my tracing images in Illustrator tutorial as a PSD file.  Select your file and click OK.


10.  This will apply the texture at the default settings.  Scale changes the size of the embossing texture.  Texturizer will automatically wrap the texture.  Change the scale to your desired size.  I changed mine to 100%


11.  Relief changes the depth of the emboss.  I left mine at the default of 20.

12.  Light changes the direction of the light.  I changed mine to Top Left.


13.  Invert flips the emboss so that the peaks are valleys and vice versa.


Here is the final image.

Mitered Corner Frame Script


This script will allow you to take any size ribbon and turn it into a square frame with mitered corners.  It should not matter what type of image you start with.  The script will check for transparency.  Testers have been able to use this script with lace and ric rac.

Sunday, May 9, 2010

Frame with Mitered Corners


The original request for this tutorial was how to make a frame with mitered corners out of a ribbon.

1.  Open your ribbon.  I'm using an image that is 3600 pixels wide and 300 pixels high.

2.  Rotate the image 45 degrees to the left.

Direction = Left
Free = 45
All Layers = Checked

3.  Crop the image in a rectangle to cut off a triangle on the right side of the image.


4.  Rotate the 90 degrees clockwise.


5.  Crop the image in a rectangle to cut off a triangle on the left side of the image.


6.  Rotate the image 45 degrees to the left.

Direction = Left
Free = 45
All Layers = Checked

7.  Select All (Ctrl + A).

8.  Float the Selection (Ctrl + F).

9.  De-float the Selection (Ctrl + Shift + F).  This creates an anti-aliased selection.

10.  Crop to the selection.


11.  Increase your canvas size so that the sides are all the length of the ribbon.  In my case, this is 3601 pixels.  Make sure that the placement of the re-sized object is at the top of the canvas.

Width = 3601
Height = 3601
Top = 0
Bottom = 3298
Left = 0
Right = 0

12.  Apply an inner bevel to the frame so that the mitered edge will be visible.

Bevel = 1
Width = 12
Smoothness = 16
Depth = 4
Ambience = 0
Shininess = 0
Color = White
Angle = 315
Intensity = 50
Elevation = 30

13.  Duplicate the layer (Layers > Duplicate).

14.  Flip the layer (Ctrl + I).


15.  Mirror the layer (Ctrl + M).


16.  Merge the two layers.  I used Merge Down (Layers > Merge > Merge Down).

17.  Duplicate the layer (Layers > Duplicate).

18.  Rotate the image 90 degrees.


The frame is now complete.  Here is the completed frame.