Donations Welcome

I am currently saving toward a new version of Paint Shop Pro. If you wish to help me out, then please donate.

Larger versions of images can be seen by clicking on the image. Also, thank you for your kind and encouraging comments. I love reading the comments. If you use my any of freebies, I would be overjoyed with a comment containing a link to your item. I love seeing any of my freebies in use.

Thursday, July 29, 2010

Teardrop

This tutorial will show you how to draw a vector teardrop using Paint Shop Pro.

1.  Open a new image the size of your desired teardrop.  Select Vector Background under Image Characteristics to start off with a vector layer.


2.  Select the Ellipse Tool.


3.  Set the foreground to transparent and the background to the desired color of your teardrop.


4.  Draw out an perpendicular oval.  Show Nodes should be checked.

Mode = Draw Ellipse
Show Nodes = Checked

5.  Select the Pen tool.


6.  Right-click on the oval and select Convert to Path.


7.  Right-click on the node at the top of the oval.  Go to Node Type and select Line Before.


8.  Right-click on the node at the top of the oval a second time.  Go to Node Type and select Line After.  The point of the teardrop has now been created.


9.  Left-click the node on the left side of the oval and drag it down toward the bottom of the image.


10. Left-click the node on the right side of the oval and drag it down toward the bottom of the image.  The teardrop is now complete.

Watermelon Alpha


So, after using it for a year, I've decided that the rainbow that I use in the corner of my previews is too big.  I don't know what I would replace it with, though.  Anyways, here is an alpha that I made before the beginning of the conference.

Sunday, July 25, 2010

Psychedelic Pebble Town


I am at a research conference this week and unable to work on tutorials.  The cutter action is going to need a tutorial to go along with it because it isn't as straight forward as I would like.  I don't know how the people who sell actions do their cutter actions, but I feel that mine will need a tutorial to get the most out of the action.  So, it will have to wait until the conference is over.

Also, 4shared seems to have increased the wait time for downloads on free accounts.  If anyone wants to help me get a Premium account so that everyone can download my freebies without waiting, then please donate.  For now, here is a chipboard alpha.

Monday, July 19, 2010

Chunk Alpha


I've been working on re-making the PSD format of my 3D alpha templates to use layer masks so that it is easier to add papers to them.  I also changed the way I did the 3D part because I wanted it to look more three-dimensional and experimented with some papers to see if the result would look nice. I'm also experimenting with an alpha cutter action for Photoshop.  I am sharing the alphas today.  There are four separate alphas, one for each template. 

Sunday, July 18, 2010

Friday, July 16, 2010

Psychedelic Organic Plasma


I've been working on this series of "psychedelic" chipboard alphas for about two years now and I keep coming back to them.  I can't decide if I should post them here or on the new alpha blog that  I started last year.

Sequins Action


Here is an action that makes sequins. It follows the steps in my tutorial but allows the user to choose the color of the sequin.  It should work in PSE as there aren't any Photoshop-specific commands, but I have not tested it in PSE yet.  I did not want to abuse the members of my group by asking them to test this action, therefore it has not been tested in other versions of Photoshop.  If this action works for you in PSE or other versions of Photoshop, please leave a comment.

Thursday, July 15, 2010

Sequins


This tutorial will show you how to make sequins in Photoshop.  This technique will also work in Photoshop Elements eventhough the screenshots are taken in Photoshop.  If it is too confusing for PSE users, leave a comment and I will make PSE screenshots.

1.  Open up a new canvas.  Mine is 300 x 300 pixels at 300 dpi for a 1 inch sequin.

2.  Select the ellipse tool.  Click the triangle button next to the shape tool on the toolbar to make the ellipse options menu appear.  Select Fixed Size and make the width and height the same as the size of your canvas.  Make sure From Center is checked.  Click the color box at the right hand side of the toolbar and select the color for your sequin.


3.  Click the center of your canvas.  It may be necessary to enable rulers to find the exact center.  A perfect circle will appear.


4.  Select the polygon tool.  Make sure that sides are set to 6.


5.  Draw out the hexagon so that the left side and the right side have a point.


6.  Change the color of the hexagon so that it can be seen more easily by clicking the color box on the right side of the toolbar.  The exact color does not matter as this hexagon will be deleted later.


7.  Select the line tool.  Set the weight to 2 pixels.


8.  Draw a line horizontally across the circle so that it passes through two points of the hexagon.  The line needs to touch each edge of the circle. 


9.  Duplicate the layer with the line (Layer > Duplicate Layer).

10.  Rotate the layer using Transform Path (Edit > Transform Path > Rotate).


11.  Set the rotation angle to 60 and accept the transformation.


12.  Repeat steps 9-11 to create a third rotated line.  In making the third line, duplicate the current layer with the line.  There is no need to change layers to the original layer with the line.


13.  There should be five layers in the layers palette.  The top line layer should be the active, selected layer.


14.  Press the shift key and click the layer with the hexagon.  This should select all the layers except the one with the circle.

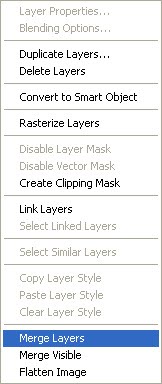
15.  Right-click on the layers palette to make the layers menu appear and select Merge Layers or Ctrl + E.


16.  Load the transparency of the current layer as a new selection (Select > Load Selection).


17.  Select the layer with the circle.

18.  Duplicate the layer.

19.  Convert the new shape layer to a raster layer.


20.  Subtract the transparent region of this layer from the existing selection.


21.  Right click on the layer and select Delete Layer as it is no longer needed.


22.  Create a new layer to hold the selections for the Facets.


23.  Fill the selection with 50% grey so that the facets are easy to select.


24.  Ctrl + D to deselect.

25.  Select the magic wand.  Make sure that Contiguous is checked and Sample All Layers is checked in the toolbar.


26.  Select the top and bottom facets.


27.  Create a new adjustment layer for brightness and contrast.


28.  Set the brightness to +25.


29.  Select the facet counterclockwise to the top facet and the one diagonal.


30.  Create a new brightness/contrast adjustment layer and set the brightness to +50.


31.  Select the last set of facets and create a new brightness/contrast layer.  Set the brightness to -25.


32.  Click the eye next to the hexagon layer and the facets layer (or delete them) to hide them as they are not needed anymore.


33.  Convert the layer with the circle to a raster layer.

34.  Select the elliptical marquee tool and draw out a circle in the center of the sequin.


35.  Press the delete key to make a hole in the sequin.  The sequin is now complete.

Wednesday, July 14, 2010

Adding a Color Picker Pop-Up to Actions

The color picker pop-up appears if the Fill command is used from the Edit menu.  To have this menu item in an action, you can either:

1.  Record the action with the Fill command and then skip to step 6.

2.  Or, Insert the Fill command with the Insert Menu Item from the Actions menu (read the original message box tutorial if you have problems finding the actions menu) by first clicking "Insert Menu Item" after opening up the actions menu.


3.  A pop-up will appear stating that you need to select a menu item with the mouse.


4.  Click the Edit menu and select Fill.


5.  The pop up will now change to show that the Fill command has been selected.  Click OK to insert the step into your action.


6.  Select the step before the Fill command.

7.  Select Insert Stop from the Actions menu.


8.  In the pop-up box that appears, write a message for the user.  Make sure that Allow Continue is checked.


This will cause the following message to show up when the action is run. 


When the user selects continue, then the Fill pop-up will appear and by selecting color in the dropdown menu, the color picker palette will appear and it will be possible to choose a color.