PSP Keyboard Shortcuts | |
Keyboard Shortcut | Action |
A | Freehand Selection tool ("Lasso") |
B | Paintbrush tool |
D | Deform tool |
E | Erase tool |
F | Fill Flood tool |
G | Zoom (“Magnifying Glass") |
I | Draw tool |
J | Arrow tool |
K | Scratch Remover tool |
M | Magic Wand tool |
N | Clone Brush tool |
Q | Vector Object Selection tool |
R | Crop tool |
S | Selection tool |
U | Airbrush tool |
V | Mover tool |
W | Overview window |
X | Text tool |
Y | Dropper tool |
C | Hide/Restore Color Palette |
H | Hide/Restore Histogram |
L | Hide/Restore Layer Palette |
O | Hide/Restore Tool Options palette |
P | Hide/Restore Tool Palette |
T | Hide/Restore Toolbar |
Tab | Hide/Restore floating palettes |
Del | Clear canvas/layer |
Spacebar | Step through tools |
.(period) | Picture Tube |
,(comma) | Color Replacer |
Shift+A | Full Screen Edit |
Shift+B | Brightness/Contrast |
Shift+C | Start Capture |
Shift+D | Duplicate Window |
Shift+E | Equalize(Histogram function) |
Shift+G | Gamma Correction |
Shift+H | Hue/Saturation/Lightness |
Shift+I | Current Image Information |
Shift+K | Invert Mask |
Shift+L | Colorize |
Shift+M | Highlight/Midtone/Shadow |
Shift+O | Load Palette |
Shift+P | Edit color Palette |
Shift+R | Crop to Selection |
Shift+S | Resize Image |
Shift+T | Stretch (Histogram function) |
Shift+U | Red/Green/Blue |
Shift+V | View Palette Transparency |
Shift+W | New Window |
Shift+Y | Hide All(Mask) |
Shift+Z | Posterize |
Shift+right arrow | Move selection right |
Shift+left arrow | Move selection left |
Shift+up arrow | Move selection up |
Shift+down arrow | Move selection down |
Ctrl+right arrow | Move selection right |
Ctrl+left arrow | Move selection left |
Ctrl+up arrow | Move selection up |
Ctrl+down arrow | Move selection down |
Ctrl+Shift+right arrow | Move selection right 10 pixels |
Ctrl+Shift+left arrow | Move selection left 10 pixels |
Ctrl+Shift+up arrow | Move selection up 10 pixels |
Ctrl+Shift+down arrow | Move selection down 10 pixels |
Ctrl+A | Select All |
Ctrl+B | Browse |
Ctrl+C | Copy |
Ctrl+D | Deselect (Select none) |
Ctrl+E | Paste as New Selection |
Ctrl+F | Float Selection |
Ctrl+G | Paste as New Vector Selection |
Ctrl+H | Feather Selection |
Ctrl+I | Flip Image |
Ctrl+K | Edit Mask |
Ctrl+L | Paste as New Layer |
Ctrl+M | Mirror |
Ctrl+N | New file |
Ctrl+O | Open file |
Ctrl+P | Print |
Ctrl+R | Rotate Image |
Ctrl+S | Save file |
Ctrl+T | Set Transparent Color |
Ctrl+V | Paste as New Image |
Ctrl+W | Fit to Window |
Ctrl+X | Cut |
Ctrl+Y | Repeat |
Ctrl+Z | Undo |
Ctrl+(layer number) | Select as Current Layer |
Ctrl+Alt+G | Toggle Grid |
Ctrl+Alt+N | Normal Viewing |
Ctrl+Alt+R | Toggle Rulers |
Ctrl+Alt+V | View Mask |
Ctrl+Alt+Z | Redo |
Ctrl+F12 | Save Copy As |
Ctrl+Del | Delete file |
Shift+Ctrl+A | Full Screen Preview |
Shift+Ctrl+B | Create Selection from a Vector Object |
Shift+Ctrl+C | Copy Merged Layers |
Shift+Ctrl+E | Paste as Transparent Selection |
Shift+Ctrl+F | Defloat Selection |
Shift+Ctrl+H | Histogram Adjustment |
Shift+Ctrl+I | Invert Selection |
Shift+Ctrl+L | Paste Into Selection |
Shift+Ctrl+M | Hide Selection Marquee |
Shift+Ctrl+P | Promote Selection to Layer |
Shift+Ctrl+S | Create Selection from Mask |
Shift+Ctrl+T | View All Tools and Windows |
Shift+Ctrl+V | Transparent Color (Selection) |
Shift+Ctrl+Z | Command History |
Shift+Ctrl+1 | Decrease Color Depth-2 Colors |
Shift+Ctrl+2 | Decrease Color Depth-16 Colors |
Shift+Ctrl+3 | Decrease Color Depth-256 Colors |
Shift+Ctrl+4 | Decrease Color Depth-32K Colors |
Shift+Ctrl+5 | Decrease Color Depth-64K Colors |
Shift+Ctrl+6 | Decrease Color Depth-X Colors |
Shift+Ctrl+8 | Increase Color Depth-16 Colors |
Shift+Ctrl+9 | Increase Color Depth-256 Colors |
Shift+Ctrl+0 | Increase Color Depth-16.7M Colors |
Shift+Alt+D | Delete Workspace |
Shift+Alt+L | Open Workspace |
Shift+Alt+R | Toggle Ruler |
Shift+Alt+S | Save Workspace |
F5 | Cycle through palette tools |
F9 | Cycle through active image, Tool options window and Histogram window |
F12 | Save As |
Ctrl+F12 | Save Copy As |
Node Edit Keyboard Shortcuts | |
Keyboard Shortcut | Action |
Del | Delete |
F5 | Refresh |
Ctrl+A | Select All |
Ctrl+B | Line Before (Node Type) |
Ctrl+C | Copy |
Ctrl+D | Select None |
Ctrl+E | Toggle between Edit and Drawing modes |
Ctrl+F | Line After (Node Type) |
Ctrl+J | Join selected nodes |
Ctrl+K | Break the curve |
Ctrl+L | Convert to Line (Node Type) |
Ctrl+M | Merge |
Ctrl+Q | Quit Node Edit |
Ctrl+R | Reverse Contour |
Ctrl+S | Symmetric (Node Type) |
Ctrl+T | Smooth/Tangent (Node Type) |
Ctrl+V | Paste |
Ctrl+X | Cusp (Node Type) |
Ctrl+Z | Undo |
Shift+Ctrl+C | Close the curve |
Shift+Ctrl+R | Reverse Path |
Shift+Ctrl+S | Asymmetric (Node Type) |
Ctrl+Alt+Z | Redo |
Ctrl+1 | Curve Before (Node Type) |
Ctrl+2 | Curve After (Node Type) |
Browser Keyboard Shortcuts | |
Keyboard Shortcut | Action |
Ctrl+A | Select All |
Ctrl+B | Go to new folder |
Ctrl+D | Select None |
Ctrl+F | Find file |
Ctrl+M | Move selected image(s) |
Ctrl+P | Print |
Ctrl+R | Rename selected image |
Ctrl+W | Fit window to thumbnails |
Ctrl+Y | Copy selected image(s) |
Ctrl+Del | Delete selected image(s) |
Alt+F3 | Find file |
F3 | Repeat Find |
F5 | Update Thumbnails |
Ctrl+F5 | Refresh Tree |
Shift+Tab | Next pane |
F6 | Next pane |
Shift+F6 | Previous pane |
Shift+I | Image Information |
Alt+Enter | Image Information |
Enter | Open selected image(s) |
Shift+A | Full Screen Edit |

Monday, September 8, 2008
PSP Keyboard Shortcuts


Saturday, September 6, 2008
From X to X1 - Brushes
Here is a compilation of file name changes from PSP X to X1 for the brushes that come with the program.
All shapes starting at Corel_11_038 and increasing in number are not included in PSP 9, may not be in PSP 10 and are not listed here. Images are courtesy of Deb of DeBee DeZines.
| PSP 9/X | PSP X1/X2 | |
|---|---|---|
| Brushes | ||
| +Default | Corel_01_001 |  |
| +Round 05 | Corel_01_002 | |
| +Round 10 | Corel_01_003 | |
| +Round 25 | Corel_01_004 | |
| +Round 50 | Corel_01_005 | |
| +Square 01 | Corel_01_006 | |
| +Square 05 | Corel_01_007 | |
| +Square 10 | Corel_01_008 | |
| +Square 25 | Corel_01_009 | |
| +Square 50 | Corel_01_010 | |
| Line horizontal | Corel_01_011 | |
| Line left | Corel_01_012 | |
| Line Right | Corel_01_013 | |
| Line vertical | Corel_01_014 | |
| Artistic | ||
| Crosshatch | Corel_01_015 |  |
| Curl | Not Included | |
| Rake fading | Corel_01_017 | |
| Rake hard | Corel_01_018 | |
| Spiky twirl large | Corel_01_019 | |
| Spiky twirl medium | Corel_01_020 | |
| Spiky twirl small | Corel_01_021 | |
| Star points | Corel_01_022 | |
| Surreal | Corel_01_023 | |
| Twirly star | Corel_01_024 | |
| X | Corel_01_025 | |
| Media Brushes | ||
| Calligraphy | Corel_01_026 |  |
| Fuzz soft | Corel_01_025 | |
| Marble1 | Corel_01_028 | |
| Marble2 | Corel_01_029 | |
| Marble3 | Corel_01_030 | |
| Marble4 | Corel_01_031 | |
| Smoke puff | Corel_01_032 | |
| Smoke wisp large | Corel_01_033 | |
| Smoke wisp medium | Corel_01_034 | |
| Smoke wisp small | Corel_01_035 | |
| Wavey | Corel_01_036 | |
All shapes starting at Corel_11_038 and increasing in number are not included in PSP 9, may not be in PSP 10 and are not listed here. Images are courtesy of Deb of DeBee DeZines.
Wednesday, August 27, 2008
Troubleshooting Scripts
These are screenshots of common problems that occur when using scripts in Paint Shop Pro. I have assembled screenshots that I use when helping people.
Problem A - JascApp vs. PSPApp
A common problem with PSP scripts is version compliance. Scripts written in PSP 8 and PSP 9 use a module called JascApp. Scripts after PSP X use a module called PSPApp. When a PSP X or higher script is placed in the Scripts-Restricted folder and used in PSP 8 or 9, it will produce an error "This script has attempted an operation that is not permitted in a restricted script. This script may be run by moving it to a trusted directory."
 When the script is moved to the Scripts-Trusted directory and the person tries to use it, another error is produced, "This script could not be loaded."
 This error can be easily fixed by changing the PSPApp module to the JascApp module. This is steps 5, 6 and 7 in my Color Customization tutorial.
Problem B - Case Sensitivity
Paint Shop Pro scripts use the Python interpreter. This means that Paint Shop Pro scripts are case-sensitive. You will also get Problem A if you use some variation of Jasc like jasc or JASC or even jASC.

Problem C - Editor Problems
Sometimes, in foreign versions of Paint Shop Pro (like Dutch, Swedish and German), after the script has been editted in Notepad, it will not run. In some languages, Notepad will leave strange characters in the script file that will prevent it from working in PSP. The solution to this problem is to change the default Script Editor in Paint Shop Pro to WordPad.
The Script Editor is located in File > Preferences > File Locations. In the dialog on the left-hand side, find Python Source Editor and click on it.
 Change the executable pathfrom "C:\WINDOWS\NOTEPAD.EXE" to "C:\Program Files\Windows NT\Accessories\wordpad.exe"
Once the default editor has been changed to WordPad, the user needs to remember to save the script files as text.

Problem A - JascApp vs. PSPApp
A common problem with PSP scripts is version compliance. Scripts written in PSP 8 and PSP 9 use a module called JascApp. Scripts after PSP X use a module called PSPApp. When a PSP X or higher script is placed in the Scripts-Restricted folder and used in PSP 8 or 9, it will produce an error "This script has attempted an operation that is not permitted in a restricted script. This script may be run by moving it to a trusted directory."
 When the script is moved to the Scripts-Trusted directory and the person tries to use it, another error is produced, "This script could not be loaded."
 This error can be easily fixed by changing the PSPApp module to the JascApp module. This is steps 5, 6 and 7 in my Color Customization tutorial.
Problem B - Case Sensitivity
Paint Shop Pro scripts use the Python interpreter. This means that Paint Shop Pro scripts are case-sensitive. You will also get Problem A if you use some variation of Jasc like jasc or JASC or even jASC.

Problem C - Editor Problems
Sometimes, in foreign versions of Paint Shop Pro (like Dutch, Swedish and German), after the script has been editted in Notepad, it will not run. In some languages, Notepad will leave strange characters in the script file that will prevent it from working in PSP. The solution to this problem is to change the default Script Editor in Paint Shop Pro to WordPad.
The Script Editor is located in File > Preferences > File Locations. In the dialog on the left-hand side, find Python Source Editor and click on it.
 Change the executable pathfrom "C:\WINDOWS\NOTEPAD.EXE" to "C:\Program Files\Windows NT\Accessories\wordpad.exe"
Once the default editor has been changed to WordPad, the user needs to remember to save the script files as text.

Sunday, August 3, 2008
Parts of a Script

The first line in a script 'from JascApp import *' allows for communication between the script and PSP. It is essential. When the wrong module is loaded (PSPApp, for example), then the script cannot function. The next word in the script is 'def' which defines a function. In this case, it is the ScriptProperties function which provides information such as the author of the script, copyright, and a description of the script.

The name of a function appears after the word def. The second function in any script is the Do function. Most of the work of the script occurs inside the Do function.

All scripts are called with the App.Do method. App refers to a variable name inside of JascApp. Do is the function. App.Do passes the Environment argument, the Command name (circled in blue) and a dictionary to PSP to perform a command.

The dictionary is composed of keys which can be used to summon information from the dictionary and values which is the information needed to perform the command.

Finally, there are pound or number (#) signs which are used to designate comments. Anything with a pound sign to the left is a comment and is ignored by the script and PSP. Comments are used to for notations in the script so that the script author can tell future users what is happening in the script.
The following is a complex script which I broke down for Deb of DeeBe Designs. It details the script modifications seen in a lot of my script tutorials.

Circled is the Fill Variable. Once the GetMaterial command has been executed, it contains all the information for Material in a dictionary which has the keys: Color, Gradient, Pattern, Texture and Art.
In the Custom Colors in Effects tutorial, the script snippet uses a while loop. There are several elements in the code snippet which are explained here. First, the user is asked to choose a color so that the Fill variable is set prior to execution of the loop. Every action in the loop is indented inside the loop. I recommend at least 3 spaces and the first line of new App.Do function calls should be indented the same amount. The while loop sets two variables: Fill and MyColor.

If the Fill variable is unset, then if the user clicks cancel in the Materials palette, MyColor can end up with a null value which will cause PSP to cycle endlessly in a loop. The only to stop the loop is to abort the program. In the while loop, we ask the user to choose a color if they happen to choose a gradient or pattern. The while loop forces the user to choose a color instead of a different option. So, as long as there is not a color, the loop will cycle. Once the user chooses a color, we call the color out of the Fill dictionary and place the color inside the MyColor variable.

This example shows how the MyColor variable is set and then used in the Blinds Effect.
However, if a color choice is forced and then the resulting variable is used in Fill or any other command which accepts a material, such a preset shape, then it is important to use the correct variable. If a dictionary is improperly defined, the App.Do method will send the incorrect information to PSP and the script will not work correctly.
For example, the FlowerFill variable is being used to store all the information resulting from the GetMaterial command. The FlowerFill variable can be used by itself as the data for the Fill key in the Preset Shape command.

However, if the color information is placed in a new variable, FlowerColor, the variable FlowerColor cannot be used as the entire data for the Fill key. That is because FlowerColor is a tuple and Fill requires a dictionary. FlowerColor can only substitute as data for the Color key inside the dictionary.

Saturday, August 2, 2008
Checking Program Version in Scripts
One of the problems with scripts is that Paint Shop Pro is not completely backwards compatible. Between PSP X and X1, Corel changed the names of brushes, gradients and preset shapes. Therefore, a script which works in X1 and X2 may not work correctly in 9 and X. It is possible to have the script check for the program version and then switch between the old name for a brush, gradient or preset shape and the new name using an if statement. The GetVersionInfo command returns the following keys: BuildType, MinorVersion, MajorVersion, MicroVersion, BuildNumber, VersionString and Program.
The following code snippet will provide the version of the program and place it in the variable 'version'.
Insert the snippet after Do(Environment) at the beginning of the script.
The variable 'version' can then be used to set variables for use in the script. For example, to switch between custom brushes.
The following code snippet will provide the version of the program and place it in the variable 'version'.
   VersionInfo = App.Do(Environment, 'GetVersionInfo')
   version = VersionInfo['MajorVersion']
Insert the snippet after Do(Environment) at the beginning of the script.
def Do(Environment):
The variable 'version' can then be used to set variables for use in the script. For example, to switch between custom brushes.
   if version == 9:
      brush = u'Marble2'
   elif version == 10:
      brush = u'Marble2'
   elif version == 11:
      brush = u'Corel_01_029'
   else:
      brush = u'Corel_01_029'
Then, replace the CustomBrush string in the brush command with the 'brush' variable.
    # PaintBrush
    App.Do( Environment, 'PaintBrush', {
            'BrushTip': {
                'Shape': App.Constants.BrushShape.Custom,
                'CustomBrush': brush,
                'Size': 500,
                'Hardness': 100,
                'Step': 32,
                'Density': 100,
                'Thickness': 100,
                'Rotation': 0,
                'BrushVariance': {
                    'SizeVariance': App.Constants.VarianceMethod.Pressure,
                    'SizeJitter': 0,
                    'OpacityVariance': App.Constants.VarianceMethod.None,
                    'OpacityJitter': 0,
                    'DensityVariance': App.Constants.VarianceMethod.None,
                    'DensityJitter': 0,
                    'ThicknessVariance': App.Constants.VarianceMethod.None,
                    'ThicknessJitter': 0,
                    'RotationVariance': App.Constants.VarianceMethod.None,
                    'RotationJitter': 0,
                    'ColorBlendVariance': App.Constants.VarianceMethod.None,
                    'ColorBlendJitter': 0,
                    'HueVariance': App.Constants.VarianceMethod.None,
                    'HueJitter': 0,
                    'SaturationVariance': App.Constants.VarianceMethod.None,
                    'SaturationJitter': 0,
                    'LightnessVariance': App.Constants.VarianceMethod.None,
                    'LightnessJitter': 0,
                    'PositionJitter': 0,
                    'UseScaledPositionJitter': False,
                    'ImpressionsPerStep': 1,
                    'FadeRate': 100
                    }
                },
            'Brush': {
                'Opacity': 87,
                'ContinuousPaint': True,
                'WetLookPaint': True,
                'BlendMode': App.Constants.BlendMode.Multiply
                },
            'PrimaryMaterial': App.Constants.MaterialRef.Foreground,
            'ForegroundMaterial': {
                'Color': (128,128,128),
                'Pattern': None,
                'Gradient': None,
                'Texture': None,
                'Art': None
                },
            'BackgroundMaterial': {
                'Color': (128,128,128),
                'Pattern': None,
                'Gradient': None,
                'Texture': None,
                'Art': None
                },
            'Stroke': [
                (App.Constants.PathEntryInterpretation.Absolute,(880.5,1680.5),0),
                (App.Constants.PathEntryInterpretation.Absolute,(880.5,1680.5),188)
            ],
            'GeneralSettings': {
                'ExecutionMode': App.Constants.ExecutionMode.Default,
                'RandomSeed': 77296609,
                'AutoActionMode': App.Constants.AutoActionMode.Match,
                'Version': ((12,0,1),1)
                }
            })
Friday, August 1, 2008
Scripts - If Statement
Scripts in Paint Shop Pro use a scripting language called Python. In order to perform advanced tasks in PSP scripts, it is necessary to understand Python. This tutorial will cover the if clause (also known as the if statement). Sometimes it is beneficial in a script to allow a user to choose to perform an action or not. This choice occurs using the if clause. I will show how to manipulate a simple script so that a user can choose whether or not to apply a plugin.
Supplies:
Simple Ribbon Tutorial
1. Have my Simple Ribbon Tutorial available (either printed or open in a web browser).
2. Go to the script toolbar (or menu) and press the circle to start recording.
Toolbar
Menu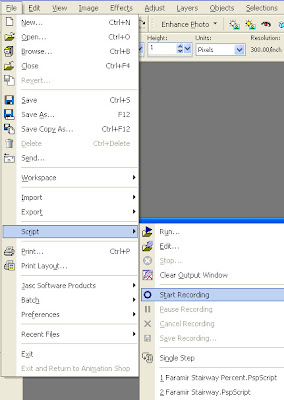
3. Follow the directions in the Simple Ribbon Tutorial, including the optional steps. Do not worry if you make a mistake. If you make a mistake, just undo the action (Ctrl-Z).
4. Once you have finished the tutorial, save the script by going to the script toolbar (or menu) and pressing the disk icon.
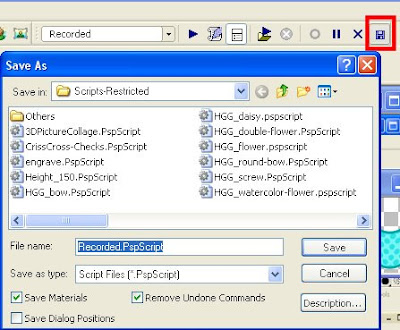 A window will pop up asking you for a name (and location) to save the script. Make sure 'Remove Undone Commands' is checked and 'Save Dialog Positions' is unchecked. To make sure that your script will be identical to the one in this tutorial, make sure 'Save Materials' is checked. You now have a script that will make a ribbon in only one set of colors. If you save the script with 'Save Materials' unchecked, then the script will make a ribbon in your existing foreground and background colors.
5. Now we will edit the script so that the user can choose whether or not to apply the plugin, Greg's Factory Output Vol. II: Pool Shadow. Open up the script editor by clicking the scroll button on the script toolbar.
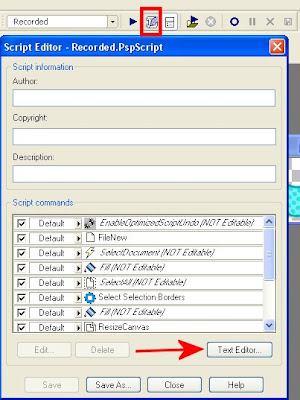 A pop up window for the Script Editor will appear. Go to the bottom and click 'Text Editor.'
6. The script looks like this:
7. This will create a question message box with two options: Yes and No. (Read more about message boxes.)
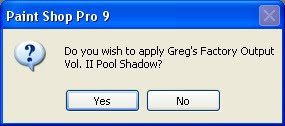 The answer to the question is stored in the variable 'result'. The value of 'result' will either be 1 or 0. If the answer is Yes, then 'result' will be 1. If the answer is No, then 'result' will be 0. By itself, the answer to the question does not cause the script to pause, skip the plugin or perform any action. The answer to the question, 'result' must be used by a conditional (in this case 'if') to produce the desired effect.
8. To make the script use the plugin if the user chooses yes, but skip the plugin if the user chooses no, insert the 'if' statement before the plugin command.
This conditional says, if the result is equal to one (meaning Yes) then use the plugin. Else, if the result is not equal to one then produce a message box saying that the script is complete.
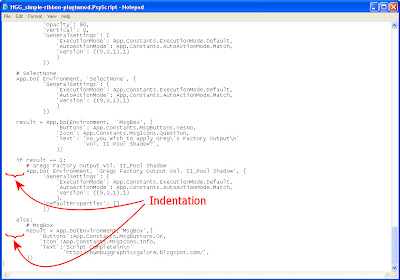 Note that both the plugin command and the message box are nested inside the if clause. Indentation matters.
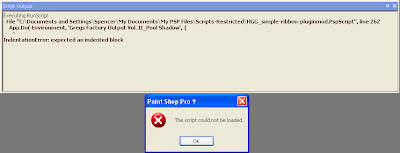
If the block is not indented, then the script will not load and the script output window will produce an error stating, "IndentationError: expected an indented block"
9. The 'else' part of the if clause is optional. It does not need to exist and it only occurs when the user answers 'No' to the question. The following code snippet would produce the same effect for the plugin, but the final message would always appear, not just when the user clicked 'No'.
In this case, what happens is that after the script reaches the end of the if clause, it continues with the rest of the script.
10. Finally, multiple if statements can be nested inside each other. For example,
This is known as nesting. The indentation tells Python when various pieces of code end.
Supplies:
Simple Ribbon Tutorial
1. Have my Simple Ribbon Tutorial available (either printed or open in a web browser).
2. Go to the script toolbar (or menu) and press the circle to start recording.
Toolbar

Menu

3. Follow the directions in the Simple Ribbon Tutorial, including the optional steps. Do not worry if you make a mistake. If you make a mistake, just undo the action (Ctrl-Z).
4. Once you have finished the tutorial, save the script by going to the script toolbar (or menu) and pressing the disk icon.
 A window will pop up asking you for a name (and location) to save the script. Make sure 'Remove Undone Commands' is checked and 'Save Dialog Positions' is unchecked. To make sure that your script will be identical to the one in this tutorial, make sure 'Save Materials' is checked. You now have a script that will make a ribbon in only one set of colors. If you save the script with 'Save Materials' unchecked, then the script will make a ribbon in your existing foreground and background colors.
5. Now we will edit the script so that the user can choose whether or not to apply the plugin, Greg's Factory Output Vol. II: Pool Shadow. Open up the script editor by clicking the scroll button on the script toolbar.
 A pop up window for the Script Editor will appear. Go to the bottom and click 'Text Editor.'
6. The script looks like this:
from JascApp import *

def ScriptProperties():
    return {
        'Author': u'',
        'Copyright': u'',
        'Description': u'',
        'Host': u'Paint Shop Pro 9',
        'Host Version': u'9.01'
        }

def Do(Environment):
    # EnableOptimizedScriptUndo
    App.Do( Environment, 'EnableOptimizedScriptUndo', {
            'GeneralSettings': {
                'ExecutionMode': App.Constants.ExecutionMode.Default,
                'AutoActionMode': App.Constants.AutoActionMode.Match,
                'Version': ((9,0,1),1)
                }
            })

    # FileNew
    App.Do( Environment, 'NewFile', {
            'Width': 3600,
            'Height': 150,
            'ColorDepth': App.Constants.Colordepth.SixteenMillionColor,
            'DimensionUnits': App.Constants.DimensionType.Pixels,
            'ResolutionUnits': App.Constants.ResolutionUnits.PixelsPerIn,
            'Resolution': 300,
            'FillMaterial': {
                'Color': (255,255,255),
                'Pattern': None,
                'Gradient': None,
                'Texture': None,
                'Art': None
                },
            'Transparent': True,
            'LayerType': App.Constants.NewLayerType.Raster,
            'ArtMediaTexture': {
                'Category': u'Art Media',
                'Name': u'Asphalt',
                'EnableFill': True,
                'FillColor': (255,255,255)
                },
            'GeneralSettings': {
                'ExecutionMode': App.Constants.ExecutionMode.Default,
                'AutoActionMode': App.Constants.AutoActionMode.Match,
                'Version': ((9,0,1),1)
                }
            })

    # SelectDocument
    App.Do( Environment, 'SelectDocument', {
            'SelectedImage': 0,
            'Strict': False,
            'GeneralSettings': {
                'ExecutionMode': App.Constants.ExecutionMode.Default,
                'AutoActionMode': App.Constants.AutoActionMode.Match,
                'Version': ((9,0,1),1)
                }
            })

    # Fill
    App.Do( Environment, 'Fill', {
            'BlendMode': App.Constants.BlendMode.Normal,
            'MatchMode': App.Constants.MatchMode.None,
            'Material': {
                'Color': (54,146,171),
                'Pattern': None,
                'Gradient': None,
                'Texture': None,
                'Art': None
                },
            'UseForeground': True,
            'Opacity': 100,
            'Point': (2376.5,66.5),
            'SampleMerged': False,
            'Tolerance': 10,
            'GeneralSettings': {
                'ExecutionMode': App.Constants.ExecutionMode.Default,
                'AutoActionMode': App.Constants.AutoActionMode.Match,
                'Version': ((9,0,1),1)
                }
            })

    # SelectAll
    App.Do( Environment, 'SelectAll', {
            'GeneralSettings': {
                'ExecutionMode': App.Constants.ExecutionMode.Default,
                'AutoActionMode': App.Constants.AutoActionMode.Match,
                'Version': ((9,0,1),1)
                }
            })

    # Select Selection Borders
    App.Do( Environment, 'SelectSelectionBorders', {
            'Antialias': True,
            'BordersType': App.Constants.BordersType.Inside,
            'BorderWidth': 10,
            'GeneralSettings': {
                'ExecutionMode': App.Constants.ExecutionMode.Default,
                'AutoActionMode': App.Constants.AutoActionMode.Match,
                'Version': ((9,0,1),1)
                }
            })

    # Fill
    App.Do( Environment, 'Fill', {
            'BlendMode': App.Constants.BlendMode.Normal,
            'MatchMode': App.Constants.MatchMode.None,
            'Material': {
                'Color': (141,204,213),
                'Pattern': None,
                'Gradient': None,
                'Texture': None,
                'Art': None
                },
            'UseForeground': True,
            'Opacity': 100,
            'Point': (2079.5,3.5),
            'SampleMerged': False,
            'Tolerance': 10,
            'GeneralSettings': {
                'ExecutionMode': App.Constants.ExecutionMode.Default,
                'AutoActionMode': App.Constants.AutoActionMode.Match,
                'Version': ((9,0,1),1)
                }
            })

    # ResizeCanvas
    App.Do( Environment, 'ResizeCanvas', {
            'AspectRatio': 24,
            'FillColor': (255,255,255),
            'HoriPlace': App.Constants.HorizontalType.Center,
            'MaintainAspect': False,
            'NewDimUnits': App.Constants.UnitsOfMeasure.Pixels,
            'NewHeight': 150,
            'NewWidth': 3580,
            'PlaceBottom': 0,
            'PlaceLeft': -10,
            'PlaceRight': -10,
            'PlaceTop': 0,
            'VertPlace': App.Constants.VerticalType.Center,
            'GeneralSettings': {
                'ExecutionMode': App.Constants.ExecutionMode.Default,
                'AutoActionMode': App.Constants.AutoActionMode.Match,
                'Version': ((9,0,1),1)
                }
            })

    # Blinds
    App.Do( Environment, 'Blinds', {
            'Width': 5,
            'Opacity': 25,
            'Horizontal': False,
            'LightFromLeftTop': True,
            'Color': (62,105,148),
            'GeneralSettings': {
                'ExecutionMode': App.Constants.ExecutionMode.Default,
                'AutoActionMode': App.Constants.AutoActionMode.Match,
                'Version': ((9,0,1),1)
                }
            })

    # SelectInvert
    App.Do( Environment, 'SelectInvert', {
            'GeneralSettings': {
                'ExecutionMode': App.Constants.ExecutionMode.Default,
                'AutoActionMode': App.Constants.AutoActionMode.Match,
                'Version': ((9,0,1),1)
                }
            })

    # Halftone
    App.Do( Environment, 'Halftone', {
            'BackgroundColor': (255,255,255),
            'ColorScheme': App.Constants.ColorScheme.Greyscale,
            'HalftonePattern': App.Constants.HalftonePattern.Line,
            'Overlay': True,
            'OverlayBlendMode': App.Constants.BlendMode.Screen,
            'OverlayOpacity': 48,
            'PatternColor': (0,0,0),
            'ScreenAngles': (90,137,137),
            'Size': 5,
            'TransparentBackground': False,
            'GeneralSettings': {
                'ExecutionMode': App.Constants.ExecutionMode.Default,
                'AutoActionMode': App.Constants.AutoActionMode.Match,
                'Version': ((9,0,1),1)
                }
            })

    # SelectNone
    App.Do( Environment, 'SelectNone', {
            'GeneralSettings': {
                'ExecutionMode': App.Constants.ExecutionMode.Default,
                'AutoActionMode': App.Constants.AutoActionMode.Match,
                'Version': ((9,0,1),1)
                }
            })

    # Magic Wand
    App.Do( Environment, 'MagicWand', {
            'General': {
                'Mode': App.Constants.SelectionOperation.Replace,
                'Antialias': True,
                'Feather': 0,
                'SampleMerged': False
                },
            'MatchMode': App.Constants.MatchMode.RGBValue,
            'Contiguous': False,
            'Point': (1482.5,90.5),
            'Tolerance': 1,
            'AntialiasType': App.Constants.AntialiasType.Outside,
            'GeneralSettings': {
                'ExecutionMode': App.Constants.ExecutionMode.Default,
                'AutoActionMode': App.Constants.AutoActionMode.Match,
                'Version': ((9,0,1),1)
                }
            })

    # Drop Shadow
    App.Do( Environment, 'DropShadow', {
            'Blur': 5,
            'Color': (0,0,0),
            'Horizontal': 0,
            'NewLayer': False,
            'Opacity': 80,
            'Vertical': 0,
            'GeneralSettings': {
                'ExecutionMode': App.Constants.ExecutionMode.Default,
                'AutoActionMode': App.Constants.AutoActionMode.Match,
                'Version': ((9,0,1),1)
                }
            })

    # SelectNone
    App.Do( Environment, 'SelectNone', {
            'GeneralSettings': {
                'ExecutionMode': App.Constants.ExecutionMode.Default,
                'AutoActionMode': App.Constants.AutoActionMode.Match,
                'Version': ((9,0,1),1)
                }
            })

    # Gregs Factory Output Vol. II_Pool Shadow
    App.Do( Environment, 'Gregs Factory Output Vol. II_Pool Shadow', {
            'GeneralSettings': {
                'ExecutionMode': App.Constants.ExecutionMode.Default,
                'AutoActionMode': App.Constants.AutoActionMode.Match,
                'Version': ((9,0,1),1)
                },
            'DefaultProperties': []
            })
We are going to place the section in purple inside an if clause. First, we need to ask the user a question using a Message Box.
    result = App.Do(Environment,  'MsgBox', {
                'Buttons': App.Constants.MsgButtons.YesNo,
                'Icon': App.Constants.MsgIcons.Question,
                'Text': 'Do you wish to apply Greg\'s Factory Output\n'
                        'Vol. II Pool Shadow?',
                })
The \n in the text section tells the Message Box to insert a return. Special characters, such as the apostrophe, need to be escaped with a backslash (\) so that the text does not end prematurely.
7. This will create a question message box with two options: Yes and No. (Read more about message boxes.)
 The answer to the question is stored in the variable 'result'. The value of 'result' will either be 1 or 0. If the answer is Yes, then 'result' will be 1. If the answer is No, then 'result' will be 0. By itself, the answer to the question does not cause the script to pause, skip the plugin or perform any action. The answer to the question, 'result' must be used by a conditional (in this case 'if') to produce the desired effect.
8. To make the script use the plugin if the user chooses yes, but skip the plugin if the user chooses no, insert the 'if' statement before the plugin command.
    if result == 1:
       # Gregs Factory Output Vol. II_Pool Shadow
       App.Do( Environment, 'Gregs Factory Output Vol. II_Pool Shadow', {
            'GeneralSettings': {
                'ExecutionMode': App.Constants.ExecutionMode.Default,
                'AutoActionMode': App.Constants.AutoActionMode.Match,
                'Version': ((9,0,1),1)
                },
            'DefaultProperties': []
            })
    else:
       # MsgBox
       Result = App.Do(Environment,'MsgBox',{
           'Buttons':App.Constants.MsgButtons.OK,
           'Icon':App.Constants.MsgIcons.Info,
           'Text':'Script Complete\n\n'
                  'http://humbuggraphicsgalore.blogspot.com/',
       })
This conditional says, if the result is equal to one (meaning Yes) then use the plugin. Else, if the result is not equal to one then produce a message box saying that the script is complete.
 Note that both the plugin command and the message box are nested inside the if clause. Indentation matters.
If the block is not indented, then the script will not load and the script output window will produce an error stating, "IndentationError: expected an indented block"
9. The 'else' part of the if clause is optional. It does not need to exist and it only occurs when the user answers 'No' to the question. The following code snippet would produce the same effect for the plugin, but the final message would always appear, not just when the user clicked 'No'.
    if result == 1:
       # Gregs Factory Output Vol. II_Pool Shadow
       App.Do( Environment, 'Gregs Factory Output Vol. II_Pool Shadow', {
            'GeneralSettings': {
                'ExecutionMode': App.Constants.ExecutionMode.Default,
                'AutoActionMode': App.Constants.AutoActionMode.Match,
                'Version': ((9,0,1),1)
                },
            'DefaultProperties': []
            })

    # MsgBox
    Result = App.Do(Environment,'MsgBox',{
        'Buttons':App.Constants.MsgButtons.OK,
        'Icon':App.Constants.MsgIcons.Info,
        'Text':'Script Complete\n\n'
               'http://humbuggraphicsgalore.blogspot.com/',
    })
In this case, what happens is that after the script reaches the end of the if clause, it continues with the rest of the script.
10. Finally, multiple if statements can be nested inside each other. For example,
    EC5 = App.Do(Environment,  'MsgBox', {
                'Buttons': App.Constants.MsgButtons.YesNo,
                'Icon': App.Constants.MsgIcons.Question,
                'Text': 'Do you have Eye Candy 5 Impact?',
                })
    if EC5 == 1:
       # Alien Skin Eye Candy 5: Impact_Bevel
       App.Do( Environment, 'Alien Skin Eye Candy 5: Impact_Bevel', {
         'GeneralSettings': {
             'ExecutionMode': App.Constants.ExecutionMode.Default,
             'AutoActionMode': App.Constants.AutoActionMode.Match,
             'Version': ((9,0,1),1)
             },
         'DefaultProperties': [(1313631852,1651470188,0,(1,r'''AQ==''')),(1466201192,1413830740,0,(1,
             r'''NDIgcGl4ZWxzAA==''')),(1131312242,1685026146,0,(1,r'''AAAAAACAQUA=''')),(1399682152,
             1685026146,0,(1,r'''AAAAAAAAWUA=''')),(1111847523,1685026146,0,(1,r'''AAAAAAAAAAA=''')),
             (1111848057,1701737837,0,(1,r'''aXRlQjBUZWI=''')),(1148349294,1685026146,0,(1,r'''AAAAAAAAAAA='''
             )),(1181491232,1651470188,0,(1,r'''AQ==''')),(1111843443,1701737837,0,(1,r'''eXR1UzBSdXM='''
             )),(1114468417,1685026146,0,(1,r'''AAAAAAAAOUA=''')),(1399874414,1413830740,0,(1,r'''OS4wODMgcGl4ZWxzAA=='''
             )),(1382966355,1819242087,0,(1,r'''1x8AAA==''')),(1148347252,1685026146,0,(1,r'''AAAAAADgcEA='''
             )),(1229874028,1685026146,0,(1,r'''AAAAAABAUEA=''')),(1114793832,1685026146,0,(1,r'''AAAAAAAAREA='''
             )),(1399353968,1685026146,0,(1,r'''AAAAAACAUUA=''')),(1131180576,1413830740,0,(1,r'''UkdCOiAyNTUgMjU1IDI1NSAA'''
             )),(1935963971,1413830740,0,(1,r'''UkdCOiA2NCA2NCA2NCAA''')),(1111843683,1413830740,0,(1
             ,r'''Q3VzdG9tQ3VydmU6IDMgMCAxIDAgMC41IDAuNjYgMCAxIDAgMAA=''')),(1111843700,1701737837,0,
             (1,r'''dGNlQjBUY2I=''')),(1111843444,1701737837,0,(1,r'''Y2JlQjBVYmI='''))]
         })
    else:
       EC4000 = App.Do(Environment,  'MsgBox', {
             'Buttons': App.Constants.MsgButtons.YesNo,
             'Icon': App.Constants.MsgIcons.Question,
             'Text': 'Do you have Eye Candy 4000?',
             })
       if EC4000 == 1:
          # Eye Candy 4000_Bevel Boss
          App.Do( Environment, 'Eye Candy 4000_Bevel Boss', {
            'GeneralSettings': {
               'ExecutionMode': App.Constants.ExecutionMode.Interactive,
               'AutoActionMode': App.Constants.AutoActionMode.Match,
               'Version': ((12,0,1),1)
               },
             'DefaultProperties': [(1466201192,1413830740,0,(1,r'''MjQuMDAgcGl4ZWxzAA==''')),(1131312242,
                1685026146,0,(1,r'''AAAAAAAASUA=''')),(1399682152,1685026146,0,(1,r'''AAAAAADAUkA=''')),
                (1651928147,1701737837,0,(1,r'''aXRlQjBUZWI=''')),(1148349294,1685026146,0,(1,r'''AAAAAAAAAAA='''
                )),(1181491232,1651470188,0,(1,r'''AQ==''')),(1148347252,1685026146,0,(1,r'''AAAAAADgYEA='''
                )),(1229874028,1685026146,0,(1,r'''AAAAAACARkA=''')),(1114793832,1685026146,0,(1,r'''AAAAAAAAWUA='''
                )),(1399353968,1685026146,0,(1,r'''AAAAAAAAOUA=''')),(1131180576,1413830740,0,(1,r'''UkdCOiAxMDAuMCUgMTAwLjAlIDEwMC4wJSAoMjU1IDI1NSAyNTUpAA=='''
                )),(1935963971,1413830740,0,(1,r'''UkdCOiAwLjAlIDAuMCUgMC4wJSAoMCAwIDApAA==''')),(1111848556
                ,1413830740,0,(1,r'''QmV2ZWw6IDMvMC4wMDAgMS4wMDAgMC8wLjUwMCAwLjY2MCAwLzEuMDAwIDAuMDAwIDAA'''
                ))]
          })
       else:
          result = App.Do(Environment,  'MsgBox', {
                'Buttons': App.Constants.MsgButtons.OK,
                'Icon': App.Constants.MsgIcons.Info,
                'Text': 'You need a version of Eye Candy.',
                })
Notice that the if statements are placed (left indented) inside the previous if statements, like so:
Code
   |----Code
              |----Code
                         |----Code
This is known as nesting. The indentation tells Python when various pieces of code end.
Message Boxes in Scripts
There are three types of message boxes in Paint Shop Pro scripts: the information box, the question box, and the stop box.

Code Snippet:

Code Snippet:

Code Snippet:
The results from the message box are stored in the variable 'result'. The MsgBox produces one value. The value will either be 1 or 0. The 'result' variable can be used in the if clause to allow switching between choices.
To change the type of buttons on the message box, you change the word after .MsgButtons. The options are OK, OKCancel, or YesNo.

Code Snippet:
   result = App.Do(Environment,  'MsgBox', {
           'Buttons': App.Constants.MsgButtons.OK,
           'Icon': App.Constants.MsgIcons.Info,
           'Text': 'This is an OK button with an informational icon.',
           })

Code Snippet:
   result = App.Do(Environment,  'MsgBox', {
           'Buttons': App.Constants.MsgButtons.YesNo,
           'Icon': App.Constants.MsgIcons.Question,
           'Text': 'These are Yes and No buttons with a question mark icon.',
           })

Code Snippet:
   result = App.Do(Environment,  'MsgBox', {
           'Buttons': App.Constants.MsgButtons.OKCancel,
           'Icon': App.Constants.MsgIcons.Stop,
           'Text': 'These are Ok and Cancel buttons with a stop sign icon.',
           })
The results from the message box are stored in the variable 'result'. The MsgBox produces one value. The value will either be 1 or 0. The 'result' variable can be used in the if clause to allow switching between choices.
To change the type of buttons on the message box, you change the word after .MsgButtons. The options are OK, OKCancel, or YesNo.
result = App.Do(Environment, 'MsgBox', {To change the picture on the message box, you change the word after .MsgIcons. The options are Info, Question, or Stop.
'Buttons': App.Constants.MsgButtons.YesNo,
'Icon': App.Constants.MsgIcons.Question,
'Text': 'These are Yes and No buttons with a question mark icon.',
})
result = App.Do(Environment, 'MsgBox', {To change the text in a message box you may edit anything between the two single quotes after Text.
'Buttons': App.Constants.MsgButtons.YesNo,
'Icon': App.Constants.MsgIcons.Question,
'Text': 'These are Yes and No buttons with a question mark icon.',
})
   result = App.Do(Environment,  'MsgBox', {
           'Buttons': App.Constants.MsgButtons.YesNo,
           'Icon': App.Constants.MsgIcons.Question,
           'Text': 'These are Yes and No buttons with a question mark icon.',
           })
Scripts - Variables
Python stores information in variables. A variable is something whose value changes over time. A variable stores information. Variables do not perform actions. Common things stored by Paint Shop Pro in a variable are selections from the materials palette and answers to questions from message boxes. In general, the variable is the word to the left of the equal sign.
In the example script for the dotted ric rac, MyFill is the variable. It stores the color, gradient or pattern information from the materials palette. This information is then used in the fill command.
 Common variables seen in commercially available PSP scripts are: result, Fill, KLEUR and VULLING. A variable can have any name. A variable can be re-used. If a variable does not have a unique name (such as result), then whenever the variable is used again, the old value is replaced with the new value. Paint Shop Pro does not care what you name the variable, but the variable needs to be a single word. Using spaces will produce syntax errors. Variables are case-sensitive. Result is not equal to result. Result and result are two different variables.
Variables can store any type of information. Two common types of information stored by a Paint Shop Pro script are material and text. Material is a selection from the materials palette. A material is a type of data known as an array. In computer programming languages, an array is a group of objects with the same attributes. The Material array contains several sub-variables (also known as elements) inside it: color, gradient, pattern, art, and texture. Some of these elements are also arrays. So, it is possible to store arrays inside arrays. These elements are referred by name, not number. This makes the Material array a "dictionary". To fetch an element out of a dictionary, you have to call it by name. This is known as a key. The data stored is known as a value.

In the Fill example, Material is a 'key' which can be used to find the value for the color, pattern, gradient, texture, and art. However, Color is a 'key' inside the Material dictionary which holds the value '(0,0,255)'.
In the example below, after Fill is executed with the GetMaterial command, it will point to all the Material information.

To store the color information from the Fill variable in a new variable, you need to name a new variable, MyColor, and place the color information in it.
The Color 'key' is being used to grab the color data and place it in the new variable 'MyColor'. An array is always in curly brackets and the individual elements are retrieved from it using square brackets. Therefore, a dictionary is always in curly brackets and the individual elements are retrieved from it using square brackets.
Color is a data type known as a tuple. Color is a three element tuple consisting of 3 numbers which are the red, green and blue values for the color. A tuple is always in parenthesis. For example in this Fill command, the material element (in italics and bold) is an dictionary.
Text is a data type known as a string. In Paint Shop Pro, a string is always prefixed with a 'u'. This is because PSP uses Unicode strings. Unicode strings use the Unicode character set as defined by the Unicode Consortium and ISO 10646. An example of text use can be see in the Customizing Text tutorial. In that tutorial you can see that the GetString command stores the answer to the dialog in the variable 'Result'. The 'Result' variable is an dictionary.
This tutorial does not cover all the information about variables, or data types in Python. There are many excellent Python programming books which provides excellent detail on this subject. I recommend Programming Python by Mark Lutz. This tutorial only covers the aspects of variables and data types pertinent to intermediate-level scripting in Paint Shop Pro. For advanced scripting in Paint Shop Pro, read the scripting API.
In the example script for the dotted ric rac, MyFill is the variable. It stores the color, gradient or pattern information from the materials palette. This information is then used in the fill command.
 Common variables seen in commercially available PSP scripts are: result, Fill, KLEUR and VULLING. A variable can have any name. A variable can be re-used. If a variable does not have a unique name (such as result), then whenever the variable is used again, the old value is replaced with the new value. Paint Shop Pro does not care what you name the variable, but the variable needs to be a single word. Using spaces will produce syntax errors. Variables are case-sensitive. Result is not equal to result. Result and result are two different variables.
Variables can store any type of information. Two common types of information stored by a Paint Shop Pro script are material and text. Material is a selection from the materials palette. A material is a type of data known as an array. In computer programming languages, an array is a group of objects with the same attributes. The Material array contains several sub-variables (also known as elements) inside it: color, gradient, pattern, art, and texture. Some of these elements are also arrays. So, it is possible to store arrays inside arrays. These elements are referred by name, not number. This makes the Material array a "dictionary". To fetch an element out of a dictionary, you have to call it by name. This is known as a key. The data stored is known as a value.
In the Fill example, Material is a 'key' which can be used to find the value for the color, pattern, gradient, texture, and art. However, Color is a 'key' inside the Material dictionary which holds the value '(0,0,255)'.
In the example below, after Fill is executed with the GetMaterial command, it will point to all the Material information.
To store the color information from the Fill variable in a new variable, you need to name a new variable, MyColor, and place the color information in it.
    Fill = App.Do(Environment,'GetMaterial',{
        'IsPrimary':App.Constants.Boolean.true,
        'GeneralSettings': {
            'ExecutionMode':App.Constants.ExecutionMode.Interactive
        }
    })
    MyColor = MyFill['Color']
The Color 'key' is being used to grab the color data and place it in the new variable 'MyColor'. An array is always in curly brackets and the individual elements are retrieved from it using square brackets. Therefore, a dictionary is always in curly brackets and the individual elements are retrieved from it using square brackets.
Color is a data type known as a tuple. Color is a three element tuple consisting of 3 numbers which are the red, green and blue values for the color. A tuple is always in parenthesis. For example in this Fill command, the material element (in italics and bold) is an dictionary.
    # Fill
    App.Do( Environment, 'Fill', {
            'BlendMode': App.Constants.BlendMode.Normal,
            'MatchMode': App.Constants.MatchMode.None,
            'Material': {
                'Color': (141,204,213),
                'Pattern': None,
                'Gradient': None,
                'Texture': None,
                'Art': None
                },
            'UseForeground': True,
            'Opacity': 100,
            'Point': (2079.5,3.5),
            'SampleMerged': False,
            'Tolerance': 10,
            'GeneralSettings': {
                'ExecutionMode': App.Constants.ExecutionMode.Default,
                'AutoActionMode': App.Constants.AutoActionMode.Match,
                'Version': ((9,0,1),1)
                }
            })
The color element (141,204,213) in the Material dictionary is a tuple.
Text is a data type known as a string. In Paint Shop Pro, a string is always prefixed with a 'u'. This is because PSP uses Unicode strings. Unicode strings use the Unicode character set as defined by the Unicode Consortium and ISO 10646. An example of text use can be see in the Customizing Text tutorial. In that tutorial you can see that the GetString command stores the answer to the dialog in the variable 'Result'. The 'Result' variable is an dictionary.
    Result = App.Do( Environment, 'GetString', {
        'DefaultText': 'Name',
        'DialogTitle': 'Name for Tag',
        'Prompt': 'Enter Name',
        'MaxLength': 25,
        'GeneralSettings': {
            'ExecutionMode': App.Constants.ExecutionMode.Interactive
            }
        })

    MyText = Result['EnteredText']
The text needed for the Text command is the stored in 'EnteredText'. The EnteredText element is a string. It is retrieved from the dictionary and stored in MyText.
This tutorial does not cover all the information about variables, or data types in Python. There are many excellent Python programming books which provides excellent detail on this subject. I recommend Programming Python by Mark Lutz. This tutorial only covers the aspects of variables and data types pertinent to intermediate-level scripting in Paint Shop Pro. For advanced scripting in Paint Shop Pro, read the scripting API.
Thursday, July 31, 2008
Plugins Troubleshooting
 The following error message:
Paint Shop Pro was unable to load the requested plug-in filter. The plug-in may not be installed properly or may be missing files.is caused by a missing .DLL file. Most commonly, it is caused by lack or misplacement of MSVCRT10.DLL. It can also be caused by lack or misplacement of PLUGIN.DLL. These files do not come with Windows. To fix the problem, install MSVCRT10.DLL and/or PLUGIN.DLL into:
| Operating System | Location |
|---|---|
| Windows 95 | C:\Windows\System |
| Windows 98 | C:\Windows\System |
| Windows ME | Put Msvcrt10.dll in C:\Windows\System Put Plugin.dll in C:\Windows |
| Windows NT 4.0 | C:\WINNT\System32 |
| Windows 2000 | C:\WINNT\System32 |
| Windows XP | C:\Windows\System32 |
| Windows Vista | C:\Windows\System32 |
| Windows Vista 64-bit | C:\Windows\SysWOW64 |
PLUGIN.DLL is distributed with Adobe products like Photoshop, Photoshop Elements, Illustrator etc. It is technically a proprietary plugin, but you can find it all over the internet. You can also find msvcrt10.dll all over the internet. Other possible missing files are: msvcrt.dll, msvcrt20.dll and msvcrt40.dll. These files should come with your installation of windows.
What is a .DLL file?
DLL stands for dynamic link library. It is how Windows implements shared libraries. Msvcrt10.dll contains program code used to run programs written using Microsoft Visual C++. Msvcrt10.dll is required for programs written with Visual C++ to function correctly.
Subscribe to:
Posts (Atom)