Donations Welcome

I am currently saving toward a new version of Paint Shop Pro. If you wish to help me out, then please donate.

Larger versions of images can be seen by clicking on the image. Also, thank you for your kind and encouraging comments. I love reading the comments. If you use my any of freebies, I would be overjoyed with a comment containing a link to your item. I love seeing any of my freebies in use.

Saturday, June 26, 2010

Seamless Tile Script

It has been raining a lot here and I spent part of this week without power.  My basement has also flooded twice.  So, there hasn't been much scrapping as there has been a lot of cleanup to perform.


This is a utility script that I wrote while making patterns for a bunch of alphas.  The script takes an image then mirrors it 3 times to create a seamless tile.  It won't work with patterned images with directionality as the images will look like they are upside down.  This script is a nice timesaver for me and I thought other people might find it useful so I am sharing it.  It has not been tested, but I'm fairly confident that it will work PSP 9 and higher versions of PSP.  If you use this script and it works for you, please leave a comment.

Friday, June 25, 2010

Triple Frame Scripts


This is a set of two scripts which make a set of triple frames. These scripts are the result of a request for scripts which make triple frames without embellishments. The scripts will take any color, gradient or pattern and turn them into a set of triple frames. I have not had these scripts tested, but they work for the requestor in PSP 9.  I'm fairly confident that they will work in other versions of PSP.  If you use these scripts in a different version of PSP and they work for you, then please leave a comment.

Monday, June 14, 2010

Extracting Images


It was brought to my attention that the Extract Filter is an extra goodie for CS4 and a quick Google search suggests that Adobe may no longer be supporting the Extract Filter.  So, I decided to see how fast it would be to remove the background from an image using the Quick Selection Tool.

1.  Open you image in Photoshop.  I am using an image of one of my orchids to make it challenging as a flower in the background is blending into the part of the image that I want to extract.

Dtps. Fire-Cracker 'Malibu'


2. Choose the Quick Selection Tool.


3.  Set your brush size and make sure that Add to Selection (the wand with the + sign) is chosen.


4.  Start selecting on your image by brushing over the area that you want to keep.  The Quick Selection Tool will automatically detect edges and add similar areas to the selection.  Here is my first selection.


5.  After selection is complete, it is possible to see that in some areas, too much of the flower was selected.  In others, too little was selected.


Therefore, I reduced the size of my brush used it to pick up the small parts of the flower that were not chosen earlier.  Then, I chose Subtract from Selection (wand with - sign) and removed unwanted bits from the image.


6.  Choose Refine Edge to open up the Refine Edge options.


7.  Adjust the options to remove any "jaggies" and smooth out the selection.  I increased the contrast to 56%  and used the default values for all the other options.  Your choices will depend on your image.  Make sure that Preview is checked and then I chose to preview "On White" to see how my image would look.  This is the second preview option from the right.  Click OK when you are happy.


8.  If the image is not a layer, then turn it into one (Layer > New > Layer From Background).

9.  Invert the selection (Shift + Ctrl + I).

10.  Press the delete key to remove the background.


In conclusion, I think this method is a lot easier and faster than using the Extract Filter.  The Quick Selection Tool was not added until CS3 so this method for removing the background will not work in CS2 or below.  This method was tested in CS4.

Click on the image to see a larger version.  You may save my extracted Dtps. Fire-Cracker 'Malibu' and use it.

Removing Background in Photos


Tonight I decided to explore whether or not background removal in Photoshop was as fast and easy as people tried to portray.  I decided to document my testing in case anyone else wanted to try, but my conclusion is that NO, background removal in Photoshop is not fast and easy.

1.  Open the photograph.  I chose a picture of a gardenia that I took last year as it had nice contrast between the background and the flower.  I figured it would be easy to extract the gardenia given the strong differences in color.

Gardenia

2.  The extract tool is located in Filter > Extract (or Alt + Ctrl + X).


3.  Select the highlight tool and set the brush size to so that you can easily trace the edges of the part of the image you wish to keep.


4.  Try to trace only the edge of your object.  Covering too much of the object itself will result in too much removal.  I went with a brush size of 50.  As you will see later,  it removed a lot of the flower that I wanted to keep.


5.  Optional.  If you have a well-defined edge, select Smart Highlighting as it will create a highlight that is just wide enough to cover the edge, regardless of the current brush size.  I thought I had a well-defined edge so I tried it.


6.  After completely tracing the object so that there are no gaps, select the Fill tool and click in the interior of the object to select the part of the object that you wish to keep.


This is where the Smart Highlight failed as it did not create a completely closed trace and the entire image was selected.

7.  Click the preview button to see what the extracted image would look like.


8.  Optional.  If too much of the object has been removed, select the eraser then make sure both 'Show Highlight' and 'Show Fill' are checked.  Use the eraser to remove the excess highlight. Use the Fill tool and fill in the object after you finish erasing the excess highlight marks as the first eraser stroke will remove the fill.  Preview again to make sure the background has been removed as desired.


9.  Select OK once you are satisfied.  This will extract the image and remove the background.  You may still have an image where too much of the object has been removed and extraneous background bits.  I certainly did.


Here is a closeup of my extracted gardenia.  Notice the dark shadow between the petal and the transparent region.


10.  Select the history brush, go to the history palette and find the step before the Extract step.  Click the square to the left of the step to set the source for the history brush.


11.  Select a solid brush for the history brush.  I chose a round brush at 32 pixels in size and removed any extras except for smoothing.


12.  Choose the same brush for the eraser tool.

13.  Use the history brush to brush back any parts of the object which have been removed incorrectly by the Extract filter.  Alternate with the eraser tool to remove any parts of the background which are still present.

Here is my final image after application of the history brush and the eraser.


The most labor-intensive part of this process was using the eraser and history brush to "tidy" up the image.  This is summarized into a single step, but it actually took the most time.  Once again, not fast and not easy.

If you came here looking for gardenia clipart, I have also made my extracted image available for use.


Saturday, June 12, 2010

Glass Leading Styles


For people who use PSE and have limited style creation options, I have made 2 styles available for creating the leading for stained glass.  One is the smooth leading in my stained glass example.  The other is rougher for those who might want to create old stained glass.  The zip also includes the XML file so that the styles will show up in their own category in PSE.

Installing Styles in Photoshop Elements 7.0

1.  PSE does not make it easy to install styles.  First, you must be able to see hidden folders in order to find the directory for installing the styles.

2. In Windows XP, the style needs to go into the following directory:

C:\Documents and Settings\All Users\Application Data\Adobe\Photoshop Elements\7.0\Photo Creations\layer styles


The Application Data directory is usually hidden so you will not find it if you cannot see hidden folders.  For the purposes of this tutorial, I am using my HGG Glass Leading Styles.


3. To make the style show up as its own entry you must create an XML file for the styles.  The XML file needs to be named .metadata.xml  The name for the ASL file must be identical to the name for the XML file.


4.  The inside of the XML file needs one entry for each style in the .asl file.  I have two styles in my file, so there are two entries.


5.  For the style entry, you need and ID for the style and a name for the style.  The ID should not contain spaces.  It is located before the equal sign.  The name is located after the equal sign.  The name may contain spaces and it is what you see when you hover over the style inside PSE..


6.  To have the style show up in its own category, you need to have a category ID and category name.  The ID should not contain spaces.  It is located before the equal sign.  The name may contain spaces and it is what you see in the styles dropdown menu inside PSE.


7.  To get the styles to show up, the ThumbDatabase.db3 must be deleted prior to starting up PSE.  The ThumbDatabase.db3 file is located in:

C:\Documents and Settings\All Users\Application Data\Adobe\Photoshop Elements\7.0


8.  Start up PSE.  It may take while to rebuild the ThumbDatabase, but eventually, when it finishes, the style will be installed.

Friday, June 11, 2010

Stained Glass


This tutorial will show you how to make different types of stained glass and then use those patterns to create your own stained glass window.  You will need a stained glass pattern.  I made mine using stained glass clipart from Dover.  There is also completely free stained glass patterns at  find-stainedglasspatterns.com.  Since this tutorial is for Art Nouveau theme of SNL 63,  I am providing a link to free Art Nouveau stained glass patterns.

I live in an area where many of the turn of the century homes have stained glass windows.  It is commonly called Art Glass in my area.  Therefore, there is a lot of Art Nouveau stained glass in windows as I walk through the neighborhood.  So, as part of this tutorial, I walked around to see what types of glass were commonly seen in Art Nouveau glass.  This is not a comprehensive study, but as a result of my observations,  I am going to show you how to make two different types of glass: hammered glass and streaky glass.  There is not much streaky glass in my area and I tend to associate it with more modern glass creations. 

Monotone Hammered Glass Pattern

1.  Open up a new canvas.  I'm making mine 3600 x 3600 so that the final glass could also be used as a background paper.

2.  Fill the canvas with the color of your choice (Edit > Fill > Color).


3.  Add 15% noise (Filter > Noise > Add Noise).  If you have a much smaller image, reduce the noise percentage.


Amount = 15%
Distribution = Guassian
Monochromatic = Checked

4.  Apply the Motion Blur filter (Filter > Blur > Motion Blur).  If you have a much smaller image, reduce the distance.

Angle = -30
Distance = 30

5. Apply the Crystallize filter (Filter > Pixelate > Crystallize).  If you have a much smaller image, reduce the cell size.

Cell Size = 25

6.  Apply the glass distortion filter (Filter > Distort > Glass).  If you have a much smaller image, reduce the distortion, smoothness and scaling.

Distortion = 10
Smoothness = 5
Texture = Frosted
Scaling = 200%

Duotone Hammered Glass Pattern

1.  Open up a new canvas.  I'm making mine 3600 x 3600 so that the final glass could also be used as a background paper.

2.  Select one color as your foreground color and one color as your background color by left-clicking on the square that corresponds to the foreground/background then selecting a color with the color picker or choosing one from the color palette that pops up.


3.  Apply the clouds filter (Filter > Render > Clouds).


4.  Add 15% noise (Filter > Noise > Add Noise).  If you have a much smaller image, reduce the noise percentage.

Amount = 15%
Distribution = Guassian
Monochromatic = Checked

4.  Apply the Motion Blur filter (Filter > Blur > Motion Blur).  If you have a much smaller image, reduce the distance.

 Angle = -30
Distance = 30

5.  Apply the Ocean Ripple filter (Filter > Distort > Ocean Ripple).  If you have a much smaller image, reduce the ripple size and ripple magnitude.

Ripple Size = 15
Ripple Magnitude = 20

Streaky Glass

1.  Open up a new canvas.  I'm making mine 3600 x 3600 so that the final glass could also be used as a background paper.

2.  Select one color as your foreground color and one color as your background color by left-clicking on the square that corresponds to the foreground/background then selecting a color with the color picker or choosing one from the color palette that pops up.


3.  Fill the canvas with your foreground color (Edit > Fill > Foreground).

4.  Apply the Fiber filter (Filter > Render > Fiber).

Variance = 20
Strength = 10

5.  Apply the Wave filter (Filter > Distort > Wave).

Number of Generators = 5
Wavelength Min = 10
Wavelength Max = 327
Amplitude Min = 5
Amplitude Max = 188
Scale Horiz = 100
Scale Vert = 100
Type = Sine
Undefined Areas = Wrap Around

6.  Optional.  Apply the Twirl Filter if you want to add some spin to the wave pattern (Filter > Distort > Twirl)

Angle = 100

7.  Apply the Motion Blur to soften up the streaking (Filter > Blur > Motion Blur).

Angle = -30
Distance = 30

Stained Glass Lead

1.  Load your stained glass design.  I loaded mine as a smart object since I traced the stained glass design in Illustrator.  If you also wish to do this, use my tracing tutorial.  My image is approximately 3200 x 3500 pixels.


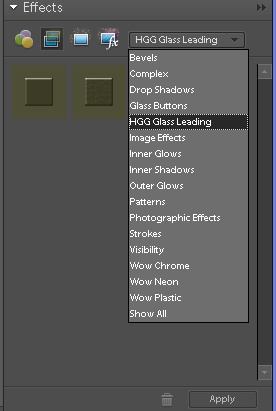
2.  I used styles to create the look of the lead.

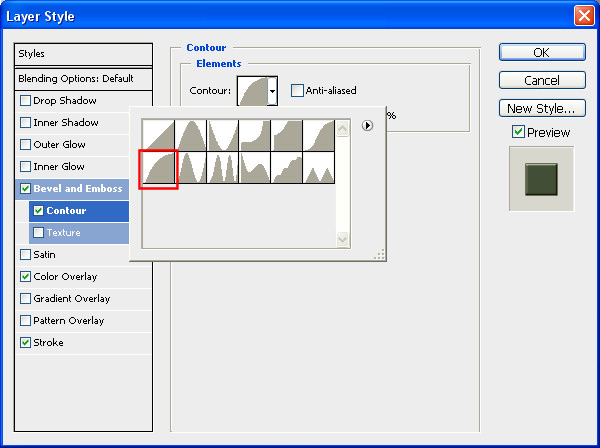
The Bevel and Emboss style uses the default settings.

Change the contour bevel to Half Round.

My stained glass pattern was black, so I changed the color with the color overlay.

I increased the size of the stroke to 5 pixels.  You may wish to have a smaller stroke if your image is smaller than mine.

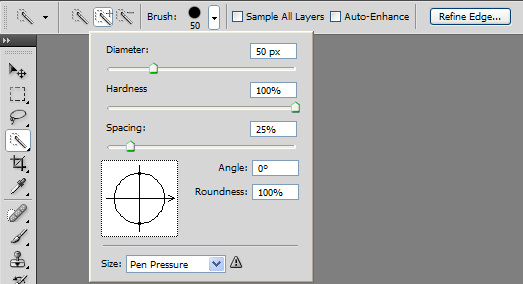
3.  Use the magic wand selection tool to choose the areas for a particular glass pattern.


4.  Create a new layer (Layer > New > Layer).

5.  Create a new layer mask revealing the selection (Layer > Layer Mask > Reveal Selection).


6.  If your glass pattern is not already open, open it in Photoshop.  Drag it onto the glass pattern canvas and position it so that it covers the entire selection or canvas.

NOTE:  I had to reduce the size of my glass pattern before applying the different types of stained glass because my computer began to run out of memory and I did not want it to crash before I finished the tutorial.

7.  The glass pattern layer should be a new layer directly above the layer with the mask.  Merge the glass pattern layer with the layer containing the mask (Layer > Merge Down).  Choose to Preserve the layer mask when asked.


8.  Select the layer with the stained glass design and repeat steps 3-7 for each different glass pattern.

Here is my final stained glass design.  Click on it for a large view that shows the glass patterns in more detail.