 I'm back from vacation, but very, very busy with work and visiting relatives. I have a bunch of scripts to post, but I haven't gotten around to making previews for them yet. Here are the Beach Babies alphas without the chipboard back.
Saturday, July 11, 2009
Beach Babies Glitter Alphas
I'm back from vacation, but very, very busy with work and visiting relatives. I have a bunch of scripts to post, but I haven't gotten around to making previews for them yet. Here are the Beach Babies alphas without the chipboard back. Saturday, July 4, 2009
Flip Flops Script

I wrote this script when making my Beach Babies kit. I thought I would share it with everyone. The script makes a vector flipflop which you can then decorate or adjust to any size (without pixelating). Since I'm on vacation, I didn't send this script out to be tested by my Script Testing Team. So, if it works (or doesn't work) for you in any version of PSP, please leave a comment. I wrote it in PSP 9.
Wednesday, July 1, 2009
Spring Garden Blog Train

I would like to thank Honey for this award. Unfortunately, I'm terrible at finding blogs who deserve awards. I think most of them already have this award. I will pass it on to Lena, A Design by Lena, for now.

I have left on vacation and this post is being made automatically by Blogger, but here is my contribution to the Spring Garden blog train. You can get all the stops at the train station.
Tuesday, June 30, 2009
Beach Babies Alphas

I made 3 simple alphas for Beach Babies. I really wanted to do more with glitter in this kit, but, oh well, perhaps next time. I also have all the glitter letters without the chipboard, but I'm not sure if people are interested in them. Would people use glitter letters by themselves? Please leave a comment if you have an opinion. It might help me decide.
Monday, June 29, 2009
Beach Babies

This month's Scrap Kit Challenge theme was Beach Babies. I did not make papers for this month's collaborative kit, but if you follow the blog train, I'm certain you will find some great ones. Not all my elements are shown. This kit comes with:
- 4 seamless glitter tiles
- 3 shovels
- 3 pails
- 3 shells
- 3 starfish
- 3 beach umbrellas
- 3 pairs of flipflops
- 1 pile of sand
- 7 flowers
The blog train list:
Humbug Graphics Galore <--- You are here
Greyashowl
Ryn Creations
4 Heart Design
Kathy's Scraps
Eadie Designs
A Fish Design
Saturday, June 27, 2009
Fan Tutorial
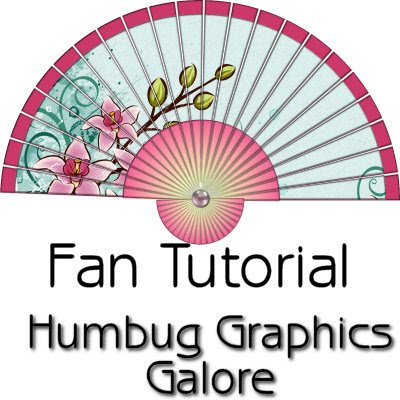
I saw a tutorial for a fan in PhotoImpact that used a funky feature of the program called Path Wrap and I decided I wanted to see if I could duplicate this effect in PSP. You can easily curve text on a path in PSP, but not shapes, so I had to come up with a different method.
Supplies:
Fanslats script
Cymbidium image
1. Open a new canvas 1200 x 1200.
2. Use the custom selection tool and create a new selection.

Top = 0
Bottom = 1200
Left = 600
Right = 625
3. Fill the selection with white.
4. Repeat steps 2 and 3 twenty-one more times. Each time, add 27 to the Left and Right numbers. For example, the first repeat will have the following settings:
Repeat 1
Top = 0
Bottom = 1200
Left = 627
Right = 652
Because this step is so tedious, I wrote a mini-script that will create the twenty-two slats. To use the mini-script, open your canvas, then run HGG_fanslats.
5. You will now have 22 slats that go halfway across the canvas. Select None (Ctrl + D).

6. Apply the Polar deformation (Effects > Deformation Effects > Polar Coordinates).

7. Rotate the image 90 degrees to the left (Image > Rotate > Rotate Counterclockwise 90).

8. Duplicate the layer (Layers > Duplicate) and use the manual color correction tool to change the color from white to grey, for easier visualization.


9. Select the Raster Deformation Tool and deform the grey layer using the following settings:
 Mode = Scale
Pivot X = 600.00
Pivot Y = 321.00
Position X = 42.00
Position Y = 43.00
Scale X = 93.00
Scale Y = 92.85
Perspective X = 0.00
Perspective Y = 0.00
Shear = 0.00
Angle = 0.000
Click the arrow to apply the settings.
10. Select All (Ctrl + A). Then click the fan with the selection tool to float the selection.
11. Now, defloat the selection (Ctrl + Shift + F).
12. Save the selection to the alpha channel (Selections > Load/Save Selections > Save Selection to Alpha Channel). I called the channel Fan.


13. Create a new raster layer. Name it Struts.
14. Use the selection tool to draw a circle, using the location where all the slats come together as a starting point.

15. Fill the selection with a color, pattern, or gradient for the struts.
16. Load the selection from the alpha channel (Selections > Load/Save Selections > Load Selection from Alpha Channel.

17. Click the selection to float it and apply a drop shadow.

18. Defloat the selection (Ctrl + Shift + F).
19. Expand the selection by 2.

20. Invert the selection (Ctrl + Shift + I).
21. Press the delete key to clear the selection and then Select None (Ctrl + D).

22. Duplicate the struts layer (Layers > Duplicate).
23. Invert the layer (Ctrl + I).
24. Raster deform the layer.

Mode = Scale
Pivot X = 602.00
Pivot Y = 665.00
Position X = 466.00
Position Y = 592.00
Scale X = 57.14
Scale Y = 58.17
Perspective X = 0.00
Perspective Y = 0.00
Shear = 0.00
Angle = 0.000
25. The basic body of the fan is now complete. To make a ball for the strut pivot, I used the selection tool to draw a circle.

26. Use balls and bubbles to create a ball. I used my iridescent bead preset which you can find in my iridescent bead tutorial and then changed the Material to the same gradient as my fan struts.

27. There is a slight halo around the ball, so I contracted the selection by 2 (Selections > Modify > Contract).
28. I added a drop shadow to give my ball greater depth (Effects > 3D Effects > Drop Shadow).
29. Select None (Ctrl + D) and then select the bottom-most layer (the layer with the white fan slats).
30. Select All (Ctrl + A) and then click the fan slats with the selection tool to float it. Defloat the selection (Ctrl + Shift + F). I perform these steps to obtain a nice, smooth anti-aliased selection.
31. Fill the fan slats with your color, pattern or gradient of choice. I used #cc3868.

32. I floated the selection (Ctrl + F), then used the cutout effect to give my fan slats some depth.


33. Select None (Ctrl + D) and then select the next layer up, the layer with the grey fan.
34. I loaded the selection from the alpha channel.

35. Fill the selection with a color, pattern or gradient of your choice. I used an image of cymbidium orchids which I have included in the supplies zip.
36. I floated the selection and then applied the same cutout effect that I used on the fan slats layer.

The fan is now complete. For my final fan, I went back and added the cutout effect to my fan struts.
Thursday, June 25, 2009
Maple Leaf Preset Shapes
In honor of Canada Day (July 1), I am making available these Maple Leaf Preset Shapes. I hope that people will find them useful.

Tuesday, June 23, 2009
Blue Sampler
Here is a sampler of blue items that I made while testing scripts or writing tuts that I decided to keep. I hope that people find a use for them. I thought they were too pretty to delete.

Monday, June 22, 2009
Mason Jar Script

This mason jar script allows you to either choose the default colors (clear jar with a gold top) or to choose your own colors. The script is based on my mason jar tutorial, but it took a lot of writing to code in the gradients. So, there isn't any need to install gradients. I've stored the information in the script. The script has not been tested in PSP X2 as I do not have a PSP X2 tester. Please leave a comment if it works for you in PSP X2.
Sunday, June 21, 2009
Iridescent Bead

Supplies:
Iridescent Bead Preset
Cool Kitchen Environment Map
1. Put the Cool Kitchen image into your Environment Maps folder (usually, My Documents > My PSP Files > Environment Maps).
2. Put the HGG iridescent bead preset in your presets folder (usually, My Documents > My PSP Files > Presets).
3. Open a new canvas, 300 x 300.
4. Apply the Balls and Bubbles effect (Effects > Artistic Effects > Balls and Bubbles), selecting the HGG iridescent bead preset from the drop down menu. Change the color in the Material box by right-clicking the box and then choosing either a color, gradient or pattern.

5. If you want a round bead, you are now done. The script that I wrote will let you choose to make a pony bead or stay with a round bead. Apply the Cylinder effect (Effects > Geometric Effects > Cylinder - Horizontal) at 50% strength.

6. Select the raster deform tool and change Y Scale to 80.

The presets and the script are all in the same file. Please leave a comment if the script works in other versions of PSP.

Subscribe to:
Posts (Atom)