This tutorial will show you how to make a 2 inch seamless corrugated cardboard tile which you can then use as a pattern to fill a larger canvas.
Supplies:
Foreground-Background2 Gradient (optional)
1. Open a new canvas 600 x 600 at 300 dpi.
2. Choose #533c29 as the foreground color and #ffffff as the background color.
3. I went into my basement and measured the spacing of the ridges in a piece of corrugated cardboard. The each ridge is 3/16ths of an inch. Therefore, to match reality, a 2 inch piece of digital corrugated cardboard will need 10.6 ridges. I rounded to 11. Go to the fill bucket and then set either the foreground or background material to the foreground-background linear gradient with 11 repeats.
Style = Linear
Angle = 0
Repeats = 11
Addendum: After I finished this tutorial, I decided that I did not like the gradient. So, if you want a more distinctive ripple, I have included a modified foreground-background gradient (Foreground-background2.PspGradient) in the script zip file. Here is a sample of what the other gradient produces. I think it looks more corrugated.

4. Apply the medium hatch texture to the ridges to make the cardboard less smooth and glossy.
 Texture = Hatch medium lump
Size = 100
Smoothness =12
Depth = 7
Ambience =0
Shininess =0
Color = White
Angle = 187
Intensity = 50
Elevation = 30
5. Apply a motion blur to soften up the texture.

6. Remove the bright white by reducing the brightness and contrast (Adjust > Brightness and Contrast > Brightness/Contrast or Shift + B).
 Brightness = -10
Contrast = -10
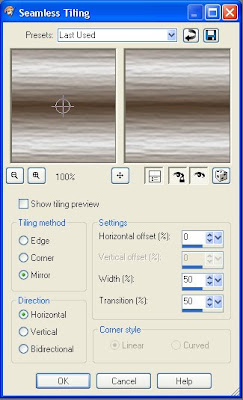
7. Use the seamless tile effect to blend the edges.
 Tiling method = Mirror
Direction = Horizontal
Horizontal offset = 0
Width = 50
Transition = 50
The corrugated cardboard is now complete and can be used for papers, tags and other projects.

I am including a corrugated cardboard script which makes a 2 inch x 2 inch piece of seamless corrugated cardboard. You can easily modify the script to make a 12 inch x 12 inch piece of cardboard by changing the linear gradient repeats to 69, but if you do not have enough memory, then the script will run very slowly. It is much faster to make the small seamless cardboard tile and then fill a larger canvas. Since I wrote this script while writing the tutorial, it has not been tested in other versions of PSP. If you get this script to work in another version of PSP, please leave a comment.

Tried it with PSP X2, did not work. Blank image at the end of the script. :(
ReplyDelete4shared appears to not have accepted the updated zip file which has (I hope) the functioning version of the script and the gradient. I will have to try to upload the new zip file again when I get home. Thank you for bringing it to my attention, Sylvie.
ReplyDeleteI've just tried this in PSP X11 and it worked fine. Many thanks:)
ReplyDeleteRedowloaded...retried...works great now! Thanks!
ReplyDeleteSylvie
Erzurum
ReplyDeleteElazığ
Konya
Zonguldak
Eskişehir
DD88
Adana
ReplyDeleteElazığ
Kayseri
Şırnak
Antep
HNA
görüntülüshow
ReplyDeleteücretli show
2FSRİ8
goruntulu show
ReplyDeleteücretli
EİHWX
3F743
ReplyDeleteBolu Evden Eve Nakliyat
Aydın Evden Eve Nakliyat
Tekirdağ Cam Balkon
Referans Kimliği Nedir
Ankara Evden Eve Nakliyat
16536
ReplyDeleteBursa Parça Eşya Taşıma
Edirne Lojistik
Mardin Lojistik
Hakkari Lojistik
Artvin Evden Eve Nakliyat
010E0
ReplyDeleteMaraş Evden Eve Nakliyat
Yozgat Evden Eve Nakliyat
Ordu Şehirler Arası Nakliyat
Iğdır Şehir İçi Nakliyat
Nevşehir Şehir İçi Nakliyat
Kırklareli Şehir İçi Nakliyat
Bilecik Lojistik
Urfa Evden Eve Nakliyat
Muğla Parça Eşya Taşıma
8E7D0
ReplyDeleteVindax Güvenilir mi
Tekirdağ Lojistik
Maraş Lojistik
Tokat Şehirler Arası Nakliyat
Mersin Şehir İçi Nakliyat
Paribu Güvenilir mi
Hamster Coin Hangi Borsada
Karapürçek Parke Ustası
Altındağ Parke Ustası
2C5BA
ReplyDeleteÇerkezköy Marangoz
Yozgat Şehir İçi Nakliyat
Konya Şehirler Arası Nakliyat
Mith Coin Hangi Borsada
Muş Parça Eşya Taşıma
Star Atlas Coin Hangi Borsada
Ünye Çelik Kapı
Nevşehir Şehirler Arası Nakliyat
Altındağ Boya Ustası
128BA
ReplyDeleteErzincan Evden Eve Nakliyat
Ünye Boya Ustası
Maraş Parça Eşya Taşıma
Samsun Evden Eve Nakliyat
Kırşehir Parça Eşya Taşıma
Pepecoin Coin Hangi Borsada
Edirne Evden Eve Nakliyat
Kütahya Lojistik
Bee Coin Hangi Borsada
3A4D0
ReplyDeletekastamonu kadınlarla ücretsiz sohbet
istanbul canlı görüntülü sohbet uygulamaları
amasya sesli mobil sohbet
kayseri yabancı sohbet
çanakkale yabancı görüntülü sohbet uygulamaları
parasız sohbet siteleri
en iyi sesli sohbet uygulamaları
bedava sohbet odaları
elazığ parasız görüntülü sohbet
D9B04
ReplyDeleteBolu Tamamen Ücretsiz Sohbet Siteleri
Muş Telefonda Kızlarla Sohbet
Kocaeli Sesli Sohbet
yalova canlı sohbet odası
hakkari kadınlarla ücretsiz sohbet
kızlarla canlı sohbet
kilis random görüntülü sohbet
Artvin Sohbet Muhabbet
kızlarla rastgele sohbet
4AB89
ReplyDeleteParibu Borsası Güvenilir mi
Kripto Para Üretme Siteleri
Pinterest Takipçi Hilesi
Mexc Borsası Güvenilir mi
Arg Coin Hangi Borsada
Pitbull Coin Hangi Borsada
Threads Beğeni Satın Al
Bitcoin Nasıl Üretilir
Mefa Coin Hangi Borsada
69AB9
ReplyDeleteBinance Hesap Açma
Madencilik Nedir
Binance Hangi Ülkenin
Lovely Coin Hangi Borsada
Görüntülü Sohbet Parasız
Gate io Borsası Güvenilir mi
Bitcoin Üretme
Dxy Coin Hangi Borsada
Binance Nasıl Oynanır
8C47D
ReplyDeleteGörüntülü Sohbet
Likee App Takipçi Hilesi
Telegram Görüntüleme Satın Al
Kripto Para Nasıl Alınır
Twitch İzlenme Hilesi
Sohbet
Likee App Beğeni Hilesi
Kripto Para Kazma Siteleri
Tumblr Takipçi Hilesi
D267C
ReplyDeleteBitcoin Madenciliği Nedir
Binance Referans Kodu
Btcturk Borsası Güvenilir mi
Bone Coin Hangi Borsada
Kripto Para Nasıl Çıkarılır
Binance Komisyon Ne Kadar
Twitter Retweet Satın Al
Mexc Borsası Kimin
Baby Doge Coin Hangi Borsada
974A9
ReplyDeleteMuş İftar Saatleri
Antalya İftar Saatleri
Mersin İftar Saatleri
İzmir İftar Saatleri
Kars İftar Saatleri
Edirne İftar Saatleri
Gaziantep İftar Saatleri
Nevşehir İftar Saatleri
Balıkesir İftar Saatleri
B3B148DAAD
ReplyDeletetwitter takipçi satın al
E27DB3E148
ReplyDeleteucuz takipci alma
A3F1E5F263
ReplyDeleteEn İyi Telegram Farm Botları
Yatırımsız Para Kazanma Telegram
Telegram Güvenilir Coin Oyunları
Telegram Para Kazanma Grupları
Binance Hesabı