Donations Welcome
I am currently saving toward a new version of Paint Shop Pro. If you wish to help me out, then please donate.
Larger versions of images can be seen by clicking on the image. Also, thank you for your kind and encouraging comments. I love reading the comments. If you use my any of freebies, I would be overjoyed with a comment containing a link to your item. I love seeing any of my freebies in use.
Showing posts with label commercial use ok. Show all posts
Thursday, November 18, 2010
Square Overlays 2
Here is a second set of square overlays which can be used in layers or alone for making patterned papers.
Saturday, October 2, 2010
Square Overlays 1
Here is another set of 5 overlays similar to the circle overlay set. I am still pondering whether I should go with a Premium 4shared account ( to make instant downloads available to everyone) or some other file sharing service. None of the services seem to be the best or even better. For every comment about someone liking a service, I've gotten an equal comment that another person hates that service (or that the service infected their computer with malware). So, I'm still undecided. Any more opinions?
Wednesday, September 15, 2010
Circle Overlay Set
This is a set of five overlays which can be mixed and matched to create different combinations of dot patterns.
Monday, September 13, 2010
Circle & Line Overlays
I have been really busy and haven't had much time to do a lot of designing, but I've been in a mood to make overlays. Here is a set of six transparent overlays.
Tuesday, August 24, 2010
Edge Overlays 3
Here is another set of edge overlays. I wanted to try some different brush settings and this is what I ended up with.
Thursday, August 19, 2010
Pinwheel Script
This is the script that I made while writing up the pinwheel tutorial. It has been tested and should work in all versions of PSP 9 and up.
Monday, August 16, 2010
Edge Overlays 2
I always seem to have way too many design projects on my docket and the list only seems to be getting longer, rather than shorter. I have several tutorials in the works, some scripts, some actions and instead of working on them, I made more edge overlays because it was fun. I also discovered that it was not possible to make edge overlays on my laptop. I kept running out of RAM. Sniff, so sad. My tutorial only works on my desktop with its spiffy NEW-ish RAM. Again, thanks to all the people out there who helped me get this RAM. It keeps me designing and creating.
I hope that people can use these overlays and if you do, I'd love it if you could share your creations with me.
Saturday, August 14, 2010
Train Template
I made this train template a few months back and I thought that other people could use it for making blog train tags. I'm providing in vector format as a PSPImage file. I have also converted to to layered PSD format. Both file formats are provided in the zip file.
Thursday, August 12, 2010
Sequin Script
Here is a script for PSP users. It has been tested and works in all versions of PSP 9 and up.
Sunday, August 8, 2010
Edge Overlays
Here is a set of 6 overlays that I made using my edge overlay tutorial. I hope that people can use them.
Friday, July 16, 2010
Sequins Action
Here is an action that makes sequins. It follows the steps in my tutorial but allows the user to choose the color of the sequin. It should work in PSE as there aren't any Photoshop-specific commands, but I have not tested it in PSE yet. I did not want to abuse the members of my group by asking them to test this action, therefore it has not been tested in other versions of Photoshop. If this action works for you in PSE or other versions of Photoshop, please leave a comment.
Tuesday, July 13, 2010
Twill Ribbon Action
A member of my group offered up this action which she made following my twill tape tutorial. I am delighted to share it with everyone. The author of the action states that this item is commercial use ok.
Saturday, June 26, 2010
Seamless Tile Script
It has been raining a lot here and I spent part of this week without power. My basement has also flooded twice. So, there hasn't been much scrapping as there has been a lot of cleanup to perform.
This is a utility script that I wrote while making patterns for a bunch of alphas. The script takes an image then mirrors it 3 times to create a seamless tile. It won't work with patterned images with directionality as the images will look like they are upside down. This script is a nice timesaver for me and I thought other people might find it useful so I am sharing it. It has not been tested, but I'm fairly confident that it will work PSP 9 and higher versions of PSP. If you use this script and it works for you, please leave a comment.
Friday, June 25, 2010
Triple Frame Scripts
This is a set of two scripts which make a set of triple frames. These scripts are the result of a request for scripts which make triple frames without embellishments. The scripts will take any color, gradient or pattern and turn them into a set of triple frames. I have not had these scripts tested, but they work for the requestor in PSP 9. I'm fairly confident that they will work in other versions of PSP. If you use these scripts in a different version of PSP and they work for you, then please leave a comment.
Monday, June 14, 2010
Removing Background in Photos
Tonight I decided to explore whether or not background removal in Photoshop was as fast and easy as people tried to portray. I decided to document my testing in case anyone else wanted to try, but my conclusion is that NO, background removal in Photoshop is not fast and easy.
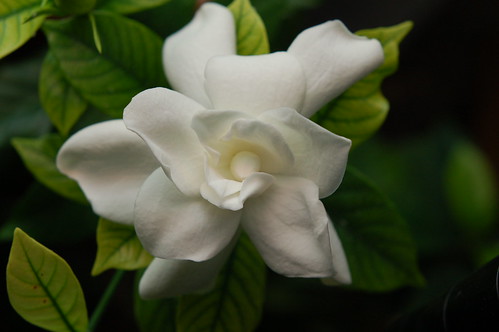
1. Open the photograph. I chose a picture of a gardenia that I took last year as it had nice contrast between the background and the flower. I figured it would be easy to extract the gardenia given the strong differences in color.
2. The extract tool is located in Filter > Extract (or Alt + Ctrl + X).
3. Select the highlight tool and set the brush size to so that you can easily trace the edges of the part of the image you wish to keep.
4. Try to trace only the edge of your object. Covering too much of the object itself will result in too much removal. I went with a brush size of 50. As you will see later, it removed a lot of the flower that I wanted to keep.
5. Optional. If you have a well-defined edge, select Smart Highlighting as it will create a highlight that is just wide enough to cover the edge, regardless of the current brush size. I thought I had a well-defined edge so I tried it.
6. After completely tracing the object so that there are no gaps, select the Fill tool and click in the interior of the object to select the part of the object that you wish to keep.
This is where the Smart Highlight failed as it did not create a completely closed trace and the entire image was selected.
7. Click the preview button to see what the extracted image would look like.
8. Optional. If too much of the object has been removed, select the eraser then make sure both 'Show Highlight' and 'Show Fill' are checked. Use the eraser to remove the excess highlight. Use the Fill tool and fill in the object after you finish erasing the excess highlight marks as the first eraser stroke will remove the fill. Preview again to make sure the background has been removed as desired.
9. Select OK once you are satisfied. This will extract the image and remove the background. You may still have an image where too much of the object has been removed and extraneous background bits. I certainly did.
Here is a closeup of my extracted gardenia. Notice the dark shadow between the petal and the transparent region.
10. Select the history brush, go to the history palette and find the step before the Extract step. Click the square to the left of the step to set the source for the history brush.
11. Select a solid brush for the history brush. I chose a round brush at 32 pixels in size and removed any extras except for smoothing.
12. Choose the same brush for the eraser tool.
13. Use the history brush to brush back any parts of the object which have been removed incorrectly by the Extract filter. Alternate with the eraser tool to remove any parts of the background which are still present.
Here is my final image after application of the history brush and the eraser.
The most labor-intensive part of this process was using the eraser and history brush to "tidy" up the image. This is summarized into a single step, but it actually took the most time. Once again, not fast and not easy.
If you came here looking for gardenia clipart, I have also made my extracted image available for use.
Wednesday, May 26, 2010
Mirrored Mitered Corners Frame
So, the original version of the script was not what the person was looking for. The mitered corners need to be mirrors of each other across the cut. Therefore, I've modified the original script to mirror the mitered corners. I have not had this script tested, but I am 99% confident that it should work in all versions of PSP from 9 on up. Please leave a comment if it doesn't.
Thursday, May 20, 2010
Circularize Script
The previous circular frame script did not fulfill the request. I made this script while working on a script to circularize an existing paper. Though that script is still incomplete, I have made this circularize script which may work with papers, but I haven't tested it yet. If you do not wish to use the script, you can follow my tutorial on how to circularize an element.
This script will take any linear element (ribbon, lace, wordart, string of beads, etc) and turn it into a circular element. The script should check for orientation of the element. Though the script works best if your linear element has its widest part going from left to right. It has been tested and works in all versions of PSP 9 and up. Please leave a comment if you have a problem with this script.
Sunday, May 16, 2010
Rectangular Frame Script
This is the companion to the elliptical frame script. This script takes any size paper and turns it into a rectangular or square frame the same size as the original paper. I have not had this script tested, but it is a modification of the elliptical frame script so I am 99% confident that it should work in all versions of PSP from 9 and up. Please leave a comment if this script does not work for you.
Friday, May 14, 2010
Elliptical Frame Script
This script was a request. It takes any size paper and turns it into either a round or an oval frame. The frame will be the same size as the original paper. I am still working on the script that will turn any paper into a square or rectangular frame.
Monday, May 10, 2010
Mitered Corner Frame Script
This script will allow you to take any size ribbon and turn it into a square frame with mitered corners. It should not matter what type of image you start with. The script will check for transparency. Testers have been able to use this script with lace and ric rac.
Subscribe to:
Posts (Atom)