Donations Welcome

I am currently saving toward a new version of Paint Shop Pro. If you wish to help me out, then please donate.

Larger versions of images can be seen by clicking on the image. Also, thank you for your kind and encouraging comments. I love reading the comments. If you use my any of freebies, I would be overjoyed with a comment containing a link to your item. I love seeing any of my freebies in use.

Thursday, June 18, 2009

Sunflower 2 Script

Here is the second version of the sunflower. It is supposed to look like it is starting to go to seed. I'm very excited as the glass for the conservatory has arrived and I have lost my backyard. Who knows if I'll do any scrapping in the next few weeks.

This script has not been test in PSP X2 because I do not have a PSP X2 tester. If it works for you in PSPx2, then please leave a comment.

Wednesday, June 17, 2009

Sunflower Script


Here is the script that makes the first version of the sunflower. I actually started this script last month, but became side-tracked with other ideas. It hasn't been tested in PSP X2, since I do not have a PSP X2 tester. If you are interested in becoming a tester, you can obtain more information in my CT call. If this script works for you in PSP X2, please leave a comment.

Tuesday, June 16, 2009

Sunflowers


I have been working on two sunflower scripts. Here are some examples of the scripts courtesy of Kelly. I am still looking for a PSP X2 tester. I have not been able to get a PSP X2 tester yet because my script testing requirements are quite extensive. If you are interested in joining my script testing team, please continue reading.

1. Someone willing to try to break the script. I write Python code in my scripts. I need someone who is willing to test everything in the script. I will write multiple choices into a script. Every choice needs to be tested. I have caused PSP to enter an infinite loop that can only be stopped by shutting down the program from the Task Manager. It is important that the tester do more than run the script once with the default options.

2. Someone willing to fill out a detail report with screenshots and error messages from the script output window when a script does break. You will need to provide the exact wording in the script output window when a script fails or provide a screenshot of the script output window which includes the line number where the code fails. It is critical that I know the line number where the script fails. You will need to state at which step the script stops. When I write vector-based scripts, past experience has shown that de-bugging in PSP X2 may take 10 or more emails to resolve.

3. Someone willing to offer up constructive criticism if the final output of a script is ugly. I want someone willing to say both that something is ugly and provide pointers on how to improve it.

4. Someone willing to send me the results of their testing for me to display/share on my blog.

If you are still interested in being a tester, then you may email me at spencer . aloysius @ gmail . com. Please remove all spaces.

Download Expired

Sunday, June 14, 2009

Life is a Banquet Alpha


There are three alphas in the zip.
  • 1 aged swiss alpha
  • 1 cracker alpha
  • 1 light swiss alpha

Life is a Banquet Blog Train

I ended up splitting the kit into three separate downloads, mostly because it is impossible to preview papers and elements together. Not everything is shown because I ran out of space on the previews.


This kit comes with:
  • 5 gradient papers
  • 2 parchment (for journaling)
  • 2 parchment with lines (for journaling)
  • 4 paperclips
  • 4 brads
  • 4 tags
  • 9 frames
  • 2 wineglasses
  • 2 champagne glasses
  • 1 champagne bottle
  • 1 ice bucket with 1 bottle
  • 1 ice bucket with 2 bottles
  • 1 grape vine
  • 1 single strawberries
  • 1 double strawberry
  • 1 chef's hat
The kit also comes with three alphas. See the next post for the alphas.

Here are all the links for the blog train:

Friday, June 12, 2009

Life is a Banquet Quick Page 4

Here is the last Life is a Banquet Quick Page. The train leaves on June 14.

Thursday, June 11, 2009

Mason Jar Tutorial


1. Open a new canvas 1200 x 1200.

2. Use the Rounded Rectangle selection tool and draw out the body of the jar.


3. Fill the selection with the gray gradient.

Angle = 90
Repeats = 1
Style = Linear
Invert = Checked

4. Change the opacity of the layer to 20%.

5. Apply the sunburst effect (Effects > Illumination Effects > Sunburst).

Light spot
Color = White
Brightness = 80
Horizontal = 25
Vertical = 15

Rays
Density = 50
Brightness = 50

Circles
Brightness = 50

6. Create a new raster layer.

7. Apply the cutout effect to create a shadow along the right edge and bottom of the jar.
Vertical = -60
Horizontal = -60
Opacity = 20
Blur = 80.00
Shadow color = Black

8. Create a new raster layer for the neck of the jar. Set the opacity of the layer to 40.


9. Use the Rounded Rectangle selection tool near the top of the jar and draw out a small neck.


10. Fill with the metallic silver gradient.

Angle = 0
Repeats = 0
Style = Linear
Invert = Unchecked

11. Create a new raster layer.

12. Apply the cutout effect to create a shadow along the right edge and bottom of the neck.


Vertical = -10
Horizontal = -10
Opacity = 29
Blur = 10.00
Shadow color = Black

13. At this point, you can select the jar layer and Ctrl + X to delete the section of the jar under the neck, but I didn't decide until after I was done that I didn't like the bit of neck, so I deleted it at the end.

14. Create a new raster layer for the lid.

15. Using the Rounded Rectangle selection tool, create the lid just above the neck. It should overlap the neck.


15. Fill with the metallic gold 02 gradient.

Angle = 0
Repeats = 0
Style = Linear
Invert = Unchecked

16. Select the warp brush and use it to dimple the lid along the right and left edges. Put the warp brush next to the lid, then push in to create the dimple. I put two dimples on each side to create the ridges where the lid would screw into the cap.


17. Use the magic wand to select the bit of gold at the top of the lid.


18. Promote the selection to a layer and Ctrl + D to de-select.

19. Use the raster deform tool to stretch the top of the lid.


20. Use the rectangle selection to select the bottom part of the stretched lid.


21. Apply the blinds effect to create the corrugated ridge along the rim of the lid.


Width = 15
Opacity = 100
Color = #987615
Horizontal = Unchecked
Light from left/top = Checked

Wednesday, June 10, 2009

Psychedelic Luminous Goo


I have been given a new award by Miggins and Wendy. Thank you both so much. I'm trying to make this post quickly before heading out for a 14 hour work day, so I'll have to pass it on later.

Here is a chipboard alpha for everyone before I leave.


And an oldie.

Tuesday, June 9, 2009

Parchment Texture in Paint Shop Pro


I wanted to see how easy or hard it would be to make a parchment texture in Paint Shop Pro versus Photoshop.

Supplies:

Balls and Bubbles Preset (Optional)

Because Paint Shop Pro does not have a clouds effect, it takes a bit more work to create a parchment paper texture. You can use a plugin, like Mura Meister Clouds or Eye Candy: Texture Noise and skip steps 5-11 .

1. Open a new canvas 1200 x 1200. I'm going to turn this into a seamless tile before using it to make a full-sized paper.

2. Fill the canvas with gray (#808080).

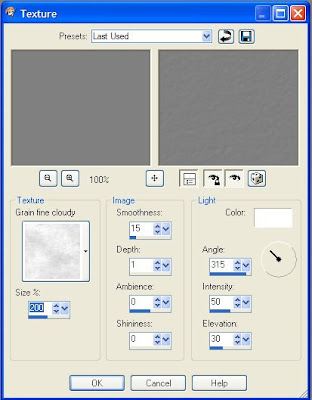
3. Apply the Grain fine cloudy Texture (Effects > Texture Effects > Texture).


Texture = Grain fine cloudy
Size = 200%
Smoothness = 15
Depth = 1
Ambience = 0
Shininess = 0
Color = White
Angle = 315
Intensity = 50
Elevation = 30

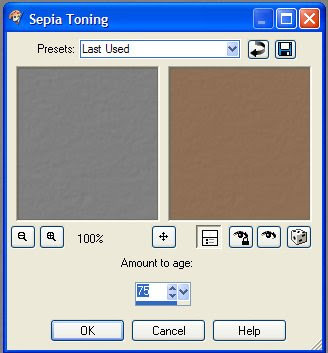
4. Sepia tone the image to age it (Effects > Artistic Effects > Sepia Toning).


Amount to age = 75

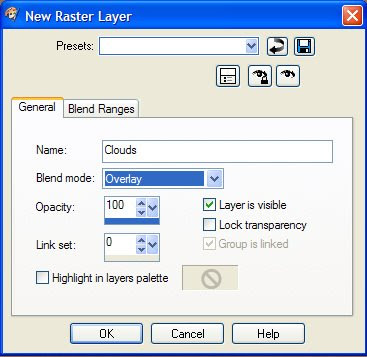
5. Now we will create the cloud effect. Create a new Raster Layer. Name it Clouds and change the blend mode to overlay.


6. Fill the layer with gray (#808080).

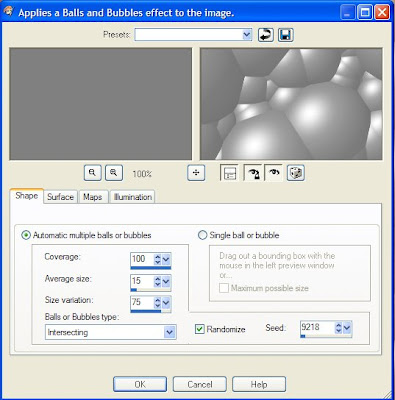
7. Apply the Balls and Bubbles effect (Effects > Artistic Effects > Balls and Bubbles).


Shape
Automatic multiple balls or bubble = Checked
Coverage = 100
Average size = 15
Size variation = 75
Ball or bubbles type = Intersecting
Randomize = Checked


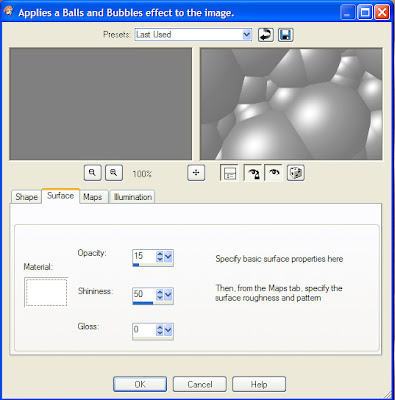
Surface
Material = White
Opacity = 15
Shininess = 50
Gloss = 0


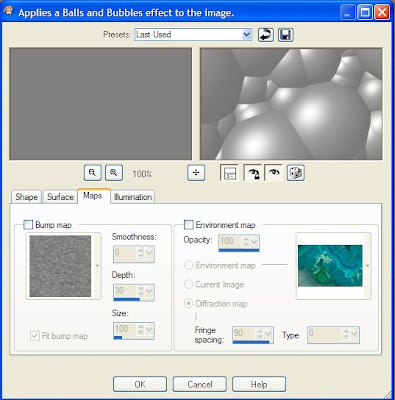
Maps
Bump Map = Unchecked
Environment Map = Unchecked


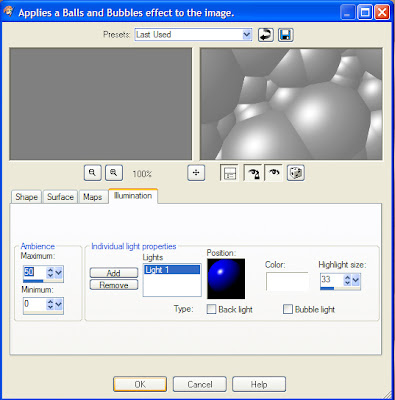
Illumination
Maximum = 50
Minimum = 0
Light 1
  • Position = Upper Left
  • Color = White
  • Highlight Size = 33
  • Back Light = Unchecked
  • Bubble Light = Unchecked
In case this is confusing, I have made a Balls and Bubbles Preset which you can place in your presets folder and load all the settings instead of trying to figure out my lighting positions.
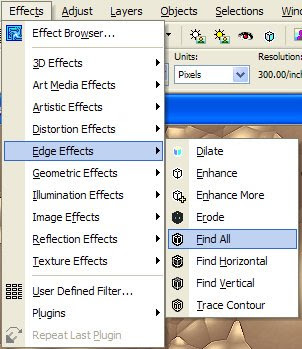
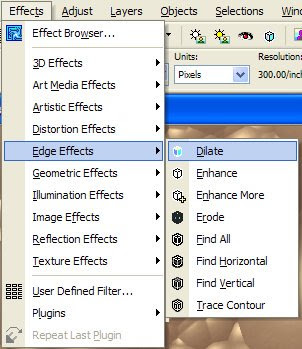
8. Dilate (Effects > Edge Effects > Dilate).


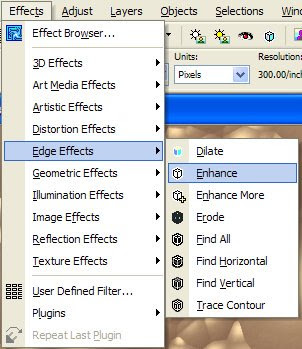
9. Enhance the edges (Effects > Edge Effects > Enhance).


10. Find the Edges (Effects > Edge Effects > Find All).


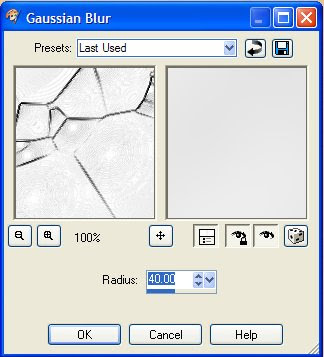
11. Gaussian Blur to create the clouds (Adjust > Blur > Gaussian Blur).


Radius = 40.0

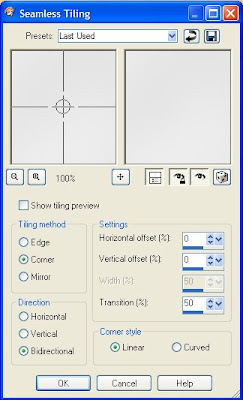
12. Seamless tile the Clouds layer (Effects > Image Effects > Seamless Tiling).


Tiling Method = Corner
Direction = Bidirectional
Horizontal offset (%) = 0
Vertical offset (%) = 0
Transition (%) = 50
Corner style = Linear

13. Merge the layers (Layers > Merge > Merge Visible).

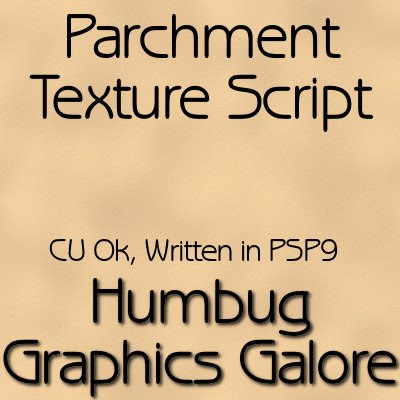
The parchment texture is now complete and can be used as a seamless tile to create larger papers. I have also made a script out of this tutorial which for those of you who want this to be as easy as an action in Photoshop.