Since I didn't post chipboard alphas over the weekend, today there are two old alphas and two new alphas.

Tuesday, March 17, 2009


Monday, March 16, 2009
Psychedelic Glazed Globules

 Glazed Globules
I'm still trudging along and re-doing the old chipboard alpha previews as well as making previews for the new chipboard alphas.
Sunday, March 15, 2009
Raspberry Swirl

Once again I would like to thank Lou for helping me with my preview. This little kit comes with:
2 papers
3 brads
1 button
2 flowers
2 frames
2 alphabets
1 bow
1 raspberry
Saturday, March 14, 2009
Sequins Alpha

Thanks to Lou of Designz by Lou for helping with this preview. I made this alpha using sequins that Lou had made and which Seacastle Graphics had tubed.
Thursday, March 12, 2009


Wednesday, March 11, 2009
Psychedelic Future Farms
I'm really behind with scrapping today. The kneebiter is sick and I was up a lot last night. I anticipate that tonight will be just as bad.


Tuesday, March 10, 2009
Psychedelic Fusion Fire

 Fusion Fire
If I haven't mentioned it recently, I hate making previews. I wish there was some way to let people know what I've made without having to made a preview. This is probably why I don't make layouts.
Monday, March 9, 2009
Seamless Glitter in ArtRage
This tutorial will show you how to remove seams using ArtRage. Unless you have a perfect hand and can color without going over the edges of your canvas, it is impossible to create a seamless image in ArtRage alone. To make a seamless glitter tile using ArtRage, you will need a second program. I have listed the various options in step 4.
1. Open a new painting in ArtRage (this tutorial uses ArtRage 2.5). The tutorial uses a 600 x 600 image at 72 dpi.
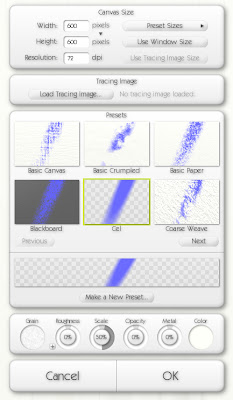
2. Fill the canvas with glitter. Click on the image to see my settings or use your own.
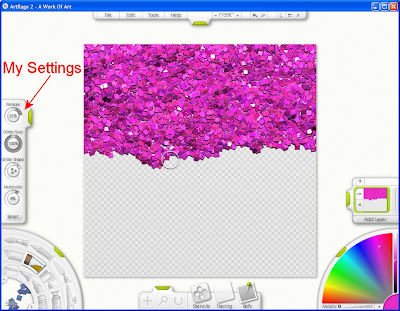
3. Export the image. I prefer to export as PNG.
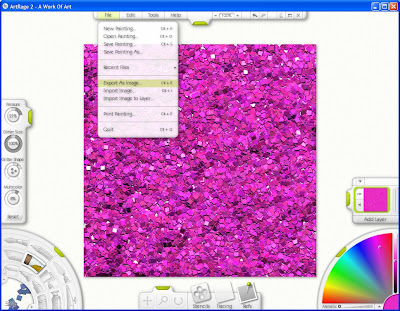
4. Now, the edges of the image must be swapped with the middle. This is accomplished by offsetting the vertical and horizontal by 50%. You can perform this action several ways though all require opening up the image in a different program. See the list.
A. Offset with Paint Shop Pro
Go to Effects > Image Effects > Offset.
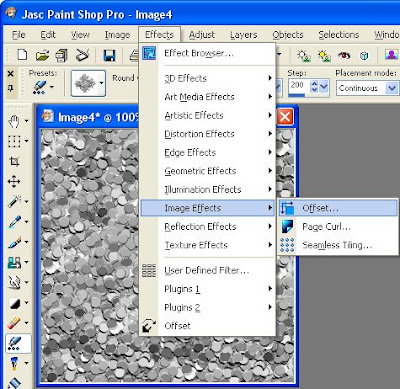
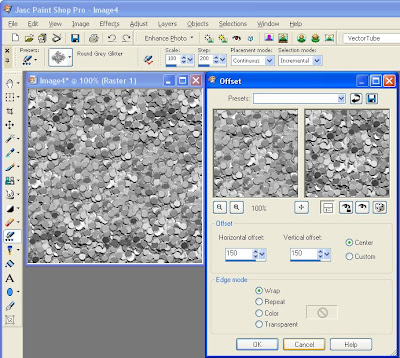
Horizontal offset = 300 (Or 50% the width of your image)
Vertical offset = 300 (Or 50% the height of your image)
Center = checked
Edge Mode = Wrap
NOTE: When you select center, the horizontal and vertical offset numbers will automatically change to be half of your image size.
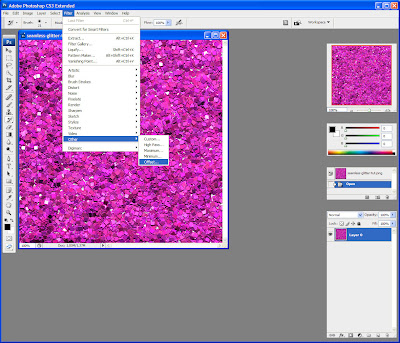
B. Offset with Photoshop
Go to Filter > Other > Offset.
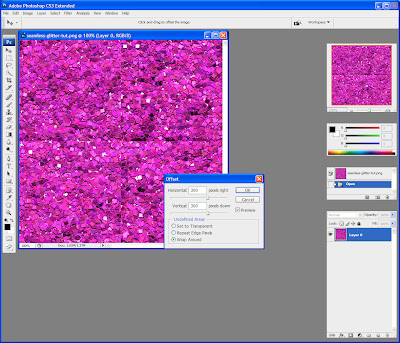 Horizontal = +300 (or 50% of your image width)
Vertical = +300 (or 50% of your image height)
Undefined Areas = Wrap Around
C. Simple Filters - Half Wrap
Simple Filters is a plugin for PSP (and perhaps Photoshop as well). The Half Wrap moves the image 50% down and 50% to the right.
D. Teph's Tricks - Wrap Filters
The Offset Wrap filter from Teph's Tricks is a plugin for PSP and Photoshop.
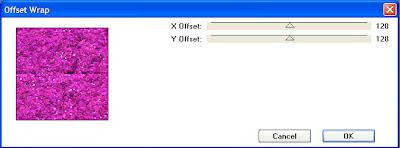 X Offset = 128
Y Offset = 128
Or you can use Slide X 50% filter followed by the Slide Y 50% filter. Both of these are also available from Teph's Tricks.
E. Offset with Gimp
Go to Layer > Transform > Offset. Click Offset by x/2, y/2. When you click Offset by x/2, y/2, Gimp will automatically fill in X and Y with the correct numbers.
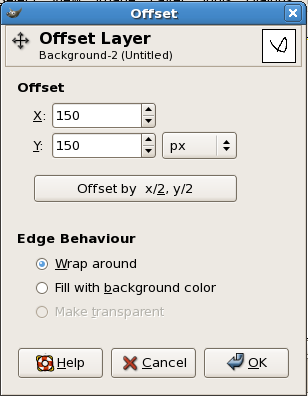 Edge Behaviour = Wrap Around
F. ImageMagick
The command line option for offsetting in ImageMagick is -roll {+-}x{+-}y
Though, if you are using ImageMagick, then you shouldn't be reading this tutorial because you already know far about image manipulation than this tutorial can provide.
5. Once the image has been offset so that the edges are now in the center, save it and import the image back into ArtRage (File > Import Image). Set Pressure to 14%. This will prevent the glitter from going off the edge of the canvas.
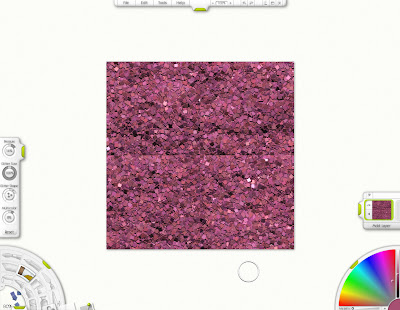
6. Put the glitter cursor at the top center of the image, directly over the seam, but without going over the edge of the canvas.
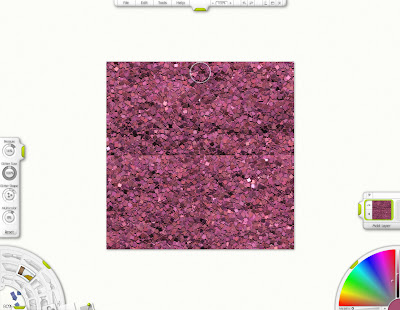
7. Glitter down the seam to the bottom of the canvas. Make sure not to go off the edge of the canvas. Repeat along the horizontal seam.
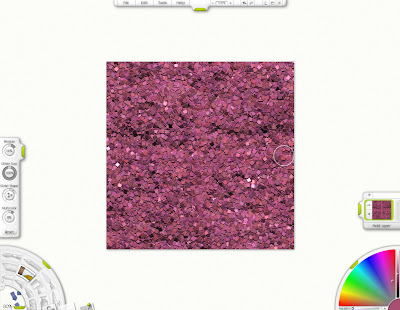
Now you have a seamless glitter tile.
1. Open a new painting in ArtRage (this tutorial uses ArtRage 2.5). The tutorial uses a 600 x 600 image at 72 dpi.

2. Fill the canvas with glitter. Click on the image to see my settings or use your own.

3. Export the image. I prefer to export as PNG.

4. Now, the edges of the image must be swapped with the middle. This is accomplished by offsetting the vertical and horizontal by 50%. You can perform this action several ways though all require opening up the image in a different program. See the list.
A. Offset with Paint Shop Pro
Go to Effects > Image Effects > Offset.


Horizontal offset = 300 (Or 50% the width of your image)
Vertical offset = 300 (Or 50% the height of your image)
Center = checked
Edge Mode = Wrap
NOTE: When you select center, the horizontal and vertical offset numbers will automatically change to be half of your image size.
B. Offset with Photoshop
Go to Filter > Other > Offset.

 Horizontal = +300 (or 50% of your image width)
Vertical = +300 (or 50% of your image height)
Undefined Areas = Wrap Around
C. Simple Filters - Half Wrap
Simple Filters is a plugin for PSP (and perhaps Photoshop as well). The Half Wrap moves the image 50% down and 50% to the right.
D. Teph's Tricks - Wrap Filters
The Offset Wrap filter from Teph's Tricks is a plugin for PSP and Photoshop.
 X Offset = 128
Y Offset = 128
Or you can use Slide X 50% filter followed by the Slide Y 50% filter. Both of these are also available from Teph's Tricks.
E. Offset with Gimp
Go to Layer > Transform > Offset. Click Offset by x/2, y/2. When you click Offset by x/2, y/2, Gimp will automatically fill in X and Y with the correct numbers.
 Edge Behaviour = Wrap Around
F. ImageMagick
The command line option for offsetting in ImageMagick is -roll {+-}x{+-}y
Though, if you are using ImageMagick, then you shouldn't be reading this tutorial because you already know far about image manipulation than this tutorial can provide.
5. Once the image has been offset so that the edges are now in the center, save it and import the image back into ArtRage (File > Import Image). Set Pressure to 14%. This will prevent the glitter from going off the edge of the canvas.

6. Put the glitter cursor at the top center of the image, directly over the seam, but without going over the edge of the canvas.

7. Glitter down the seam to the bottom of the canvas. Make sure not to go off the edge of the canvas. Repeat along the horizontal seam.

Now you have a seamless glitter tile.
Psychedelic Fudge Chunks
I want to thank everyone who has left comments. They are not necessary, but I do read them and they are much appreciated.
Here is the newest psychedelic chipboard alpha.

Here is the newest psychedelic chipboard alpha.

Sunday, March 8, 2009
Psychedelic Set Re-do

I have a real hangup with chipboard alphas. I really love them. I know that they probably won't get a lot of use from people, but I just love making them. So, I made more alphas in my Psychedelic series. Also, I decided that it was probably too hard for people to figure out which chipboard alpha they liked in my old previews, so I'm re-doing the old previews. Each day for the next month, I will post one old preview and alpha along with a new preview and alpha.

Subscribe to:
Posts (Atom)