Pages
▼
Friday, June 11, 2010
Stained Glass
This tutorial will show you how to make different types of stained glass and then use those patterns to create your own stained glass window. You will need a stained glass pattern. I made mine using stained glass clipart from Dover. There is also completely free stained glass patterns at find-stainedglasspatterns.com. Since this tutorial is for Art Nouveau theme of SNL 63, I am providing a link to free Art Nouveau stained glass patterns.
I live in an area where many of the turn of the century homes have stained glass windows. It is commonly called Art Glass in my area. Therefore, there is a lot of Art Nouveau stained glass in windows as I walk through the neighborhood. So, as part of this tutorial, I walked around to see what types of glass were commonly seen in Art Nouveau glass. This is not a comprehensive study, but as a result of my observations, I am going to show you how to make two different types of glass: hammered glass and streaky glass. There is not much streaky glass in my area and I tend to associate it with more modern glass creations.
Monotone Hammered Glass Pattern
1. Open up a new canvas. I'm making mine 3600 x 3600 so that the final glass could also be used as a background paper.
2. Fill the canvas with the color of your choice (Edit > Fill > Color).
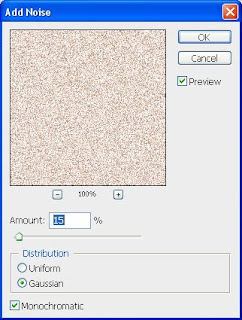
3. Add 15% noise (Filter > Noise > Add Noise). If you have a much smaller image, reduce the noise percentage.
Amount = 15%
Distribution = Guassian
Monochromatic = Checked
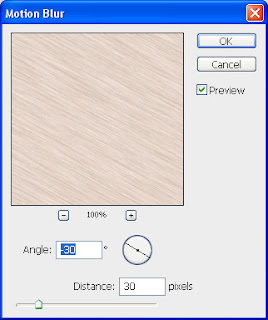
4. Apply the Motion Blur filter (Filter > Blur > Motion Blur). If you have a much smaller image, reduce the distance.
Angle = -30
Distance = 30
5. Apply the Crystallize filter (Filter > Pixelate > Crystallize). If you have a much smaller image, reduce the cell size.
Cell Size = 25
6. Apply the glass distortion filter (Filter > Distort > Glass). If you have a much smaller image, reduce the distortion, smoothness and scaling.
Distortion = 10
Smoothness = 5
Texture = Frosted
Scaling = 200%
Duotone Hammered Glass Pattern
1. Open up a new canvas. I'm making mine 3600 x 3600 so that the final glass could also be used as a background paper.
2. Select one color as your foreground color and one color as your background color by left-clicking on the square that corresponds to the foreground/background then selecting a color with the color picker or choosing one from the color palette that pops up.
3. Apply the clouds filter (Filter > Render > Clouds).
4. Add 15% noise (Filter > Noise > Add Noise). If you have a much smaller image, reduce the noise percentage.
Amount = 15%
Distribution = Guassian
Monochromatic = Checked
4. Apply the Motion Blur filter (Filter > Blur > Motion Blur). If you have a much smaller image, reduce the distance.
Angle = -30
Distance = 30
5. Apply the Ocean Ripple filter (Filter > Distort > Ocean Ripple). If you have a much smaller image, reduce the ripple size and ripple magnitude.
Ripple Size = 15
Ripple Magnitude = 20
Streaky Glass
1. Open up a new canvas. I'm making mine 3600 x 3600 so that the final glass could also be used as a background paper.
2. Select one color as your foreground color and one color as your background color by left-clicking on the square that corresponds to the foreground/background then selecting a color with the color picker or choosing one from the color palette that pops up.
3. Fill the canvas with your foreground color (Edit > Fill > Foreground).
4. Apply the Fiber filter (Filter > Render > Fiber).
Variance = 20
Strength = 10
5. Apply the Wave filter (Filter > Distort > Wave).
Number of Generators = 5
Wavelength Min = 10
Wavelength Max = 327
Amplitude Min = 5
Amplitude Max = 188
Scale Horiz = 100
Scale Vert = 100
Type = Sine
Undefined Areas = Wrap Around
6. Optional. Apply the Twirl Filter if you want to add some spin to the wave pattern (Filter > Distort > Twirl)
Angle = 100
7. Apply the Motion Blur to soften up the streaking (Filter > Blur > Motion Blur).
Angle = -30
Distance = 30
Stained Glass Lead
1. Load your stained glass design. I loaded mine as a smart object since I traced the stained glass design in Illustrator. If you also wish to do this, use my tracing tutorial. My image is approximately 3200 x 3500 pixels.
2. I used styles to create the look of the lead.
The Bevel and Emboss style uses the default settings.
Change the contour bevel to Half Round.
My stained glass pattern was black, so I changed the color with the color overlay.
I increased the size of the stroke to 5 pixels. You may wish to have a smaller stroke if your image is smaller than mine.
3. Use the magic wand selection tool to choose the areas for a particular glass pattern.
4. Create a new layer (Layer > New > Layer).
5. Create a new layer mask revealing the selection (Layer > Layer Mask > Reveal Selection).
6. If your glass pattern is not already open, open it in Photoshop. Drag it onto the glass pattern canvas and position it so that it covers the entire selection or canvas.
NOTE: I had to reduce the size of my glass pattern before applying the different types of stained glass because my computer began to run out of memory and I did not want it to crash before I finished the tutorial.
7. The glass pattern layer should be a new layer directly above the layer with the mask. Merge the glass pattern layer with the layer containing the mask (Layer > Merge Down). Choose to Preserve the layer mask when asked.
8. Select the layer with the stained glass design and repeat steps 3-7 for each different glass pattern.
Here is my final stained glass design. Click on it for a large view that shows the glass patterns in more detail.


Thanks for this Spencer it´s awesome:)
ReplyDeleteHello and Thank you for this stained glass tute...
ReplyDeleteWish this was for psp, too, hint hint--gonna have a try at it anyway, hoping I can find similar effects in my psp--I needed a project this morning, anyway!
ReplyDeletethanks for your nicely presented detailed tutorial.
ReplyDeletehope you would provide more like this.
clipping path
Thanks for that nice little tutorial. It all worked straight away ( very rare with me ) and i am now inspired to continue digging in that direction. Cheers and keep up the good work.
ReplyDeleteclipping path