

This tutorial will show you how to make a paper with a starburst pattern in Paint Shop Pro.
1. Open up a new canvas. Mine is 3600 x 3600 at 300 dpi for a full size paper.
2. Fill the canvas with a color using the Fill Bucket.

3. Create a new layer (Layers > New Raster Layer).
4. Use the custom selection tool to create a 3600 x 200 selection in the center of on the new layer.


Right = 1800
Top = 0
Bottom = 3600
5. Fill the selection with a contrasting color.

6. Ctrl + D to select none.
7. Use the Pattern effect (Effects > Reflection Effects > Pattern) to create vertical stripes. Create as many stripes as desired. I chose 9 stripes.

Vertical offset = 0
Rotation angle = 0
Scale factor = 1
Number of columns = 9
Number of rows = 3
Horizontal shift = 0
Vertical shift = 0
8. Finish by using the Polar Coordinates deformation (Effects > Distortion Effects > Polar Coordinates) to create the starburst.
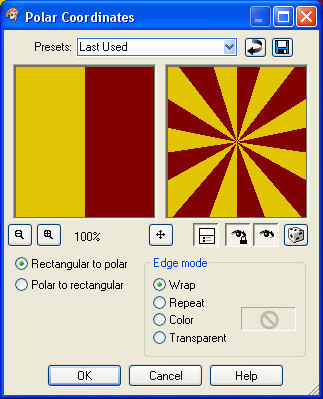
Rectangle to polar = Checked
Edge mode = Wrap
Just a quick note to let you know that a link to this post will be placed on CraftCrave today [20 Dec 01:00am GMT]. Thanks, Maria
ReplyDeleteThis is awesome, Spencer! Just what I've been looking for! Thank you :)
ReplyDeleteThis is a cool tutorial, Spencer. I've gotten to the point where instead of searching the web for a tutorial on anything scrapping and finally having to throw up my hands in defeat, I just come here. LOL! Keep up the good work!
ReplyDeleteAwesome. Very easy to follow. Thank you.
ReplyDelete