Pages
▼
Friday, April 30, 2010
Postage Stamp
This tutorial shows how to turn an image into a postage stamp using Paint Shop Pro.
Supplies:
Victorian Clipart
1. Open clipart in Paint Shop Pro. I am using a vintage Victorian calling card.
2. The average postage stamp is about an inch to 1.5 inches in length and 3/4 of an inch to 1 inch wide. Therefore, resize the clipart to 450 pixels on one side (assuming 300 dpi).
3. Add 20 pixel borders to the image (Image > Add Borders). I chose a border color from my image (#f2e1c7)
Top = 20
Left = 20
Right = 20
Bottom = 20
Symmetric = Checked
Color = #f2e1c7
4. Go to the Layers menu and select Promote Background Layer. Add borders automatically flattens the image to the background.
5. Select the eraser tool. Select the round 25 shape click the upper left corner. Change the hardness to 95 and the step to 140.
Size = 25
Hardness = 95
Step = 140
Density = 100
Thickness = 100
Rotation = 0
Opacity = 100
6. Click the image in the upper left-hand corner.
7. Press the Shift key and click the image in the upper right-hand corner.
8. Keep the Shift key depressed and click in the lower right-hand corner.
9. Keep the Shift key depressed and click the lower left-hand corner.
10. Keep the Shift key depressed and click in the upper left-hand corner.
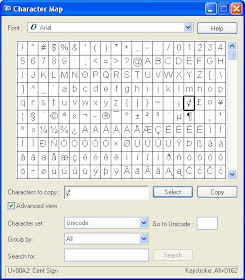
11. The basic stamp is now complete if you do not wish to add a denomination to the stamp. If you want to add a denomination, the cents sign can be difficult to add. I open the Character Map tool in Windows and select the cents sign (Unicode 00A2), then copy and paste it into my open Text window to get it in the correct font.
Here is the final stamp.


Just a quick note to let you know that a link to this post will be placed on CraftCrave today [01 May 02:00pm GMT]. Thanks, Maria
ReplyDeleteHello and Thank you for sharing this great tutorial...
ReplyDeleteWhat a great idea!! i'ld like to know more how many people you met on 1st sept, i'm quite late to see this blog.Very good! Nice information this is really interesting. Good luck in building the table.
ReplyDeletephoto retouching
Very interesting tutorial on how to Postage Stamp in photoshop. I’ve just now starting to pay attention to the tutorial on my blog ...Thanks for sharing your talent and expertise! Very detailed and well thought out
ReplyDeleteclipping path bd
awesome tutorial!!!good information.Gorgeous this web page will be famous amid all blogging users, due to it’s fastidious content and article.
ReplyDeleteIt is a very nice post. thanks for sharing!
https://www.clippingpathexclusive.com/
Really it was amazing post. Thank you for sharing with us.
ReplyDeleteeCommerce photo editing | photo retouching | amazon photo editing services | Clipping Path With Shadow Service | Real Estate Photo Editing Services | Background Removal Service
It is a very nice blog. Really it is a very international destination post. Thanks for sharing this post.
ReplyDeleteoutsourcing training center in Bangladesh
Great post. I am looking for this kind of post for a long time. Thanks.
ReplyDeleteclipping Path Service
Useful tutorial! Give another on color correction in phootshop. Color Correction Service is the process of changing the color of an image. Sometimes we need to change color or create variation with different color for the same object. Our company offers this service to its client.
ReplyDeleteIt's truly great to check out and really useful. A lot thanks for the sharing. I was seeking that as well as this is very essential for me. Thanks!
ReplyDeleteBest Regards,
images retouches