Pages
▼
Friday, April 30, 2010
Postage Stamp
This tutorial shows how to turn an image into a postage stamp using Paint Shop Pro.
Supplies:
Victorian Clipart
1. Open clipart in Paint Shop Pro. I am using a vintage Victorian calling card.
2. The average postage stamp is about an inch to 1.5 inches in length and 3/4 of an inch to 1 inch wide. Therefore, resize the clipart to 450 pixels on one side (assuming 300 dpi).
3. Add 20 pixel borders to the image (Image > Add Borders). I chose a border color from my image (#f2e1c7)
Top = 20
Left = 20
Right = 20
Bottom = 20
Symmetric = Checked
Color = #f2e1c7
4. Go to the Layers menu and select Promote Background Layer. Add borders automatically flattens the image to the background.
5. Select the eraser tool. Select the round 25 shape click the upper left corner. Change the hardness to 95 and the step to 140.
Size = 25
Hardness = 95
Step = 140
Density = 100
Thickness = 100
Rotation = 0
Opacity = 100
6. Click the image in the upper left-hand corner.
7. Press the Shift key and click the image in the upper right-hand corner.
8. Keep the Shift key depressed and click in the lower right-hand corner.
9. Keep the Shift key depressed and click the lower left-hand corner.
10. Keep the Shift key depressed and click in the upper left-hand corner.
11. The basic stamp is now complete if you do not wish to add a denomination to the stamp. If you want to add a denomination, the cents sign can be difficult to add. I open the Character Map tool in Windows and select the cents sign (Unicode 00A2), then copy and paste it into my open Text window to get it in the correct font.
Here is the final stamp.
Monday, April 26, 2010
Magical Mystery Tour
I decided at the very last minute to take part in the Magical Mystery Tour Blog Train so there isn't much to my contribution. The zip file contains:
- 6 alphas (uppercase, lowercase and numbers)
- 6 swirls (from my swirl tutorial)
- 4 glitter trails
- 3 castle frames
Here are all the participants in the blog train:
- Best Kept Memories
- CandysTreasures
- Crafty Scraps
- Humbug Graphics Galore <--- You Are Here
- Karen's Scraps and Graphics
- Purple Dragonfly Creations
- Jabi's Scraps
Wednesday, April 21, 2010
Swirls
This tutorial will show you how to make swirls using Illustrator and then transfer the swirls to Photoshop.
1. Open a new canvas in Illustrator.
2. Select the spiral tool by left-clicking on the Line Segment Tool (\), holding the mouse button down for a few seconds until the menu expands and then selecting the spiral tool.
3. Click anywhere on the canvas. This will cause the spiral tool menu to appear.
4. The spiral tool menu has four options. I have drawn a diagram that shows that happens when you increase or decrease radius, decay and segments.
5. Select the options for your swirl and then click ok. A swirl will appear on your canvas. Make as many swirls as you like.
6. If you make more than one swirl, then use the Selection Tool (V) to select them all.
7. Once the swirl objects are selected, the tool bar will show options for changing the fill color, outline color, stroke width or opacity. You can also apply a brush style or graphic style. I've made a diagram of the different settings in the tool bar depending on whether you have a single object selected or multiple objects selected. If you only make a single swirl, then you do not need to use the Selection Tool to select it. The toolbar at the top of the workspace will show the options for the Single Object.
8. Click the arrow next to the brush style. It will produce the brush style menu and you can then select one of the available brush styles. The style will be applied to all selected objects. I've applied the tapered stroke which comes with Illustrator CS3.
9. To take the finished swirl into Photoshop, select the object, then Edit > Copy (Ctrl + C) to copy.
10. Go to Photoshop and open a canvas (if one is not already open), then Edit > Paste (Ctrl + V) to paste. A menu will appear asking you how you want to paste the object.
11. I pasted the swirl as a smart object. The swirl can now be converted to a brush or used as-is.
Tuesday, April 20, 2010
Laurel Wreath
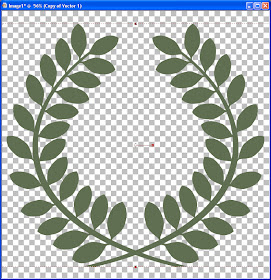
I wrote this tutorial for Limequilla. It is way too long to send in email. It shows how to make a laurel wreath using the vector tools in Paint Shop Pro.
1. Open a new canvas with a vector layer. Mine is 1200 x 1200.
2. Use the rectangle tool and make a rectangle in the color desired for the stem of your laurel wreath. Mine is #606f51.
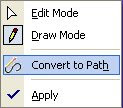
3. Convert the rectangle to a path by Right-clicking on the rectangle and selecting Convert to Path.

4. Select the pen tool. Click the upper right hand node. Right-click and change the node type to Curve After.
5. Right-click on the upper left hand node and change the node type to Curve Before.
6. Right-click on the lower left hand node and change the node type to Curve After.
7. Right-click on the lower right hand node and change the node type to Curve Before. Now we are ready to bend the stem for the wreath.
8. Pull the handles for each node over to the left. I moved the handles straight left and placed them either 1 grid block (for a handle on the left side of the rectangle) or 2 grid blocks (for a handle on the right side of the rectangle) from the left edge of the canvas. I moved my rectangle closer to the center of the canvas before I started so that I could get more curve on the stem. I have provide screenshots of the end location of each of my handle movements so that you can duplicate my curved stem.
9. Move the lower right hand node to the right to widen the bottom of the stem.
10. Move the handle for that node back to its original place on the left so that the middle of the stem is not too wide.
11. The stem is now complete. Now use the ellipse tool to make a leaf-sized ellipse somewhere on the canvas. The location does not matter as it will be moved later after it has been turned into a leaf.
12. Convert the ellipse into a path by right-clicking and selecting Convert to Path.
13. Select the pen tool. Now add a node by pressing the Ctrl key and clicking a point on the ellipse between the right node and the bottom node of the ellipse.
14. Add a second node by pressing the Ctrl key and clicking a point on the ellipse between the left node and the bottom nod of the ellipse.
15. To create the stem of the leaf, push the left node in toward the middle of the ellipse.
16. Push the right node in toward the middle of the ellipse.
17. Right-click the node at the top of the ellipse and change the Node Type to Cusp.
18. Move the right handle of the node down.
19. Move the left handle of the node down to give the leaf a pointed tip.
20. Select the node on the left of the ellipse and push it toward the center.
21. Select the node on the right of the ellipse and push it toward the center to create a thin oval leaf with a pointed tip.
22. Go to the Object Selection Tool (or the Pick Tool) and use it to move the leaf to the stem. Rotate the leaf until it is oriented the way that you like.
23. Ctrl + C to copy the leaf and then Ctrl + G to paste it as a vector. Move the new leaf with the Object Selection Tool to the desired location and rotate it slightly so that it follows the curve of the stem. If you placed your first leaf in the same location as I did, then you second leaf should be rotated clockwise. Repeat this step until all the leaves have been placed, including one at the apex of the stem.
24. Increase the canvas size to 1400 x 1400 if you made your branch as large as mine and want to be able to rotate the entire laurel branch without part of the branch going off the canvas.
25. With the Object Selection Tool, select the entire laurel branch.
26. Hover over the handle in the middle of the selection and rotate the branch about 10 degrees or until the apical leaf is to the left of the bottom of the stem.
27. Optional Stem Extension. If you want the branches of the wreath to cross at the bottom, then extend the stem. First, go to the pen tool. Click the stem to make it the active vector object. Then, in Edit Mode (with the arrow selected) click a point below and to the left of the two nodes that form the bottom of the stem. Holding the mouse button down, drag out the selection rectangle to encompass both nodes that form the bottom of the stem.
28. Optional Stem Extension. Drag the two nodes to the right.
29. Optional Stem Extension. Right-click and in the Edit sub menu choose Select None.
30. Optional Stem Extension. Click the left node and then pull the handle for the node back to the left side of the canvas.
31. Optional Stem Extension. Click the right node and then pull the handle for the node back to the left side of the canvas.
32. Optional Stem Extension. Use the Object Selection Tool to select the entire branch. This step is optional because your entire branch should already be selected if you skipped the optional stem extension steps.
33. Move the branch to the left side of the canvas.
34. Duplicate the layer (Layers > Duplicate).
35. Ctrl + M to mirror the duplicated layer.
I'm providing the file in PSP format. It was so many steps to put all the leaves on that many steps were no longer in my history when I finished so there is no script.


