2. Fill canvas with the color of your choice.
3. Select All (Ctrl + A).
4. Select a 10 pixel border (Selections > Modify > Select Selection Borders)
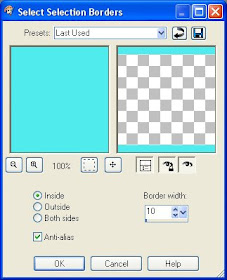
Inside = Checked
Anti-alias = Checked
Border width = 10
5. Fill the selection with a color.
6. Resize Canvas (Image > Canvas Size) to 3580 x 150.
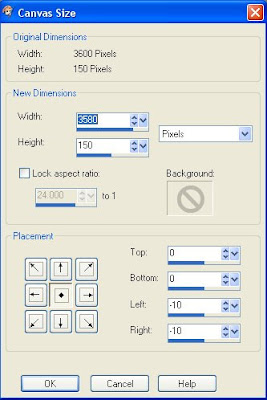
Width = 3580
Height = 150
Canvas Placement = Center
7. Apply the Blinds Effect (Effects > Texture Effects > Blinds).
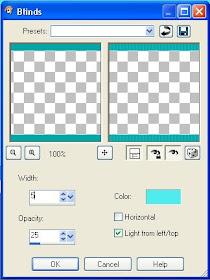
Width = 5
Opacity = 25
Color = (Same as the color in step 5)
Horizontal = Unchecked
Light from left/top = Checked
8. Invert Selection (Ctrl + I).
9. Apply the Halftone Effect (Effects > Artistic Effects > Halftone).
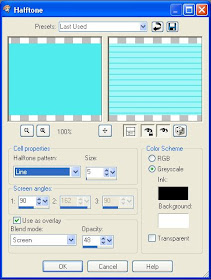
Halftone Pattern = Line
Size = 5
Screen angles = 90
Use as overlay= Checked
Blend mode = Screen
Opacity = 48
Color Scheme = Greyscale
Ink = Black
Background = White
Transparent = Unchecked
10. Select None (Ctrl + D) and the basic ribbon is complete.
Optional:
11. Add depth to the stripes. Select the stripes with the magic wand.
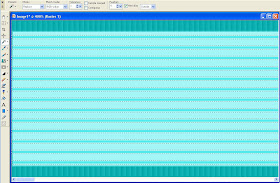
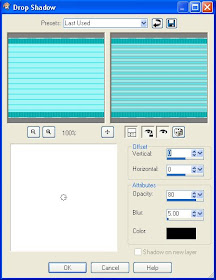
12. Apply a weak drop shadow (Effects > 3D Effects > Drop Shadow) to the stripes.
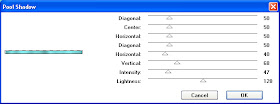
13. Add depth to the ribbon with the very popular Greg's Factory Output Vol. II: Pool Shadow plugin. This gives the ribbon a rippled look.
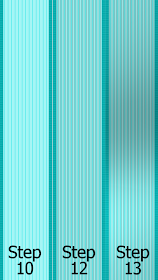
Here is a comparison of the ribbons after each of the optional steps.

Great Tutorial Spencer!
ReplyDeleteThanks so much!!!
Hugs!