Pages
▼
Saturday, January 31, 2009
Wire and Diamond Heart Alpha
Here is the first in a new series of alphas from me, gemstone hearts. I know lots of people have released gemstone hearts, but I made these myself! Also, I don't think there is an alpha like there yet.
Thursday, January 29, 2009
Gold Wire and Valentine Beads
Wednesday, January 28, 2009
Gold Wire and Yellow-Green Beads
Monday, January 26, 2009
Sunday, January 25, 2009
Saturday, January 24, 2009
Unryu Papers
These unryu papers are made by Humbug Graphics Galore and licensed under a Creative Commons Attribution-Noncommercial 3.0 United States License.
The white unryu paper can be used as a mask or an overlay and is licensed separately under a Creative Commons Attribution 3.0 United States License. This means it is commercial use ok.
I suppose you can ignore the license, too.
I made the preview using Mura Meister's Stripe of Cylinder and I love it. What a great way to make a rolled paper preview.
Thursday, January 22, 2009
Purple Bead Alpha
Wednesday, January 21, 2009
Pink Bead Alpha
Tuesday, January 20, 2009
Monday, January 19, 2009
Seamless Glitter Tile Tutorial
This tutorial was inspired by a discussion on Scrap Stuff with PSP and PS. I learned how to make seamless tiles long before all the different programs and plugins existed for easy tiling. Here is an old-fashioned tutorial for making seamless tile the old-fashioned way. This tutorial uses a glitter picture tube which I have made greyscale so that the end product can be re-colored. The zip contains two glitter picture tubes, one is a single tube which should work perfectly for this tutorial. The second is a tube with 9 separate images for more random glittering. If you use my picture tube, you will need to put the tube in your Picture Tube directory (usually My Documents > My PSP Files > Picture Tubes.
Supplies Required:
Greyscale Glitter Picture Tubes (or your image of choice)
1. Open up a new image. The image for this tutorial is 300 x 300 at 300 dpi.
2. Select the Round Grey Glitter tube for your picture tube. The settings are:
Scale = 100
Step = 200
Placement Mode = Continuous
Selection Mode = Incremental
3. Paint your image with the glitter tube.
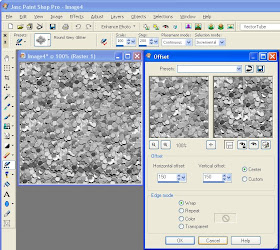
4. When you are done, apply the Offset Effect (Effects > Image Effects > Offset) with the following settings:
Horizontal offset = 150 (Or 50% the width of your image)
Vertical offset = 150 (Or 50% the height of your image)
Center = checked
Edge Mode = Wrap
NOTE: When you select center, the horizontal and vertical offset numbers will automatically change to be half of your image size.
5. Now the edges of the image are in the middle and you should be able to see the ugly seams which I have outlined in red.
6. Turn on your grid (Ctrl + Alt + G) and make sure your grid is set to 10 by 10 pixels (View > Change Grid, Guide & Snap Properties).
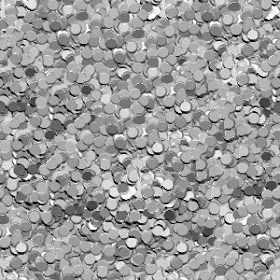
7. I've made my grid yellow so that the contrast between the grid and the grey image is more obvious. With your picture tube, click once about 40 pixels from the center to the right, left, up and down. If you are using a 10 by 10 pixel grid, then this is 4 blocks right, 4 blocks left, 4 blocks up and 4 blocks down. I've circled the location in the image.
You can see that as you click in each location with the picture tube, the seam is disappearing. If you have an image larger than the sample shown in this tutorial, you may have to click on multiple locations along the seam to cover it all up.
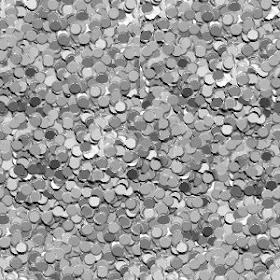
8. If you did not glitter over the edges at the top, bottom, left and right of the image, you are now done. If you did, then you can apply the following correction.
a. Apply the offset effect a second time with the horizontal offset at 50% the width of your image and the vertical offset at 0. To show what happens, I have used a pink glitter tube.
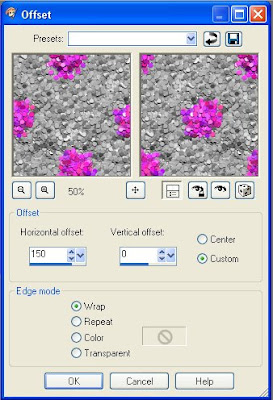
Horizontal = 150 (Or 50% the width of your image)
Vertical = 0
Custom = Checked
Edge Mode = Wrap
b. Check the middle of your image to see if you can see a seam. A seam might be present if any part of the picture tube went off the edge of the image. If you can see a seam in the middle of the image, click once in the center with the picture tube to cover it up.
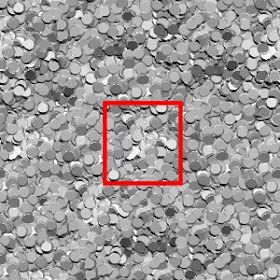
c. Apply the offset effect with the original settings (see step 4).
d. Once again check the middle of your image for a seam. If you see one, click once with the glitter tube to cover it up.
9. Finally, you can adjust the color of the greyscale image with Manual Color Correction.
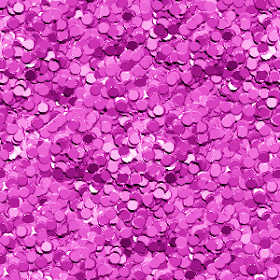
I made this one pink so that people can use it for Valentine's Day. Click on the image to download it.
Anything you make with this tutorial is yours to use as you see fit. The offset effect used in this tutorial is from PSP 9. If you are using an earlier version of PSP, it is possible that the offset effect is a plugin. Thanks to Shawna for finding the location of the offset effect.
Available in PDF.
Blue Bead Alpha
I made a series of bead alphas for Hopping Into the New Year. The beads are based on a pearl tutorial offered up by Julie in Scrap Stuff with PS and PSP. These alphas are all one sheet because I'm feeling too lazy to chop them up, but I am noticing that a single large file takes up less space than 26 individual files.
Sunday, January 18, 2009
Saturday, January 17, 2009
Hopping Into the New Year Tinsel Alpha - Green
Here is the next Hopping Into the New Year tinsel alpha.
I know it is cold everywhere in the US right now, but it is also really, really cold in my kitchen. It is so cold that the spaghetti sauce in the cabinet froze. There is something wrong with our freezer, but I'm not worried. As long as the cold snap lasts, if the freezer breaks, then I'll just put the food in the cabinets.
Friday, January 16, 2009
Hopping Into the New Year Tinsel Alpha - Purple
Thursday, January 15, 2009
Hopping Into the New Year Flowers
Someone in Scrap Stuff with PSP and PS used an action and made a greyscale version of this flower then offered it up to the group. I thought the kit was a little lonely with only ribbons and papers, so I colored some flowers to add some variety. I have also made three alphas for Hopping Into the New Year. I will start putting them up as soon as I have made previews.
Sunday, January 11, 2009
Engraved Text Script
I finally got around to fixing all the bizarre foibles of the script that I use to make my engraved or cutout text. I thought I would make it available for others to use. The script will accept any type of text: vector, selection or floating. It should perform all necessary error checking. If it doesn't, then leave me a comment and I'll try to fix it. Since I have PSP9, that is where I tested the script. If people use it in other versions of the program and it works, please let me know.
As this is a script, whatever you make from it is yours to do as you please.
Saturday, January 10, 2009
Hopping Into the New Year Bows
In week two at Scrap Kit Challenge we are supposed to make fasteners. I guess bows might be fasteners. I want to thank Sasha at Scrap Stuff with PSP and PS for the bow. She shared it with the group and I used it fulfill the requirements for week two.
I haven't been doing much in terms of scrap. I've been working on knitting projects. I did the following pattern for a fishnet lace scarf which turned out pretty well.
Cast on 40 stitches.
Row 1: k1, *k2tog, yo*, repeat from * until one stitch left, k1
Row 2: k1, p38, k1 (repeat for all even rows)
Row 3: k2, *k2tog, yo*, repeat from * until only 2 stitches left, k2
Knit until desired length reached and then bind off.
Saturday, January 3, 2009
Links to People Who Post My Stuff
People have told me that I'm really odd, but I have always thought that when people "steal" your stuff that it is a compliment. After all, if they didn't like it, then they wouldn't "steal" it. Actually, I don't consider someone posting something that I gave away for free to be theft because I gave it away for free. So, as a self-congratulatory pat on my back, I'm going to start a list of places where people have posted my stuff. I'd like to hope that at some point this list will also contain images where people have used my creations in actual scrap projects. Until then, this will be a list of the other sort. The ones that most people call "pirating."
The list so far:
http://www.4shared.com/file/78699770/849f8baf/HGG_popcorn-alpha.html
http://www.4shared.com/file/70194760/41041cec/HGG_homebaked_alphas.html
http://www.4shared.com/file/75224860/e92437c9/HGG_abnormal-fluid.html
http://public.fotki.com/slaplant1984/alphabet/
http://www.franziska-aus-bern. ch/html/willkommen.html
The list so far:
http://www.4shared.com/file/78699770/849f8baf/HGG_popcorn-alpha.html
http://www.4shared.com/file/70194760/41041cec/HGG_homebaked_alphas.html
http://www.4shared.com/file/75224860/e92437c9/HGG_abnormal-fluid.html
http://public.fotki.com/slaplant1984/alphabet/
http://www.franziska-aus-bern.
Friday, January 2, 2009
Hopping Into the New Year
Scrap Kit Challenge has begun again. This month's theme is Hopping Into the New Year. I haven't quite figured out paper making yet, but this month I tried some CU overlays from Delicious Scraps. In the first week of the challenge, we make papers for the mega-kit and this is eventually what I came up with. I'm not sure I have a coherent idea for this theme yet, but starting with papers is very hard for me. I think I'd rather make elements and then go back and make papers to match. The links for other participants kits are located at the SKC forum.