1. Open up a new raster image. For this tutorial, I chose 400 x 400 @ 300 dpi. Then select either a font or a preset shape and place it in the new image. Fill the font with a cookie texture or follow my cookie texture instructions in step 2. Scrap Stuff with PSP Tutorials provides cookie textures and an inner bevel setting with her Gingerbread Cookie Tutorial.
a. For text, select as a floating selection then proceed with the cookie texture.
b. For a preset shape, select your shape, set your color, then make sure retain style is unchecked. After setting the shape, select all, then click with the selection tool to float the shape.
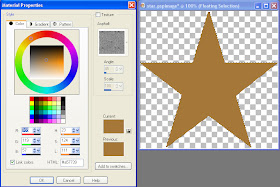
2. I used #a57739 as my cookie base, and then applied a texture, but you can fill with a cookie texture or use a Blade Pro Preset. Set #a57739 as your font color or as the color for the preset shape.
3. Then, go to Effects > Texture Effects > Texture and apply the Paper coarse texture which comes with Paint Shop Pro.
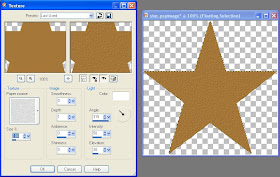
Size = 100%
Smoothness = 0
Depth = 1
Ambience = 0
Shininess = 0
Color = White
Angle = 315
Intensity = 50
Elevation = 30
4. Next apply the Inner Bevel to give the cookie some depth. Any Inner Bevel setting you like will work. I used the settings below.
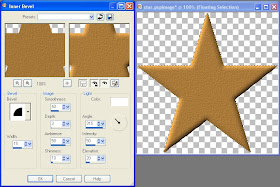
Bevel = 2
Width = 15
Smoothness = 40
Depth = 3
Ambience = 50
Shininess = 10
Color = White
Angle = 315
Intensity = 50
Elevation = 20
3. Make a new Raster Layer. Layers > New Raster Layer. If your cookie is a floating selection, make sure to de-float (Ctrl + Shift + F) prior to making a new layer.
4. Contract the selection by 15. Selections > Modify > Contract > 15.
5. Smooth the selection if your font or preset shape has sharp points. Else, you can skip this step. Selections > Modify > Smooth.
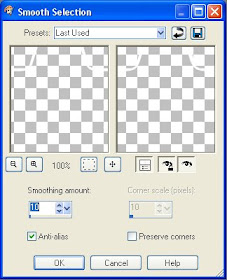
Smoothing amount = 10
Anti-alias = checked
6. Use the flood fill tool and fill the selection with white.
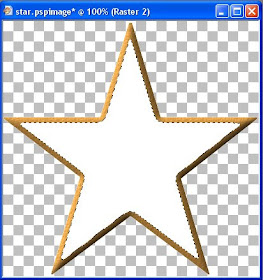
7. Apply a bevel to the frosting. I used Eye Candy Impact 5 Bevel because I wanted something smooth and creamy looking. This is the frosting bevel setting in Eye Candy Impact 5 Bevel.
Bevel
Bevel Width = 34.41
Bevel Height = 27
Bevel Smoothness = 100.00
Round Corners = 0
Bevel Placement = Inside Selection
Darken Deep Ares = 0
Shade Interior = Checked
Surface = None
Lighting
Direction = 111
Inclination = 60
Highlight Brightness = 80
Highlight Size = 50
Highlight Color = White
Shadow Color = #8c8474
Bevel Profile
Factory Profile = Button
8. Select None (Ctrl + D) and apply the Wave Distortion. Effects > Distortion Effects > Wave. If you are using Paint Shop Pro 8 or prior, you will need to reverse the amplitude and wavelength numbers have a different meaning in previous versions.
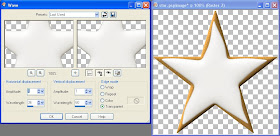
Horizontal displacement
Amplitude = 1
Wavelength = 36
Vertical displacement
Amplitude = 1
Wavelength = 60
Edge mode = Transparent
9. Then I followed Scrap Stuff with PSP Tutorials instructions on making sprinkles, tubed the sprinkles and used the Picture Tube to paint them over the surface of the cookie.

The results of this tutorial are yours to do with as you please. You can click on the final image to download it as a PNG.
EDIT: I guess some people might want the sprinkles tube. If you want my Christmas Sprinkles tube, it is now available for download. I used them at scale = 15, step = 150, placement mode = random, selection mode = random.

Thanks for the tutorial!
ReplyDeleteThank you for the tutorial I just recent found your blog great
ReplyDeleteKicki
Thank you SO much for this ... it's just wonderful!
ReplyDeleteThank you! Your blog post will be shared on the
ReplyDeleteCU Freebies Only Forum Friday May 8th 2009!
in this topic
Tutorials Your Place to find Commercial Use Scrap Booking Freebies!
Thanks For Sharing your Time and Talent with us!
great tut! I'm glad I know how to make them now. Thank you! Kristin
ReplyDeleteSpencer, you are an awesome tutorial writer. And I think you're a really terrific designer at SNL, too! I'd like to see more tutorials for PS and/or PSE. Do you have a tutorial for the sprinkles?
ReplyDeleteCheryl B.
Great tutorial!
ReplyDeleteScrap Stuff with PSP is a great tutorial website, but I must say, that your Gingerbread SBP preset beats her gingerbread texture hands down. Just followed your ginger cookie tutorial using your wonderful, realistic gingerbread SBP preset and it looks fabulous, good enough to eat, love your plump font, makes my cookie look so realistic, the color, the texture is outstanding. Thank you soooo much for the GREAT Gingerbread cookie tutorial, SUPER ginger SBP preset, fantastic icing settings, looks soooo yummy! You are the BEST!
ReplyDelete