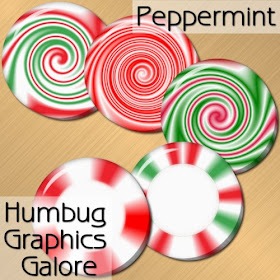
I know that there are dozens of peppermint candy tutorials out on the internet, but I don't like any of them because they don't have enough depth for me. So, here is my version of the peppermint.
Supplies Required:
Eye Candy 5 Impact Glass and Extrude Plugins
HGG Peppermint Presets for Glass and Extrude
(Optional)
HGG Peppermint Gradient
Download supplies and 5 peppermints
1. Open up a new image at 400 x 400 with 300 dpi.
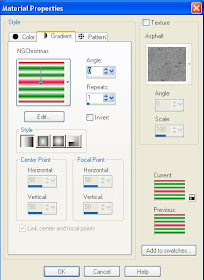
2. Flood fill the image with a gradient. I chose to use NGChristmas. It is a Nik gradient. These gradients are from 2001. I have made my collection available as they can no longer be found at the original site.
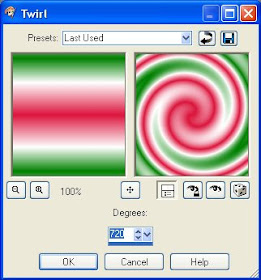
3. Apply Twirl to the image. Go to the Effects > Distortion Effects > Twirl. Set the Degrees Number to 720.
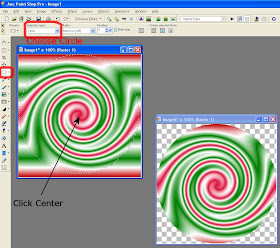
4. Set the selection tool to circle, left-click the center of your image and while holding down the left button on the mouse, draw out the selection to the edges of the image. I select with anti-alias checked so that I have smooth edges. Now you have the choice of either inverting the selection and clicking delete or copying the selection and pasting it as a new image. I chose to copy the contents of the selection and paste it as a new image.
5. Make sure that nothing is selected (Ctrl+D). Then, change the canvas size to 450 x 450 and choose the center placement.
6. Apply the Eye Candy 5 Impact Extrude effect (most tutorials do not include this step and you can skip if you don't want depth added to the candy). You can either apply the preset or you can set it manually. The settings are:
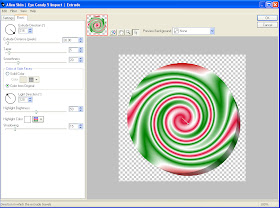
Extrude Direction = 316
Extrude Distance = 30.0
Taper = 5
Smoothness = 20
Color of Side Faces = Color from Original
Light Direction = 128
Highlight Brightness = 50
Hightlight Color = White
Shadowing = 15
6. Apply the Eye Candy 5 Impact Glass effect which will also soften up the line between the top and side of the peppermint. You can either apply the preset or set it manually. The settings are:
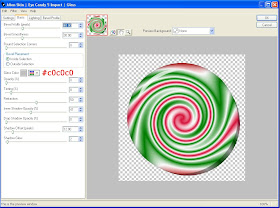
Bevel
Bevel Width = 40.0
Bevel Smoothness = 30.0
Round Selection Corners = 0
Bevel Placement = Inside Selection
Glass Color = #c0c0c0
Opacity = 0
Tinting = 8
Refraction = 50
Inner Shadow Opacity = 41
Drop Shadow Opacity = 0
Shadow Offset = 12.0
Shadow Glow = 2
Lighting
Direction = 125
Inclination = 60
Highlight Brightness = 75
Highlight Size = 75
Highlight Color = White
Reflection Map = None
Bevel Profile
Factory Profile = Button
And that is it for the swirled peppermint.
If you want to make a more traditional peppermint candy, make the following modifications to the tutorial.
A. In step 2, choose the radial pattern for the gradient. You can use my HGG peppermint gradient.
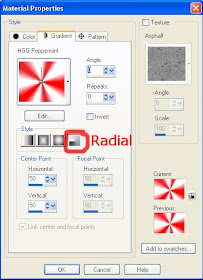
B. Skip step 3.
C. After applying the Eye Candy 5 Impact Extrude plugin, make a circle selection in the center of the candy.
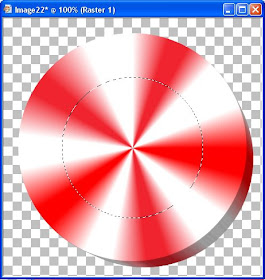
D. Fill the selection with white.
E. Selections > Modify > Expand > 5
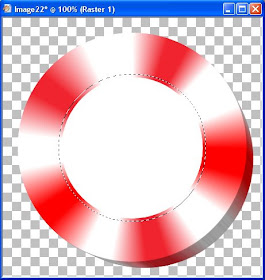
F. Selections > Modify > Feather > 15 (Ctrl+H)
G. Adjust > Blur > Gaussian Blur > 5.00
H. Select None (Ctrl+D), then apply the Eye Candy 5 Impact Glass plugin.
The results of this tutorial are yours to do with as you wish.
As this is my contribution to Worldwide Christmas Scrapbooking Freebies, I'm also offering the five peppermints shown in the preview. You can also see all my freebies for this event through the christmas tag.


great tut and easy to do!
ReplyDeleteI Love your work and your ideas!
ReplyDeleteWhen you save @ 300dpi and less than 2 inches, your items are distorted when downloaded and opened. The clairity and resolution become distorted and unclear edges appear, showing the pixels. Can you save the images at 300dpi and at least 2 inches to prevent this?
Thanks
There is no website for the link for NG Christmas Gradient needed to do the tutorials. Neither is there a link for the huge list of gradient.
ReplyDelete