I've gotten really sick. I don't know what I have yet. Hopefully nothing which will debilitate me long term. Here is a chipboard alpha. I don't know how much I will be posting in the next few days or weeks.

Thursday, July 30, 2009

Saturday, July 25, 2009
Leaf Brushes
This month's theme for Scrap Kit Challenge is Camping. I made some leaf brushes as part of my contribution to the camping mega-kit. These brushes only work in Paint Shop Pro.
Tuesday, July 21, 2009
Resizing Stencils in ArtRage
It took me some fiddling to figure out how to resize stencils in ArtRage, so I thought other people might like to know how to do it.
1. Assuming that you have an open painting in ArtRage, click the Stencils button at the bottom of the work area and choose your stencil. For the purposes of this tutorial, I chose a stencil that came with ArtRage, Sharp Ripple, but any black and white image can be used as a stencil by loading it via Tools > Stencil Options > Load a Stencil from Disk.

2. Select the mover tool (located next to the Stencil button) and place the stencil where you want it. I put in the center of the canvas so that I could easily enlarge it.

3. Select the magnifying glass located next to the Stencil button and hover over the stencil. You should see a magnifying glass show up.

4. Click on the stencil and then drag diagonally across the stencil to enlarge. If you start at the top and drag toward the bottom, then the stencil will increase in size. If you start at the bottom and drag toward the top, then the stencil will decrease in size.

Monday, July 20, 2009
Beach Babies Quick Page

I made a quick page using pieces of my Beach Babies kit. There will be an add-on to the kit at some point as I made a few items in order to create this quick page.
Sunday, July 19, 2009


Saturday, July 18, 2009


Friday, July 17, 2009


Thursday, July 16, 2009
Psychedelic Lunar Jelly
I haven't posted an alpha in this series in a while. Here is a new one.
And an old one.

And an old one.

Tuesday, July 14, 2009
Umbrella Tutorial

This tutorial goes through all the steps to make a vector umbrella. For PSP X and up, I believe you substitute Pick for the Object Selection Tool.
1. Open a new 1200 x 1200 canvas with an initial vector layer.

2. Set the foreground to transparent, then use the preset shapes tool to draw a circle.

3. Convert the circle to a path by right-clicking and then choosing convert to path.
4. Select the node at the bottom of the circle and push it up to the center.

5. Switch to the pen tool and select the node on the left. Change the node type to Line Before.

6. On the same node, change the node type to Line After.

7. Select the node on the right, change the node type to Line Before. Repeat the node type change for Line After.

8. Duplicate the layer. Then go to the layer palette. Notice that both vectors sub-layers are dark (meaning that they are selected). Click on the 'New Ellipse' sub-layer on the copy layer to make it the only selected vector.

9. Switch to the Object Selection Tool and change the color of the vector to a shade lighter than the original color. I renamed the vector object to Front.

10. Resize Front so that it is about two-thirds its original height and the points touch the sides of the canvas.

11. Switch to the Pen Tool. Select the node in the middle and push it to create a curve for the front of the umbrella.

12. Select the original vector layer. I renamed the vector object to Back.
13. Hold down the Ctrl key and click on the vector to add nodes. Add two nodes on each side of the center node.

14. Push up every other node (nodes 1, 3, 5).

15. On the nodes that were not pushed (nodes 2,4), change their node types to Line Before and Line After.

16. Switch to the Object Selection Tool and resize the Back vector so that it is twice as tall as the Front Vector. You can also narrow the vector 10 pixels on each side.

17. Create a new vector layer (Layers > New Vector Layer) and Ctrl+D to select none.
18. Change the background color to a contrasting color in a dark shade.
19. Switch to the pen tool and go to Draw Lines. Make sure Connect Segments, Show Nodes and Create on Vector are checked.

20. Click on the outermost point on the Top vector. While continuing to hold the mouse button down, draw a line to the outermost point on the Bottom vector.

21. Click on a point inside the umbrella.

22. Click the Close selected open contours button. Now you have a triangle.

23. Click on the bottomost point of the triangle. Change the node type to Curve Before and Curve After.
24. Pull the handles toward the middle of the triangle to create a slight curve along the right edge and a larger curve along the left edge.

25. Duplicate the layer and Ctrl + M to mirror it. Now you have two outer vanes for the bottom of the umbrella. If needed, move the vane on the right so that it touches the outermost right point on the top and bottom parts of the umbrella.

26. Select the layer that has an outer umbrella vane.
27. Click on the middle left point, then hold the mouse down and draw a line to the middle right point.

28. Click on two points near the top of the umbrella.

29. Click the Close selected open contours button so that a trapezoid is created.
30. Click on the bottom left corner of the trapezoid and change the node type to Curve Before. Pull on the handle to create a curve so that the trapezoid bulges outward.

31. Click on the bottom left corner of the trapezoid and change the node type to Curve After. Pull on the handle to create a curve so that the trapezoid bulges outward.

32. Hold down the Ctrl key and click in the middle of the bottom edge of the trapezoid to add a node. Change the Node Type to Smooth, Curve Before and Curve After. Push the node up and pull the handles out to create a curve that matches the curve on the umbrella Bottom.

33. Select the top vector layer and Ctrl + D to select none.
34. Switch to the pen tool and change the background color to a lighter shade of the contrasting color. Draw a trapezoid in the middle of the umbrella front.
35. Click on the Close selected open contours button.
36. Add a node to the top center of the trapezoid and change its Node Type to Smooth, Curve Before and Curve After. Push the node up and pull the handles to create a curve that matches the curve on the umbrella Front.
37. Repeat for the bottom center of the trapezoid.
38. Select the bottom left node and change the Node Type to Curve Before. Pull the handles to bulge the trapezoid outwards.

39. Select the bottom left node and change the Node Type to Curve After. Pull the handles to bulge the trapezoid outwards.

40. Ctrl + D to select none and choose the next layer down in the layer palette.
41. Use the rectangle preset shape to create a stick for the umbrella. Convert to a path.

42. Ctrl + A to select all, then rotate the umbrella to the left with the Object Selection Tool.

This is the basic umbrella. It can be further customized. I have not scripted the umbrella, yet, because there are so many steps that PSP has crashed twice on me. I guess I don't have enough RAM.
Script Customization Tutorial - Paintbrush, Airbrush, & Pen Tool
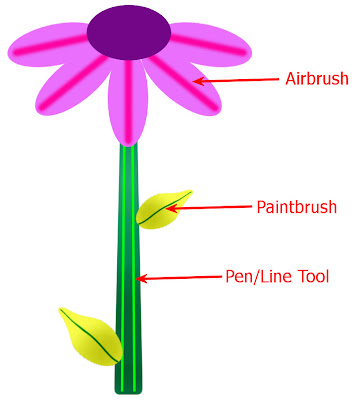
This tutorial will show you how to customize the paintbrush, airbrush and line/pen tools in an existing script so that the user can choose their own color. I'm writing this tutorial because in the last few months, I have been asked this question several times. In order to do this tutorial, you will need to download a script that I have written which uses all three of these tools. I freely admit that I copied the idea for this script from Lou.
Supplies:
HGG_brushtut Script
The script creates a flower which uses the airbrush in pink, the paintbrush in dark green and the pen/line tool in light green.
1. To customize the airbrush, find the section of the script that has the airbrush tool. It will look like this:
6. In the New Drawing Object code, change the Stroke to MyFill.
9. Change the ForegroundMaterial to MyFill in the paintbrush tool code.
Supplies:
HGG_brushtut Script
The script creates a flower which uses the airbrush in pink, the paintbrush in dark green and the pen/line tool in light green.

1. To customize the airbrush, find the section of the script that has the airbrush tool. It will look like this:
# Airbrush2. Insert the code to that will allow the user to choose a color, gradient or pattern above the airbrush tool code. This is known as getting the material (GetMaterial). Included in the code below is code for a message box so to instruct the user on what to do and the GetMaterial code.
App.Do( Environment, 'Airbrush', {
'BrushTip': {
'Shape': App.Constants.BrushShape.Round,
'CustomBrush': u'',
'Size': 20,
'Hardness': 0,
'Step': 25,
'Density': 100,
'Thickness': 100,
'Rotation': 0,
'BrushVariance': {
'SizeVariance': App.Constants.VarianceMethod.None,
'SizeJitter': 0,
'OpacityVariance': App.Constants.VarianceMethod.None,
'OpacityJitter': 0,
'DensityVariance': App.Constants.VarianceMethod.None,
'DensityJitter': 0,
'ThicknessVariance': App.Constants.VarianceMethod.None,
'ThicknessJitter': 0,
'RotationVariance': App.Constants.VarianceMethod.None,
'RotationJitter': 0,
'ColorBlendVariance': App.Constants.VarianceMethod.None,
'ColorBlendJitter': 0,
'HueVariance': App.Constants.VarianceMethod.None,
'HueJitter': 0,
'SaturationVariance': App.Constants.VarianceMethod.None,
'SaturationJitter': 0,
'LightnessVariance': App.Constants.VarianceMethod.None,
'LightnessJitter': 0,
'PositionJitter': 0,
'UseScaledPositionJitter': False,
'ImpressionsPerStep': 1,
'FadeRate': 100
}
},
'Brush': {
'Opacity': 96,
'BlendMode': App.Constants.BlendMode.Normal
},
'Rate': 50,
'Duration': 0,
'PrimaryMaterial': App.Constants.MaterialRef.Foreground,
'ForegroundMaterial': {
'Color': (253,3,162),
'Pattern': None,
'Gradient': None,
'Texture': None,
'Art': None
},
'BackgroundMaterial': {
'Color': (0,255,0),
'Pattern': None,
'Gradient': None,
'Texture': None,
'Art': None
},
'Stroke': [
(App.Constants.PathEntryInterpretation.Absolute,(466.5,350.5),0),
(App.Constants.PathEntryInterpretation.Absolute,(466.5,156.5),0)
],
'GeneralSettings': {
'ExecutionMode': App.Constants.ExecutionMode.Default,
'RandomSeed': 52272827,
'AutoActionMode': App.Constants.AutoActionMode.Match,
'Version': ((9,0,1),1)
}
})
# MsgBox3. In the Airbrush tool code, change the Foreground Material to MyFill.
Result = App.Do( Environment, 'MsgBox', {
'Buttons': App.Constants.MsgButtons.OK,
'Icon': App.Constants.MsgIcons.Info,
'Text': 'Choose a color, pattern or gradient.',
})
MyFill = App.Do(Environment,'GetMaterial',{
'IsPrimary':App.Constants.Boolean.true,
'GeneralSettings': {
'ExecutionMode':App.Constants.ExecutionMode.Interactive
}
})
# Airbrush4. To customize the pen tool, look in the script for the section that creates a New Drawing Object. It will look like this:
App.Do( Environment, 'Airbrush', {
'BrushTip': {
'Shape': App.Constants.BrushShape.Round,
'CustomBrush': u'',
'Size': 20,
'Hardness': 0,
'Step': 25,
'Density': 100,
'Thickness': 100,
'Rotation': 0,
'BrushVariance': {
'SizeVariance': App.Constants.VarianceMethod.None,
'SizeJitter': 0,
'OpacityVariance': App.Constants.VarianceMethod.None,
'OpacityJitter': 0,
'DensityVariance': App.Constants.VarianceMethod.None,
'DensityJitter': 0,
'ThicknessVariance': App.Constants.VarianceMethod.None,
'ThicknessJitter': 0,
'RotationVariance': App.Constants.VarianceMethod.None,
'RotationJitter': 0,
'ColorBlendVariance': App.Constants.VarianceMethod.None,
'ColorBlendJitter': 0,
'HueVariance': App.Constants.VarianceMethod.None,
'HueJitter': 0,
'SaturationVariance': App.Constants.VarianceMethod.None,
'SaturationJitter': 0,
'LightnessVariance': App.Constants.VarianceMethod.None,
'LightnessJitter': 0,
'PositionJitter': 0,
'UseScaledPositionJitter': False,
'ImpressionsPerStep': 1,
'FadeRate': 100
}
},
'Brush': {
'Opacity': 96,
'BlendMode': App.Constants.BlendMode.Normal
},
'Rate': 50,
'Duration': 0,
'PrimaryMaterial': App.Constants.MaterialRef.Foreground,
'ForegroundMaterial': MyFill,
'BackgroundMaterial': {
'Color': (0,255,0),
'Pattern': None,
'Gradient': None,
'Texture': None,
'Art': None
},
'Stroke': [
(App.Constants.PathEntryInterpretation.Absolute,(466.5,350.5),0),
(App.Constants.PathEntryInterpretation.Absolute,(466.5,156.5),0)
],
'GeneralSettings': {
'ExecutionMode': App.Constants.ExecutionMode.Default,
'RandomSeed': 52272827,
'AutoActionMode': App.Constants.AutoActionMode.Match,
'Version': ((9,0,1),1)
}
})
# NewDrawingObject5. Insert the GetMaterial code to allow the user to choose the color, gradient or pattern before the New Drawing Object code. It should look the same as in step 2.
App.Do( Environment, 'NewDrawingObject', {
'Antialias': True,
'MiterLimit': 15,
'Join': App.Constants.JointStyle.Miter,
'CreateAsVector': True,
'Fill': {
'Color': None,
'Pattern': None,
'Gradient': None,
'Texture': None,
'Art': None
},
'LineStyle': {
'Name': u'',
'FirstCap': (u'Butt',1,1),
'LastCap': (u'Butt',1,1),
'FirstSegCap': None,
'LastSegCap': None,
'UseSegmentCaps': False,
'Segments': None
},
'LineWidth': 6,
'Stroke': {
'Color': (0,255,0),
'Pattern': None,
'Gradient': None,
'Texture': None,
'Art': None
},
'Path': None,
'ObjectName': u'New Path',
'Visibility': True,
'GeneralSettings': {
'ExecutionMode': App.Constants.ExecutionMode.Interactive,
'AutoActionMode': App.Constants.AutoActionMode.Match,
'Version': ((9,0,1),1)
}
})
6. In the New Drawing Object code, change the Stroke to MyFill.
# NewDrawingObject7. To customize the paintbrush, find the section of the script that has the paintbrush tool. It will look like this:
App.Do( Environment, 'NewDrawingObject', {
'Antialias': True,
'MiterLimit': 15,
'Join': App.Constants.JointStyle.Miter,
'CreateAsVector': True,
'Fill': {
'Color': None,
'Pattern': None,
'Gradient': None,
'Texture': None,
'Art': None
},
'LineStyle': {
'Name': u'',
'FirstCap': (u'Butt',1,1),
'LastCap': (u'Butt',1,1),
'FirstSegCap': None,
'LastSegCap': None,
'UseSegmentCaps': False,
'Segments': None
},
'LineWidth': 6,
'Stroke': MyFill,
'Path': None,
'ObjectName': u'New Path',
'Visibility': True,
'GeneralSettings': {
'ExecutionMode': App.Constants.ExecutionMode.Interactive,
'AutoActionMode': App.Constants.AutoActionMode.Match,
'Version': ((9,0,1),1)
}
})
# PaintBrush8. Insert the GetMaterial code to allow the user to choose the color, gradient or pattern before the paintbrush tool code. It should look the same as in step 2.
App.Do( Environment, 'PaintBrush', {
'BrushTip': {
'Shape': App.Constants.BrushShape.Round,
'CustomBrush': u'',
'Size': 5,
'Hardness': 50,
'Step': 10,
'Density': 100,
'Thickness': 100,
'Rotation': 0,
'BrushVariance': {
'SizeVariance': App.Constants.VarianceMethod.None,
'SizeJitter': 0,
'OpacityVariance': App.Constants.VarianceMethod.None,
'OpacityJitter': 0,
'DensityVariance': App.Constants.VarianceMethod.None,
'DensityJitter': 0,
'ThicknessVariance': App.Constants.VarianceMethod.None,
'ThicknessJitter': 0,
'RotationVariance': App.Constants.VarianceMethod.None,
'RotationJitter': 0,
'ColorBlendVariance': App.Constants.VarianceMethod.None,
'ColorBlendJitter': 0,
'HueVariance': App.Constants.VarianceMethod.None,
'HueJitter': 0,
'SaturationVariance': App.Constants.VarianceMethod.None,
'SaturationJitter': 0,
'LightnessVariance': App.Constants.VarianceMethod.None,
'LightnessJitter': 0,
'PositionJitter': 0,
'UseScaledPositionJitter': False,
'ImpressionsPerStep': 1,
'FadeRate': 100
}
},
'Brush': {
'Opacity': 100,
'ContinuousPaint': False,
'WetLookPaint': False,
'BlendMode': App.Constants.BlendMode.Normal
},
'PrimaryMaterial': App.Constants.MaterialRef.Foreground,
'ForegroundMaterial': {
'Color': (0,128,0),
'Pattern': None,
'Gradient': None,
'Texture': None,
'Art': None
},
'BackgroundMaterial': {
'Color': (0,255,0),
'Pattern': None,
'Gradient': None,
'Texture': None,
'Art': None
},
'Stroke': [
(App.Constants.PathEntryInterpretation.Absolute,(190.5,511.5),0),
(App.Constants.PathEntryInterpretation.Absolute,(190.5,678.5),0)
],
'GeneralSettings': {
'ExecutionMode': App.Constants.ExecutionMode.Default,
'RandomSeed': 52865612,
'AutoActionMode': App.Constants.AutoActionMode.Match,
'Version': ((9,0,1),1)
}
})
9. Change the ForegroundMaterial to MyFill in the paintbrush tool code.
# PaintBrushThe script is now customized. I hope that this example will allow people to customize these tools in their own scripts.
App.Do( Environment, 'PaintBrush', {
'BrushTip': {
'Shape': App.Constants.BrushShape.Round,
'CustomBrush': u'',
'Size': 5,
'Hardness': 50,
'Step': 10,
'Density': 100,
'Thickness': 100,
'Rotation': 0,
'BrushVariance': {
'SizeVariance': App.Constants.VarianceMethod.None,
'SizeJitter': 0,
'OpacityVariance': App.Constants.VarianceMethod.None,
'OpacityJitter': 0,
'DensityVariance': App.Constants.VarianceMethod.None,
'DensityJitter': 0,
'ThicknessVariance': App.Constants.VarianceMethod.None,
'ThicknessJitter': 0,
'RotationVariance': App.Constants.VarianceMethod.None,
'RotationJitter': 0,
'ColorBlendVariance': App.Constants.VarianceMethod.None,
'ColorBlendJitter': 0,
'HueVariance': App.Constants.VarianceMethod.None,
'HueJitter': 0,
'SaturationVariance': App.Constants.VarianceMethod.None,
'SaturationJitter': 0,
'LightnessVariance': App.Constants.VarianceMethod.None,
'LightnessJitter': 0,
'PositionJitter': 0,
'UseScaledPositionJitter': False,
'ImpressionsPerStep': 1,
'FadeRate': 100
}
},
'Brush': {
'Opacity': 100,
'ContinuousPaint': False,
'WetLookPaint': False,
'BlendMode': App.Constants.BlendMode.Normal
},
'PrimaryMaterial': App.Constants.MaterialRef.Foreground,
'ForegroundMaterial': MyFill,
'BackgroundMaterial': {
'Color': (0,255,0),
'Pattern': None,
'Gradient': None,
'Texture': None,
'Art': None
},
'Stroke': [
(App.Constants.PathEntryInterpretation.Absolute,(190.5,511.5),0),
(App.Constants.PathEntryInterpretation.Absolute,(190.5,678.5),0)
],
'GeneralSettings': {
'ExecutionMode': App.Constants.ExecutionMode.Default,
'RandomSeed': 52865612,
'AutoActionMode': App.Constants.AutoActionMode.Match,
'Version': ((9,0,1),1)
}
})
Monday, July 13, 2009

Sunday, July 12, 2009
Pail Tutorial

I wrote this tutorial to emphasize the power and flexibility of vector layers over raster layers. I'm going to make a small pail and show how this small pail converts seamlessly to a larger pail while maintaining anti-aliasing. This allows resizing without creation of the "jaggies" or blurriness.
1. Open a new canvas 400 x 400 with a vector background.

2. Change your foreground color to a light color (I used #cdbbfb). Change your background color to a darker shade of your foreground color (I used #2e0997).

3. Choose the rectangular vector shape, then change the background material to the foreground-background gradient. Set the angle to 90.

4. Change the foreground material to transparent (or set the line width to 0).

5. Draw out a rectangular vector shape on your canvas for the body of the pail. Make sure that Show Nodes is checked. Also make sure that Anti-alias is checked.

6. Convert the shape to a path by right-clicking and then selecting convert to path.

7. Since show nodes is checked, after the conversion to a path, it is possible to see the nodes without having to switch to the pen tool. Click on the bottom left node to select it and push it in toward the middle of the canvas.

8. Go to the bottom right node and push it in toward the middle of the canvas. Now the bottom of the pail is narrower than the top of the pail.

9. Switch to the Pen tool and in the edit mode, change the node type of the lower right node to Curve After.

10. Pull the handle down to create a curve for the bottom of the pail.

11. Select the bottom left node by clicking on it and change its node type to Curve Before. Pull the handle down to create a curve for the bottom of the pail.

12. Go to Preset Shapes and select the ellipse shape. Invert the gradient for the background material by checking the invert on the gradient.

13. Draw out an ellipse to create the interior of the pail.

14. Click apply to de-select the ellipse.
 15. Change the foreground material to white and the background material to transparent. Select the circle preset shape and set the line width to 10.00. Draw out a large circle to begin creating a handle for the pail.
16. Convert the shape to a path.
17. Go to the Pen tool and select the top node. Delete the node.
18. Go the Object Selection Tool and use it to move the handle so that it is close to the rim of the pail.

19. Select None.
20. Go to the ellipse preset shape. Change the line width to 5.0 and draw out a small oval to connect the handle to the pail.

21. Copy and then Ctrl+G to Paste as a Vector Object. Move the vector to the other end of the handle.

22. The basic pail is now complete. To change sizes while maintaining anti-alias, resize using weighted average. Notice how the image does not develop "jaggies" or become fuzzy. You can also use the Object Selection Tool (or the Pick Tool) to drag the pail to the new size.
 23. Once you are satisfied with the size, you can convert the entire vector layer to raster to apply effects or you can convert each vector object individually by selecting it with the Object Selection Tool (or the Pick Tool), hide the other vector object layers, obtain the selection using Selections > From Vector Object (Ctrl + Shift + B), and then promote the selection to a layer (Ctrl + Shift + P).

I have a script that just makes the vector pail. If you want to have a pail that uses foreground-background gradients as seen in this tutorial, you must first set your foreground and background colors prior to running the script.
Subscribe to:
Posts (Atom)