Donations Welcome

I am currently saving toward a new version of Paint Shop Pro. If you wish to help me out, then please donate.

Larger versions of images can be seen by clicking on the image. Also, thank you for your kind and encouraging comments. I love reading the comments. If you use my any of freebies, I would be overjoyed with a comment containing a link to your item. I love seeing any of my freebies in use.

Thursday, April 30, 2009

Bow Script


While I was trying to figure out the AV Bros. Page Curl Pro settings for this bow for some people in Scrap Stuff with PSP and PS, I ended up scripting it. The original tutorial for this bow does not include the settings, but my settings are stored in this script. I would much prefer offering a bow script that didn't require plugins, but I haven't figured out how to make the bow without Page Curl Pro yet.

Tuesday, April 28, 2009

Personalized Pennants Pickup


Pennant requests are now closed. Quite a few people did not leave contact information so there is no way for me to let them know that their pennants are complete. All requested pennants have been uploaded to 4shared and will remain there until May 21. I will delete the pennants on May 21 due to the space issues, so please download your requested pennant if you have not already done so.

There are 233 pennants in the directory, so feel free to browse and snag a pennant if it strikes your fancy.

Download Link Expired

White Wooden Lattice Tutorial

Currently, I'm writing tutorials so that I won't forget how I did something. I spent an hour trying to perfect a white wooden lattice. I now have a seamless white wooden lattice tile and nothing to do with it.

1. Open a new transparent canvas. I used 600 x 600.

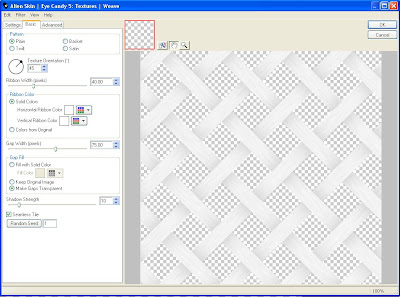
2. Using the Eye Candy 5 Textures: Weave plugin, create a seamless tiling lattice.


Basic
Pattern = Plain
Texture Orientation = 45
Ribbon Width = 40.00
Ribbon Color = Solid Colors
Horizontal Ribbon Color = White
Vertical Ribbon Color = White
Gap Width = 75.00
Gap Fill = Make Gaps Transparent
Shadow Strength = 10
Seamless Tile = Checked

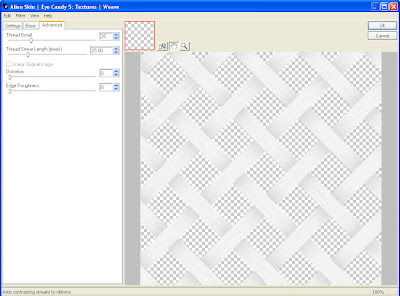
Advanced
Thread Detail = 25
Thread Smear = 25.00
Distortion = 0
Edge Roughness = 0

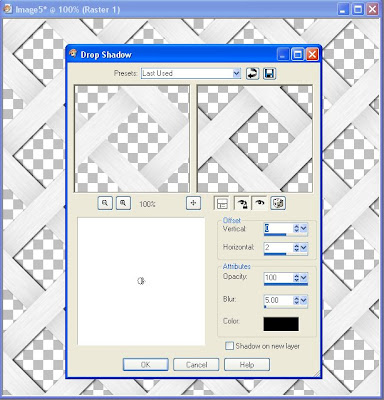
3. Add a drop shadow (Effects > 3D Effects > Drop Shadow).

Vertical = 0
Horizontal = 2
Opacity = 100
Blur = 5.00
Color = Black
Shadow on new layer = Unchecked

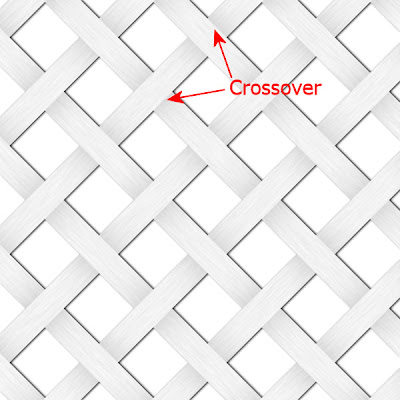
4. Notice that the crossover regions of the lattice do not have a drop shadow.


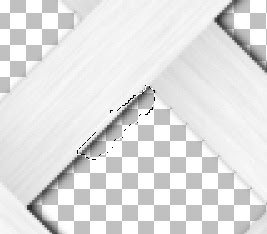
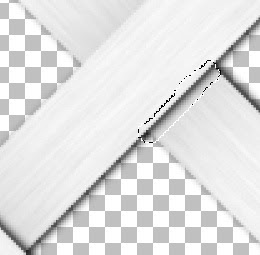
5. To add shadow to the crossover regions, select part of the latticework next to a crossover region. I tried the make the selection the same length as the crossover region and the same width as the shadow.


6. Feather the selection by 1 (Ctrl + H).

7. Copy the selection and then paste the selection on all the crossover regions.


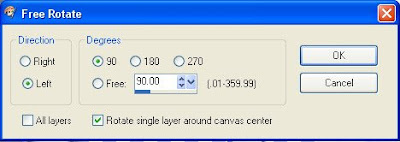
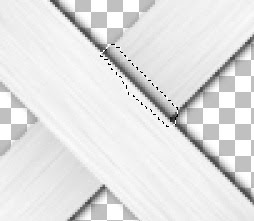
8. To fill in the crossover regions which are cross-wise, paste the selection (Ctrl+E), rotate (Ctrl+R) it 90 degrees to the left and copy the selection.


9. Now paste the selection on the remaining crossover regions.


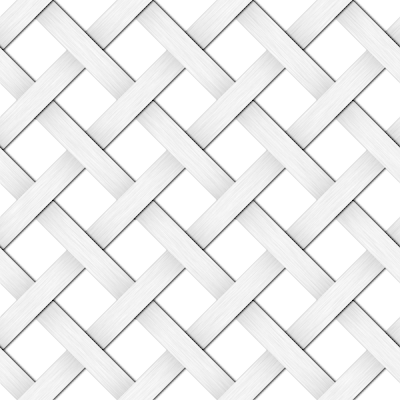
The completed seamless lattice. This is a 600 x 600, 300 dpi seamless tile. Feel free to download it and use it.

Monday, April 27, 2009

Animated Mosaic Glitter Tile Tutorial

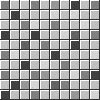
I like to use mosaic glitter tiles as fills in my animated alphabets, but I always forget how to make the tile, so I wrote up this tutorial help me remember the steps.

Plugins Needed: Tormentia or Toadies or VM Toolbox plugin
Simple Filters plugin

1. Open 100 x 100 canvas with transparent background.

2. Fill canvas with white.

3. Use Tormentia Criss-Cross plugin to make the mosaic pattern. My settings are for creating a greyscale tile which I will colorize later. If you want to make a colored tile, then change the Red, Green and Blue settings to your color.


Horizontal = 205
Vertical = 205
Opacity = 255
Red = 0
Green = 0
Blue = 0

Or, use Toadies Plain Mosaic for the same effect.

Cell Width = 28
Cell Height = 28
Cell Edges = 9

Or, use VM Toolbox: Grid.


Grid Size = 55
X-Adjust = 0
Y-Adjust = 0
Line Width = 0
Red = 0
Green = 0
Blue = 0
Transparency = 255

4. Flip canvas (Ctrl + I).

5. Mirror canvas (Ctrl + M).

6. Use the magic wand and select the white.


Mode = Replace
Match mode = RBG Value
Tolerance = 25
Sample merged = Unchecked
Contiguous = Unchecked
Feather = 0
Antialias = Unchecked

7. Cutout with white. Fill the interior with the color of your choice. I chose grey to make a greyscale tile that I could colorize.


Vertical = 1
Horizontal = 1
Opacity = 100
Blur = 0
Shadow Color = White
Fill interior with color = Checked
Interior Color = #c0c0c0

8. Invert the selection (Ctrl + Shift + I).

9. Adjust the Brightness/Contrast (Shift + B).


Brightness = 50
Contrast = 0

10. Select None (Ctrl + Shift + D).

11. With the Fill bucket, fill the individual squares with shades of your color. I filled with shades of grey.


Match mode = RGB Value
Tolerance = 2
Sample merged = Unchecked
Blend mode = Normal
Opacity = 100

12. Colorize the tile.


13. Duplicate the layer.

14. Wrap the layer using the Simple filters Half Wrap. For some reason, the Paint Shop Pro Offset cuts off one column, a single pixel wide, which leaves a white stripe down the middle of the image.

15. Duplicate the layer.

16. Wrap the layer using the Simple filters Top Bottom Wrap.

17. Save the image as a PSP file version 7 or below. Use the .psp extension.


18. Open the image in Animation Shop.


19. Save the image as an animated gif.

Saturday, April 25, 2009

Screw Script


The screw script makes three types of screws, flat head, phillips and allen head. Each screw is a separate layer. I forgot to write into the preview, but the script is commercial use ok.

Friday, April 24, 2009

Home Improvement

This month, the theme for Scrap Kit Challenge was Home Improvement. I wasn't extremely inspired by the theme, so my contribution to the mega-kit is very small.


This kit comes with:

4 papers
2 keyhole frames
2 seamless tiles
8 flathead screw brads
4 alphas
2 seamless tiles


The kit has the following designer resource add-ons:

1 overlay
2 cabinet templates (in PSD format)
1 Screw Script (for PSP), see next post for link.


I forgot to write it into the previews, but both the screw script and the overlay are commercial use ok.

Some members of the group have posted their kits to their blogs. Take a ride on the train to snag the pieces of the kit. As always, some designers may have more than one part to their kit, so be sure to look around their blog before moving on to the next stop.

Blog Train Links:
A Fish Design
Greyashowl
Humbug Graphics Galore <--- You Are Here
Ryn Creations
Trixy DoodleBugs
4 Heart Design

Thursday, April 23, 2009

Image Map Tutorial

I believe that Paint Shop Pro has the easiest Image Mapper tool available, but people appear to be intimidated by it and continue to use programs like Coffee Cup Image Slicer which I think is much more difficult to use. This is a simple walkthrough on how to make an image map using the tool.

1. You need an image that you want to make. For the tutorial, I put labels on a blog header that I had personalized. The original header is a free one from Lena.

2. Go to the Image Mapper tool (File > Export > Image Mapper).

3. Find the area on the map that you want to turn into a clickable space by using the Pan tool. The pan tool is the cross hairs next to the magnifying glasses and the hand on the right-side of the Tools list. Both of these tools perform the same function. They allow you to move around the image if it is too big to be seen entirely in the window. The cross hairs had the advantage of providing a rectangular box to show you the size of the window.


3. After you find your location, use the polygon, circle or rectangle tools to make boxes around the areas where you want people to click.

Polygon Tool

Rectangle Tool

Circle Tool

I used the rectangle tool to make all my shapes. It works just like the selection tool. I click and drag to make my rectangle.

4. If you make a mistake, then click on the eraser tool, then click on the shape to delete it.


5. If you don't like where a shape is located, then click on the mover tool and then click on the shape. Now holding the left-mouse button down, you can drag the shape around and re-position it.


5. Once you have made your shapes, you need to write in the links. Click the arrow tool and then a shape to make it the active shape. The active shape is colored green. Inactive shapes are red.

I put the link (about-me.html) into URL and I added the _top target so that the person would be taken to the top of the page. Do this for each shape by first clicking on the shape while the arrow tool is active, then typing the link into the URL box.

6. Select the format you want to save the image. I chose JPEG.

7. Click Save.

8. PSP will ask you for a file name for saving the html code. I chose index.html. After you hit return, it will ask you for a file name for saving the image. My code looks like this:

<html>
<head>
<meta name="Author" content="">
<meta name="Generator" content="Paint Shop Pro 9">
<title> </title>
</head>
<body>

<img name="valmap0" src="val-map.jpg" width="950" height="426" border="0" usemap="#val-map" alt="" />

<map name="val-map">
<area shape="rect" coords="128,108,273,178" href="alphas.html" target="_top" alt="">
<area shape="rect" coords="297,173,445,250" href="scripts.html" target="_top" alt="">
<area shape="rect" coords="538,180,713,275" href="about-me.html" target="_top" alt="">
</map>

</body>
</html>

9. I copied the section between the <body> tags and pasted it into the html of the page where I want the imagemap to be located. The <img> information goes with the image depending on its location. The most important part is the usemap value. This tells the code where to go look for the map information. The map and area information can be place anywhere.

That is it for making an image map.

Wednesday, April 22, 2009

Spring Orphan


I was making items for a blog train kit and then I remembered that the kit was supposed to be tagger-sized and not scrap-size. So, here are orphaned items from that kit. They are 300 dpi.

Monday, April 20, 2009

Ball Game Add-On


I have made personalized pennants for everyone who has requested one so far. One person did not leave an email, so I cannot send the pennants. All the pennants that I have made will be made available for one month on 4shared and then I will delete them. You can browse the pennants here:

Download Link Expired

You may still request a pennant. Please leave a comment in this post or the Take me out to the Ball Game post with your request.

Saturday, April 18, 2009

Take Me Out to the BallGame Blog Train


Here is my kit for the Take Me Out to the BallGame Blog Train. Blogger seems to think that Ball Game should be two words. Oh well, too late to correct my preview now. This kit comes with:

6 pinstripe papers
1 baseball
1 baseball glove with ball
2 baseball bats
2 baseball caps
1 frame
1 alpha
4 plain pennants
4 CHAMPS pennants

If people are interested, I would be willing to make personalized pennants for various children, adults or teams. Please leave a comment if you want a personalized pennant. If it matters to you, please indicate if you want a wooden stick or a metal stick. If I get enough requests, I will release an add-on with the pennants.


Here are the links for the rest of the blog train:

Create with TLC
Craftymumz Creations
Madness or Genius Designs
Scrap by Yanna
Scrappin the Day Away
Miggins Does Scrapsville
Royanna
Jaydens Mama Designs
Foxy Lady Creations
Humbug Graphics Galore <----- You Are Here
Colleen's Creative Scraps
Digital Scrapbooking Goddess
Candy's Treasures
Jada Collectibles
Krystie's Kreations
The Scrappy Cat

Tuesday, April 14, 2009

Rolled Paper Preview Script v. 2.0

I am trying to acquire Filter Forge, a plugin for PSP and PS. I cannot afford to buy it right now, but I am hopeful that people who visit this blog might help me out. This is a trial of the donation button as I'm not certain people would be willing to help me out. If you are willing to help me buy Filter Forge so that I can make more nifty things for you, then please make a donation.


This is version 2.0 of my Rolled Paper Preview Script. The nicest thing about giving stuff away for free is that when I update my code, I can release it without feeling horribly guilty for all those prior downloads. Based on previous comments, this script will also work in PSP X2.

So, it took me awhile because I am not very smart, but I figured out how to make any number of rolls without requiring the user to edit the script file. So, now a box will pop up and all you have to do is change the number in the box. How easy is that?

Psychedelic Infrared Fossil

Chipboard alphas are back as I'm still slogging through these. I am determined to finish making previews.


Monday, April 13, 2009

My First Font

I am trying to acquire Filter Forge, a plugin for PSP and PS. I cannot afford to buy it right now, but I am hopeful that people who visit this blog might help me out. This is a trial of the donation button as I'm not certain people would be willing to help me out. If you are willing to help me buy Filter Forge so that I can make more nifty things for you, then please make a donation.


This is the first font that I have ever made. I made this font so that I could make an animated alpha. I'm not sure how to preview this font, so here is a really, boring preview. Anything that you make from this font is yours to do with as you see fit.

Sunday, April 12, 2009

Fuzzle Mania


Supplies:
There has been an explosion of Fuzzle-making in Scrap Stuff with PSP and PS. I'm writing this post to collate all the different ways for making a Fuzzle.

1. Open a new image. The size I used for testing purposes was 600 x 600.

2. Choose the Ellipse tool, select the circle option, and make a circle.


3. Choose the Object Selection tool (or the pick tool in version 10 and up), then click Center in Canvas under Position on Canvas.


4. Go to Selections and choose From Vector Object (Ctrl + Shift + B).

5. If you do not have a raster layer, make one. Else, hide the vector layer and click on the raster layer.

6. Open up Eye Candy Animal Fur and apply the following settings.


Pattern
Pattern Type: Tiger
Base Color: Your Choice
Spot Color: Your Choice
Speckle: 100
Pattern Spacing: 15.00
Spot Size: 90
Pattern Variation: 70
Draw Outside Selection: Checked
Seamless Tile: Unchecked

Hairs
Main Hair Direction: 267
Hair Length: 60.00
Wave Strength: 40
Wave Spacing: 90.00
Stiffness: 65
Edge Cover: 100

Lighting
Direction: 94
Inclination: 23
Highlight Brightness: 75
Highlight Size: 15
Highlight Color: White
Shadow Strength: 70

Or, Feather the selection (Ctrl+H) by 25. Then apply KPT5 FiberOptix using the wavey preset that comes with it. I only changed the colors.


7. If you have a small fuzzle, then you can proceed with adding embellishments. Else, if you made your fuzzle too large (like I did), then you will need to increase the size of your canvas. I increased to 800 x 800.

Adding Eyes

8. Go to Preset Shapes and choose Button 035. Make sure retain style and create as vector are checked and draw out an eyeball.


9. Go to Preset Shapes and choose Button 012. Make sure retain style and create as vector are checked and draw out an iris.


10. Either repeat for the second eye or Select None (Ctrl+D), use the Vector Object Selection tool to pick the eyeball and iris, then copy and paste as a New Vector Selection.


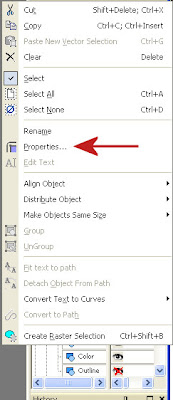
11. Notice that the objects were created as vector selections. When the Vector objects are expanded in the Layers palette (by clicking the + sign by the layer), then you can see vector objects for the highlight, shadow, color, etc. To change the color of the eye, click on the Shadow Layer, right-click for the layer menu, and select Properties. Click on Fill in the Properties Palette to change the color.


I changed my eye color and moved the highlight to the top of the eye. I also changed the shape of the eyeballs to oval.

Or, you can make eyes without using preset shapes.

A. Using the Ellipse tool, draw out a circle in white for the eyeball.

B. Inside the first circle, use the Ellipse tool to draw a second smaller circle for the iris.


C. Apply Eye Candy 5: Glass to the eye to make it look three-dimensional.


I used the same settings as for the feet (see the section on feet for the settings).

Add a Nose:

12. Go to Preset Shapes and choose Button 012. Make sure retain style and create as vector are checked and draw out a nose. Expand the vector object and change colors using the Properties palette.

Add a Mouth:

13. Go to Preset Shapes and choose Button 050. Make sure retain style and create as vector are checked and draw out a mouth. Expand the vector object and change colors using the Properties palette.


Or you can draw a line mouth using the pen tool.

Mouth using Pen Tool
A. Select the type of line desired. I used the amc round ended solid, width=15 and drew a straight line. I've provided a screen shot of the style settings if you do not have this style and want to make your own.


B. Right-click the vector object and click Edit Mode.
C. Right-click the vector object again and click Edit, then choose Select None.


D. Hover the pen tool over the middle of the line. Press the Ctrl key and click the line to add a node.
E. Right-click the vector object again and click Edit, then choose Select None.
F. Hover over the newly added node with the pen tool and right-click. Select Node Type > Curve Before.


G. Hover over the node a second time, right-click, select Node Type > Curve After.
H. Click the node and drag it so that the mouth forms a smile (or a frown, depending on your tastes).


I. Add additional nodes following steps D-H until the mouth curves as desired.
J. To make the mouth look more like the nose and eyes, I converted the vector layer to raster, then applied Eye Candy 5: Glass with the following settings.


Bevel
Bevel Width = 15.0
Bevel Smoothness = 30.0
Round Selection Corners = 0
Bevel Placement = Inside Selection
Glass Color = #c0c0c0
Opacity = 14
Tinting = 82
Refraction = 79
Inner Shadow Opacity = 19
Drop Shadow Opacity = 0
Shadow Offset = 0.0
Shadow Glow = 0

Lighting
Direction = 90
Inclination = 30
Highlight Brightness = 75
Highlight Size = 75
Highlight Color = White
Reflection Map = None

Bevel Profile
Factory Profile = Button

Adding Feet

14. Use the Ellipse Tool to draw a foot. I combined three ellipses to make a foot. Or, use my foot template. I have provided it in both PSP and PNG format.

15. Apply Eye Candy Glass to the foot using the following settings

Bevel
Bevel Width = 70.0
Bevel Smoothness = 30.0
Round Selection Corners = 0
Bevel Placement = Inside Selection
Glass Color = #c0c0c0
Opacity = 14
Tinting = 27
Refraction = 79
Inner Shadow Opacity = 19
Drop Shadow Opacity = 0
Shadow Offset = 0.0
Shadow Glow = 0

Lighting
Direction = 90
Inclination = 30
Highlight Brightness = 75
Highlight Size = 75
Highlight Color = White
Reflection Map = None

Bevel Profile
Factory Profile = Button

16. Effects > Geometric Effects > Perspective - Vertical.


That is it for a complete fuzzle. Here are the two fuzzles that I made. Click on the images to go to a large version for downloading.