Donations Welcome

I am currently saving toward a new version of Paint Shop Pro. If you wish to help me out, then please donate.

Larger versions of images can be seen by clicking on the image. Also, thank you for your kind and encouraging comments. I love reading the comments. If you use my any of freebies, I would be overjoyed with a comment containing a link to your item. I love seeing any of my freebies in use.

Saturday, February 28, 2009

Girl Power - Gold Alpha

Since Scrap Kit Challenge no longer has a website for people to come download the kit of the month, a few of us are holding a blog train with our parts of the kit. All you need to do is go from blog to blog and collect the goodies. The links will take you to one specific entry at each designer's site. Some designers have multiple parts for kit, so you may wish to wander around each blog before moving to the next site. My link will take you to the elements that I made for Girl Power. Everything is color coordinated so you will end up with a huge mega kit!

You can hop on the train at any of the following sites:

4HeartDesign
A Fish Design
AudreyG
Greyashowl
Humbug Graphics Galore
Kathy's Scraps
Morgaine Creations
Ryn Creations

As a bonus, here is an alpha add-on to Girl Power.


Thursday, February 26, 2009

Wedding Preset Shapes

Someone on Scrap Stuff with PSP and PS asked for wedding preset shapes and Shawna said she was too burnt out from her massive Preset Shapes giveaway last year to make a set. So, I made this set of preset shapes.


Unzip the file into My PSP Files > Preset Shapes. It should make a wedding folder and all the shapes will be available. Whatever you make with these preset shapes is yours to do with as you wish.

Monday, February 23, 2009

Girl Power - Red Alpha


Here is the second alpha for Girl Power.


I received this award last week from Donna, Ashley and Julie.

  1. Put the logo on your blog or post. (Right click on the logo and save to your own computer.)
  2. Nominate at least 10 blogs which show great attitude and/or gratitude!
  3. Link to your nominees within your post.
  4. Let them know that they have received this award by commenting on their blog.
  5. Share the love and link to this post with the person from whom you received your award.
I am not sure who to give this award to. The few people that I do read have already received this award. Maybe the award has already made it all the way around the internet. Or, perhaps I don't read very many people. This is a problem with working seven days a week. So, I will give this award to Scrapping Cop, who I do visit from time to time. I don't use her freebies very often since she makes items for Photoshop and I use Paint Shop Pro, but she has great ideas which I liberate on occasion for a different purpose.

Saturday, February 21, 2009

Girl Power - Pink Alpha


I couldn't decide what color combinations that I liked best, so I ended up with three alphas for Girl Power. Here is the first one.

Friday, February 20, 2009

Girl Power


I took me a long time to make this preview and it still seems to be very cluttered. Here are the elements for my part of Scrap Kit Challenge's Girl Power. I hope people can use them for something, anything. I will probably have an alpha add-on for this kit sometime next week.

The kit includes:

  • 3 frames
  • 3 wrapped frames
  • 4 bows
  • 12 ribbons
  • 3 bead strings
  • 6 heart brads
  • 3 flowers
  • 3 sunglasses
  • 2 hearts
  • 1 paper/tile texture
  • 1 bow template


Girl Power

If you are looking for the blog train list, it is with the Girl Power Gold Alpha.

Wednesday, February 18, 2009

Girl Power Papers

I have been really sick and not doing much graphics as a result. I'm on the road to recovery now, but I still feel like death warmed over when I get home from work in the evenings.


The theme for Scrap Kit Challenge this month was Girl Power. Here is the itty bitty paper pack that I made for the group mega-kit. I used overlays/greyscale papers by MsBhvin Scraps for the papers with the hearts because I still haven't figured out paper design yet. I don't think that saving papers as jpg is a really good idea because either the papers are really big or there is lossy compression. These overlays were very speckly due to the compression and I ended up spending quite a bit of time fixing the pixels. I'm also not sure of the point of making papers. Why not just make seamless tiles? Most papers appear to be a repeating pattern.

I've floated the idea of doing a blog train at the end of the month after everyone has submitted their kits since we no longer have a website for downloading everything. Hopefully, this will come to pass and non-group members will be able to get everyone's portion of the kits.

I'm running behind on my kit design due to being sick. We were supposed to make fasteners last week. I think I'll just make a big elements pack and an alpha, of course.

Sunday, February 15, 2009

For Good or Evil: Scrapblog

I'm testing out Scrapblog. I don't actually make scrap pages, so it is a rather interesting experience for me.


I used an existing theme/template just to see how the system worked. I used pictures of the kneebiter and her brother for testing purposes.

Saturday, February 14, 2009

Cloth Texture Scripts

3/12 NOTICE: I discovered a mistake in both of these scripts. I have changed the code and also written in an automatic color prediction function for when you select your own color. The scripts need to be installed in your Scripts-Trusted folder. If you have previously downloaded these scripts, please re-download them.


I like textures on my papers, so I'm still making scripts to texture for me. Here are two scripts that make cloth textures. One makes a smooth cloth texture, and the other a rough cloth texture. The script defaults to making a sepia-toned cloth, but user is able to choose the color. As these are scripts, they are commercial use ok.


I tested these scripts in PSP9. If you use these scripts and they work in a different version of Paint Shop Pro, please leave a comment.

Friday, February 13, 2009

Wire and Tanzanite Heart Alpha


I don't own anything made of tanzanite, but since I saw a tanzanite necklace in a jewelry store windows a decade ago, I have really wanted a piece made of tanzanite. I'd say it is my favorite gemstone except that I've never even gotten to hold tanzanite in my hands, so maybe I'm just deluded. It is very rare as it is only found in Tanzania and for a while I thought it might be like blood diamonds and I would be supporting oppression if I bought one.

My cold has gotten worse and I have begun taking drugs to prevent my head from feeling like an overstuffed watermelon.

Thursday, February 12, 2009

Happy Darwin Day


Happy Darwin Day!

This year is the 200th birthday of Charles Darwin and Abraham Lincoln. Perhaps non-US people don't care about Abraham Lincoln, but I think everyone has heard of Charles Darwin. I found these neat e-cards from Darwin Day 2008, but I didn't get to use them last year. I also want to state that I do not support the philosophy of the site where I found the e-cards because I don't think that science and inspiration precludes or excludes God. Beyond that, I don't want to say anything about the subject as everyone has their own beliefs and I just want to celebrate the birthday of these two great men, not become embroiled in a rancorous debate.

If you are wondering why I'm not saying happy Abraham Lincoln's birthday, well, I think Darwin Day sounds better. More alliteration and such.


As we're allowed to freely spread these e-cards around the internet, I made a little Darwin Day alpha which is based on the cute fish in the card above. It is a tagger-sized alpha, not that I think anyone will use it, but I'm addicted to alpha making. I have to feed the psychosis.


Wednesday, February 11, 2009

Wire and Topaz Heart Alpha


I would appear to have caught the kneebiter's cold and I feel miserable. It is also raining, so it is a dreary day all around. I may leave work early.

My grandmother had a topaz ring and I can't seem to capture the rich golden brown that it exuded. I'm not quite sure how to do it, so I'm sort of dissatisfied with this alpha, but, if you want a dull brown, then here is topaz.

Tuesday, February 10, 2009

Wire and Sapphire Heart Alpha


It has taken me quite a few hours to make this post. It keeps sitting open on in my browser window without any text. Work has a way of getting between me and goofing off.

Thanks to Aleah's Mommy for sharing what she does with my alphas. I'm so glad that they are usable! It almost makes me want to go to MySpace. Almost.

Alpha

Monday, February 9, 2009

Wire and Ruby Heart Alpha

Sometimes, I wonder if anyone actually uses my alphas for anything. Just curious, really.

Sunday, February 8, 2009

Saturday, February 7, 2009

Jean Texture Script


I can't ever remember all the steps to make a jean texture, so I scripted it. I am now sharing the script. The script goes in the Scripts-Restricted folder. It lets the user choose the size of the new image and the colors. Everything else should run silently. If you are able to use the script in other versions of Paint Shop Pro, please leave a comment. I only tested it in PSP 9.

Friday, February 6, 2009

Wire and Iolite Heart Alpha


I had never heard of iolite before I made this gemstone set, but it is quite interesting. The gemstone site calls iolite the gem of the Vikings. The gem can be violet, blue, clear or yellow depending on the angle. The hue is different because the gem polarizes light. You can read more about it at gemstone.org.

Thursday, February 5, 2009

Wire and Garnet Heart Alpha


I really love the deep rich red of garnets. This is the color that I always thought rubies were, rather than the more pinkish hue that they actually have.

Wednesday, February 4, 2009

Wire and Emerald Heart Alpha


I am noticing that a lot of digi-scrappers are stay at home mothers or grandmothers. I feel like an outlier.

Tuesday, February 3, 2009

Wire and Citrine Heart Alpha


I'm currently posting one gemstone alpha a day, though I wonder if this is a bad thing to do since I don't have much to say. I've noticed some scrappers are quite chatty, but I'm not very good at writing, so I generally like to keep it short and non-personal.

Monday, February 2, 2009

Wire and Aquamarine Heart Alpha


I made these gemstones using Filter Forge and was pondering buying the plugin. However, I don't think it is going to be possible. The new car collided with a taxi that failed to yield at a stop sign. The car has gone into the shop and will require at least two weeks and possibly four weeks of body work if re-strutting is required. So, no expensive plugin for me.

Sunday, February 1, 2009

Wire and Amethyst Heart Alpha


So, I went to a site about gems. Then I made every faceted gem that didn't change colors which is quite a few, so I figure I should go alphabetically. It is going to take a while to post these because the internet keeps dying. We just replaced our router and now it looks like the cable modem may be defective. Here is amethyst.

Line Art Coloring


This is a tutorial for SBQ Dawn of Scrap Stuff with PSP and PS though I suppose anyone else can use it. It covers coloring line art in PSP. I wrote it using the line art fish that she sent through the group. There are two different versions of this tutorial: one for less starting preparation and using the paintbrush and one for more starting preparation and using the flood fill tool.

Supplies:

Line Art Fish (Dawn has very kindly provided permission for me to share the fish.)


Version 1 - Fast Setup and Paintbrush Tool

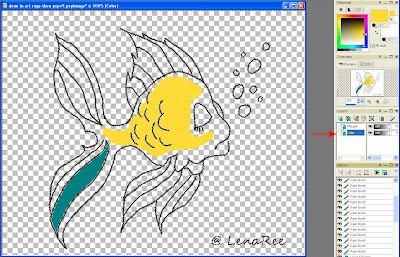
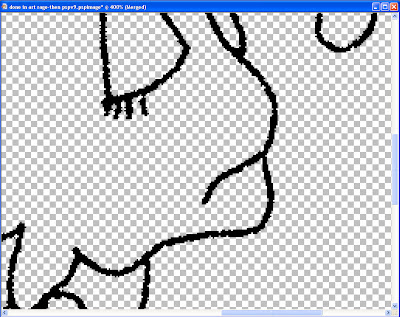
1. Open up your graphic of choice. I am using a line art fish drawn in Art Rage by SBQ Dawn's daughter, LenaRee. To make the layers more simple to interpret, I removed her copyright layer. So, what remains in the art layer (called Merged).

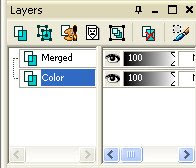
2. Make a new layer (Layers > New Raster Layer). I chose to call mine Color.


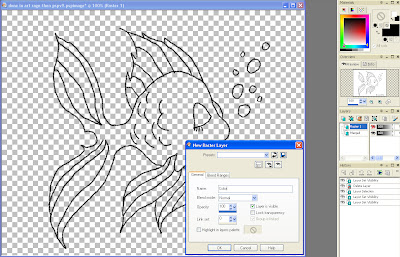
3. Move the new layer (Color) so that it is under the line art layer (Merged).


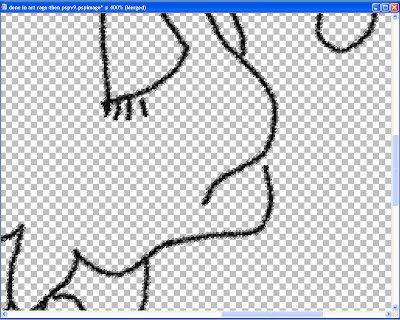
4. Return to the line art layer and use the magic wand to select all the non-line art regions. I selected all the transparent areas using the following settings on my magic wand.


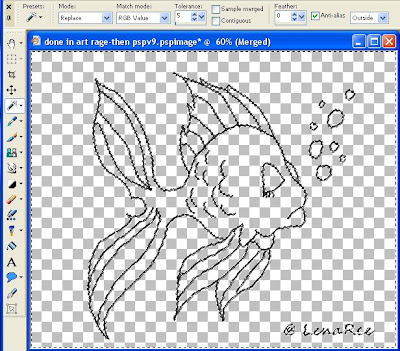
Match mode = RGB Value
Tolerance = 5
Sample merged = unchecked
Contiguous = unchecked
Feather = 0
Anti-alias = checked
Outside

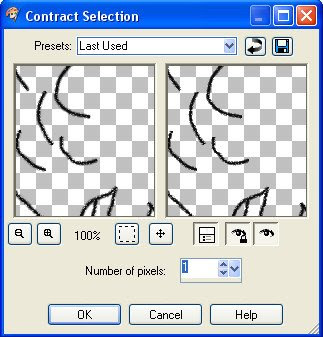
5. I inverted my selection (Ctrl+Shift+I) and contracted the selection by one (Selections > Modify > Contract). Contracting the selection is to prevent white lines from showing up between the line art and the coloring. If the line art is not anti-aliased, then selection contraction can be skipped.


6. Change to the Color layer, select your paintbrush and color, then paint the object to whatever color you want. By coloring on the blank layer, this preserves the black lines of the line art.


This concludes the first version of my line art coloring tutorial.

Version 2 - Extensive Pre-Coloring Preparation and using the Flood Fill Tool

Now I have very poor hand-eye coordination so, I do not like to use the paintbrush a lot. I prefer to use the flood fill tool.

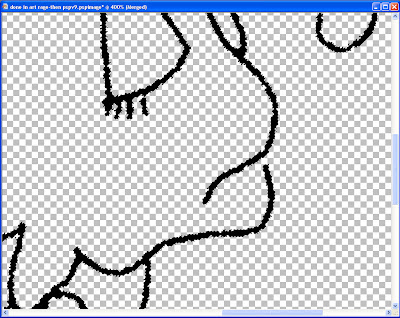
1. Steps 1-5 are exactly the same as in version 1. So, with the selection contracted, invert the selection (Ctrl+Shift+I), and then hit delete. I did this because since the art was drawn in Art Rage, it was composed of many little dots and I want to make a continuous dark, solid line with just a hint of blur at the edge to give it a smooth look. By deleting, I have now removed the uneven edges.


2. Invert the selection again (Ctrl+Shift+I).

3. Select the flood fill tool and fill the selection with black using the following settings:


Match mode = None
Tolerance = 20
Sample merged = Unchecked
Blend mode = Normal
Opacity = 100

4. You can see that there are gaps in the line art which will make using the flood fill tool difficult. So, I De-Selected (Ctrl+D) and patched the gaps using the paintbrush.


5. Once all the gaps have been patched, I used the magic wand to select the transparent region.

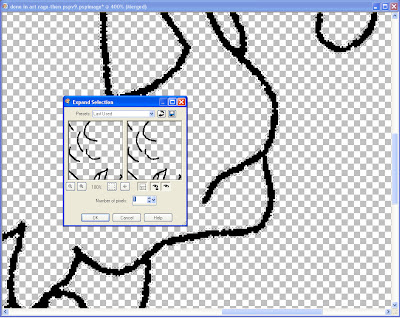
6. Expand the selection by 1 (Selections > Modify > Expand).


7. Blur the selection to return the anti-alias (Adjust > Blur > Blur). You can use whichever blur suits your fancy. Tastes will differ.

8. Contract the selection by 1 (Selections > Modify > Contract).

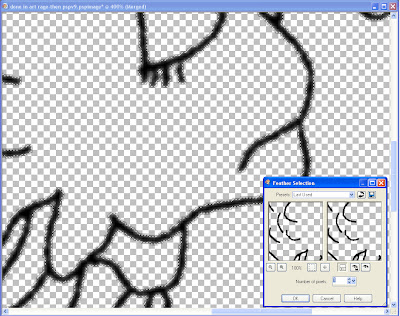
9. Feather the selection by 1.


10. Invert the selection (Ctrl+Shift+I).

11. Hit delete to smooth out the edges.


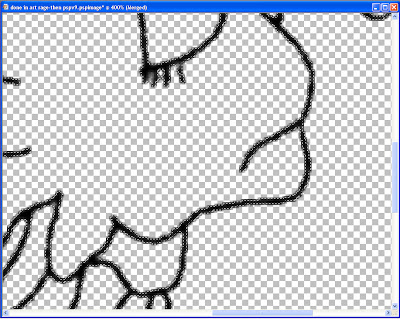
12. Because of the feathering, we cannot use the existing selection and must re-select.

a. Select None.
b. Use the magic wand and select the transparent areas.
c. Invert the selection (Ctrl+Shift+I).
d. Contract by 2 (Selections > Modify > Contract).
e. Invert the selection (Ctrl+Shift+I).

13. Change to the color layer. Select the flood fill tool and begin filling the fish. I changed my Flood Fill to Match Mode = RBG and left the other settings the same. You can fill with solid colors, gradients or patterns. I have done some of each to show the possibilities. At the end of the flood filling spree, I usually go through with the paint brush and touch up any spots that the flood fill missed.


Many of the steps in version 2 can be skipped if you have line art with very clean and well-defined edges. The trick with coloring line art is to color on a layer behind the drawing. In a best case scenario, it might be possible to do perform steps 1-5 of version 1 and then proceed with the flood fill tool. Remember to expand your selection so that the anti-aliasing is also colored. If not, you will end up with white edges between the line art and the color. I listed all the steps version 2 of the tutorial in case someone might be trying to color in hand-drawn art that has not been re-touched.